How to Stain Wood Evenly: Complete Step-by-Step Guide
Learn how to stain wood evenly in 2026. Master surface prep, application techniques, and pro tips to avoid blotchy, uneven stains on your woodworking projects today!
WOODWORKING
Here's a disaster that still haunts me: I spent two months building a beautiful cherry dresser—dovetailed drawers, hand-cut joinery, perfect proportions. Then I stained it. The result? A blotchy, streaky mess that looked like a kindergartener's finger painting project. Dark splotches next to light areas, uneven color across every surface, and grain that disappeared under muddy, inconsistent stain!
I was absolutely devastated. All that work ruined by one afternoon of bad staining. I seriously considered painting over it or just burning the whole thing in frustration. Instead, I stripped it completely and spent another week learning how to actually stain wood properly. That painful lesson taught me that staining is 90% preparation and only 10% application.
According to professional finishers, uneven staining is the most common finishing problem beginners face. Wood stain seems simple—just wipe it on and you're done, right? Wrong. Different woods absorb stain differently, end grain soaks up ten times more than face grain, and early wood versus late wood can create dramatic color variations within the same board.
If you've struggled with blotchy, uneven, or unpredictable stain results, you're in good company. I've probably stained over 200 projects at this point, and I learned through countless mistakes what actually produces even, consistent color versus what creates the streaky disasters I started with.
In this guide, I'm breaking down exactly how to stain wood evenly. I'll cover wood selection (some woods are impossible to stain evenly), critical surface preparation that determines your results, application techniques that actually work, and troubleshooting for different wood types and common problems. Whether you're staining pine furniture, oak cabinets, or maple shelves, these techniques will help you achieve professional, consistent results!
Why Wood Stains Unevenly (Understanding the Problem)
Before you can solve uneven staining, you need to understand why it happens. It's not just "bad technique"—it's wood biology working against you.
How Wood Grain Structure Affects Absorption:
Wood is made of microscopic tubes (cells) that transported water and nutrients when the tree was alive. Stain is essentially colored liquid that gets absorbed into these tubes.
The problem: these tubes aren't uniform. Some areas have larger, more open cells. Other areas have smaller, denser cells. The open areas absorb more stain, the dense areas absorb less, creating uneven color.
I learned this by examining stained wood under magnification. The dark blotches were areas with open grain that sucked up excessive stain. The light areas were dense grain that resisted absorption.
The Difference Between Early Wood and Late Wood:
Trees grow in seasons. Early wood (spring growth) grows fast with large, open cells. Late wood (summer/fall growth) grows slower with smaller, denser cells.
Look at the growth rings on any board. The light-colored, wide sections are early wood. The dark, narrow lines are late wood.
Early wood is porous and absorbs stain eagerly—often too eagerly, creating dark areas.
Late wood is dense and absorbs less stain, creating lighter areas.
This natural variation means even perfect technique can't eliminate all color variation. The goal is controlling it, not eliminating it entirely.
Why End Grain Absorbs 10x More:
End grain is where you're looking directly into those cell tubes I mentioned. It's like looking down a bundle of straws versus looking at the side of the straws.
Stain pours into end grain because there's zero resistance—you're literally pouring liquid into open tubes. Face grain has the tubes running parallel to the surface, so absorption is slower and more controlled.
I tested this with identical stain application on face grain and end grain. The end grain was 8-10 shades darker. Massive difference from the same stain, same application time!
Porous vs. Dense Wood Species:
Porous woods (oak, ash, walnut) have large, visible pores. They accept stain readily and relatively evenly because the whole surface is porous.
Dense woods (maple, cherry, birch) have tiny pores. They resist stain absorption and are prone to blotching because any slight variation in density shows dramatically.
Oak stains beautifully—the consistent porosity accepts stain evenly. Maple is a nightmare—the dense, inconsistent grain creates blotchy messes.
The Role of Sap and Resin:
Some woods contain sap or resin that blocks stain absorption. Pine is notorious for this.
Pitch pockets (concentrated resin) won't absorb stain at all, creating light spots. Sappy areas resist stain differently than dry areas.
I've had pine boards where resin created random light blotches that no amount of conditioning or technique could fix. Sometimes the wood itself is the problem.
Mill Glaze and How It Blocks Stain:
When wood is machined (planed, jointed, sanded), the cutting action compresses and burnishes the surface cells. This creates "mill glaze"—a slightly sealed surface that resists stain.
Mill glaze is subtle but real. Wood that hasn't been sanded after machining often has this invisible barrier that prevents even stain absorption.
Solution: Proper sanding removes mill glaze and opens the grain for even stain absorption.
Understanding Wood Figure:
Some woods have dramatic figure—curly maple, bird's eye maple, quilted grain. This figure is variations in grain direction and density.
Figure looks beautiful under clear finish but can create chaos when staining. The varying grain directions and densities absorb stain unpredictably.
I've learned that highly figured woods often look better with clear finish that shows the natural figure rather than stain that fights against it.
Why Some Woods Are Nearly Impossible:
Certain woods resist even staining almost by definition:
Maple: Dense, inconsistent grain prone to severe blotching Cherry: Natural blotch tendency from uneven density
Birch: Similar issues to maple, irregular absorption Pine: Resin, sap, dramatic early/late wood variation
These woods can be stained, but it requires extra steps (conditioning, gel stain, dye) and you may never achieve perfect uniformity.
The Bottom Line:
Even staining fights against wood's natural structure. Understanding this helps you:
Choose wood strategically (oak is easier than maple)
Set realistic expectations (some variation is inevitable)
Use appropriate techniques for each wood type
Know when clear finish is better than staining
I spent years fighting maple's blotching before accepting that maple just doesn't want to stain evenly. Now I use clear finish on maple or embrace the character of slight variation!
Wood Species: Best and Worst for Even Staining
Not all woods are created equal when it comes to staining. Choosing the right wood for your staining project can be the difference between success and frustration.
Easy-to-Stain Woods:
Oak (Red and White): The gold standard for staining. Oak's open, consistent grain accepts stain beautifully and evenly. The prominent grain pattern looks gorgeous under stain.
I've stained dozens of oak projects and never had blotching issues. It's forgiving, predictable, and produces rich, even color every time.
Pros: Even absorption, beautiful grain enhancement, forgiving of technique Cons: None really—oak is nearly foolproof for staining
Walnut: Already dark with beautiful natural color, but stains well when you want to adjust tone or darken further. The consistent density means even absorption.
Walnut is so beautiful naturally that I often use clear finish, but when I do stain it (usually just to darken slightly), results are excellent.
Mahogany: Relatively consistent grain with medium density. Accepts stain evenly and looks rich under colored finish.
I've had great success staining mahogany with warm brown tones. The wood cooperates beautifully.
Ash: Similar to oak with open, prominent grain. Takes stain very well with minimal blotching concerns.
Poplar (with caveats): Takes stain evenly in terms of absorption, but has natural green/purple tones that show through. Use when you're painting or using very dark stains.
Problematic Woods:
Pine: The poster child for blotchy staining. Dramatic variation between early wood (soft, porous) and late wood (hard, dense) creates extreme color variation.
Resin and pitch pockets add random light spots. Without conditioning, pine stains like a camouflage pattern.
My experience: Every pine project I stained without conditioner looked terrible. WITH conditioner and gel stain, pine can look decent but never perfectly even.
Cherry: Beautiful wood with natural blotch tendency. The random density variations create unpredictable color absorption.
Ironically, cherry's natural color darkens beautifully with age, so clear finish often looks better than stain anyway.
I've had mixed results with cherry. Some boards stain relatively evenly, others are blotchy nightmares. Wood conditioner helps significantly.
Maple (Hard Maple): Dense, closed grain with random density variations that create severe blotching. Widely considered one of the most difficult woods to stain evenly.
Bird's eye maple and curly maple are even worse—the figure creates chaos under pigment stain.
My verdict: I avoid staining maple. When I must stain it, I use dye instead of pigment stain, or go with gel stain and accept that it won't be perfect.
Birch: Similar issues to maple—dense, inconsistent grain that blotches easily. Often used as less-expensive maple alternative but shares the staining problems.
Softwoods Generally: Most softwoods (pine, fir, cedar, spruce) have dramatic early/late wood variation that creates uneven staining. They require conditioning without exception.
Why Softwoods Stain Blotchy:
The growth pattern creates alternating bands of very soft (early wood) and relatively hard (late wood) material. This creates maximum absorption variation.
Think of it like a paper towel next to plastic. Pour liquid on both and the paper towel soaks it up while plastic repels it. That's essentially what's happening in softwood grain.
Hardwoods That Resist Even Staining:
Not all hardwoods are easy to stain. Dense hardwoods with inconsistent grain (maple, cherry, birch) can be as problematic as softwoods, just for different reasons.
These woods don't have dramatic early/late wood variation, but they have random density patches that absorb stain unpredictably.
Plywood and Veneer Staining Challenges:
Plywood is notoriously difficult to stain evenly:
Problems:
Veneer is often sanded too smooth, creating burnish
Glue can bleed through thin veneer
Different veneers on same sheet may come from different logs with different absorption
Edges (end grain of plywood) absorb 20x more than face
Repairs and patches are visible under stain
I avoid staining plywood when possible. When I must, I use gel stain and accept less-than-perfect results, or I paint instead.
Exotic Woods:
Exotic species vary wildly. Some (teak, rosewood) are oily and resist stain. Others (padauk, purple heart) have such strong natural color that stain is pointless.
Research specific species before staining. Many exotics look best with clear finish.
Choosing Wood Strategically:
If you MUST have even-stained wood: Choose oak, walnut, ash, or mahogany. These species cooperate beautifully.
If you want to stain but wood choice is limited: Use wood conditioner religiously, consider gel stain, or use dye instead of pigment stain.
If you're working with maple, cherry, or pine: Accept that perfection may be impossible. Use all the conditioning and technique tricks, then embrace character rather than fighting for uniformity.
When to Avoid Staining Entirely:
Some woods look better with clear finish:
Cherry (darkens naturally to beautiful color)
Walnut (naturally dark and gorgeous)
Highly figured woods (curly maple, quilted grain)
Exotics with strong natural color
I've learned to let beautiful wood be beautiful instead of covering it with stain that adds nothing and risks ruining the natural appearance!
Surface Preparation: The Foundation of Even Staining
This is where most staining success or failure is determined. You cannot achieve even staining on poorly-prepared surfaces, no matter how good your application technique.
Proper Sanding Progression:
Skipping grits or stopping too soon creates uneven stain absorption.
My standard progression:
80 grit: Only if surface is really rough (rarely needed)
100-120 grit: Removing major imperfections and mill marks
150 grit: General smoothing
180 grit: Final finish for staining
Stop at 180 grit maximum for surfaces that will be stained. Going finer actually creates problems.
Why Final Sanding Grit Matters Critically:
I tested this extensively because advice varies widely. Here's what I found:
100 grit final: Too coarse—visible scratches show through stain
150 grit final: Acceptable—good stain absorption, minor scratches sometimes visible
180 grit final: Ideal—smooth surface, excellent stain absorption, no visible scratches
220 grit final: Starting to burnish—reduced stain absorption, can create light areas
320 grit final: Definitely burnished—stain won't penetrate well, creates light, uneven appearance
The conventional wisdom of "sand to 220 before finishing" doesn't apply to staining. For stain, stop at 180 grit!
The Danger of Over-Sanding and Burnishing:
When you sand wood very fine (220+ grit), you're not just smoothing—you're compressing and sealing the surface fibers. This "burnishing" creates a barrier that prevents stain absorption.
Burnished wood stains light and uneven. The stain sits on the surface rather than penetrating.
Common burnishing causes:
Sanding finer than 180 grit
Excessive pressure with orbital sander
Using worn, clogged sandpaper (creates heat and burnish)
Sanding too long in one spot
I ruined a tabletop once by sanding to 320 grit. The stain barely penetrated and looked washed-out and uneven. Lesson learned!
Removing Mill Marks:
Mill marks are the subtle ripples left by planers and jointers. They're often invisible until you apply stain, then they show as light/dark bands.
Detection: Wipe surface with mineral spirits. Mill marks become visible as the spirits evaporate unevenly.
Removal: Start with 100-120 grit and sand diagonally to the grain (carefully!), then finish with 150-180 grit with the grain.
I inspect every surface with mineral spirits before staining now. Catches mill marks and other issues before it's too late.
Dealing with Glue Spots:
Dried glue is impervious to stain. Any glue residue creates light spots in your stained project.
Prevention is easier than cure:
Minimize glue squeeze-out during assembly
Wipe excess glue immediately with damp cloth
Use masking tape in glue-up areas
Removing dried glue:
Scrape carefully with chisel or card scraper
Sand the area thoroughly
Check with mineral spirits to ensure complete removal
I've had glue spots ruin stain jobs. Now I'm paranoid about glue cleanup during assembly.
Raising the Grain (When and Why):
If using water-based stain or finishing over water-based products, pre-raise the grain:
Dampen the wood with distilled water
Let dry completely (30-60 minutes)
Sand lightly with 180 grit to knock down raised fibers
Clean dust thoroughly
This prevents rough texture from grain raising during staining.
I skip this step with oil-based stains—they don't raise grain significantly.
Using Mineral Spirits to Preview:
Before staining, wipe the entire project with mineral spirits. This shows you:
What the grain will look like under finish
Any glue spots or contamination
Mill marks or sanding issues
Problem areas that need attention
The mineral spirits evaporate quickly, leaving the wood ready for staining. This preview step has saved me from numerous problems.
Final Surface Inspection:
Before applying stain:
Visual check: Look across the surface with raking light (from a window or light at low angle). Any imperfections cast shadows and are visible.
Touch test: Run your hand over the surface. Should feel uniformly smooth with no catches.
Mineral spirits test: The spirits should absorb evenly. If some areas dry faster, they'll stain differently.
Dust check: Any dust will absorb stain and create dark specks. Clean with tack cloth.
If any test fails, fix the problem before staining.
My Surface Prep Routine:
Sand progression: 120 → 150 → 180 grit
Vacuum all dust thoroughly
Wipe with mineral spirits to check for issues
Fix any problems revealed
Final tack cloth wipe
Visual and touch inspection
THEN apply conditioner/stain
This systematic approach ensures consistently good results!
Wood Conditioner: When You Need It and When You Don't
Wood conditioner is the secret weapon for even staining on problematic woods. But it's not always necessary or beneficial.
What Wood Conditioner Actually Does:
Conditioner is basically thinned finish that partially seals the wood, creating more uniform absorption.
It fills some of the pores and evens out the density variations, so stain absorbs more consistently across the entire surface.
Think of it like primer for paint—it creates a more uniform substrate for the topcoat.
Which Woods Absolutely Require Conditioning:
Pine: Non-negotiable. Pine without conditioner is blotchy chaos.
Cherry: Highly recommended. Reduces natural blotch tendency significantly.
Maple: Required for pigment stains. Even with conditioning, results may be imperfect.
Birch: Same as maple—condition or expect blotches.
Any softwood: Fir, cedar, spruce all benefit from conditioning.
Plywood: Always condition—veneer is unpredictable.
I learned this the hard way on multiple projects. Now I condition these woods without exception.
Woods That Don't Need Conditioning:
Oak: Stains evenly without conditioning. I skip it.
Walnut: Consistent enough that conditioning is unnecessary.
Mahogany: Usually fine without conditioning.
Ash: Similar to oak—naturally even.
Conditioning won't hurt these woods, but it's an extra step that doesn't add value.
Oil-Based vs. Water-Based Conditioners:
Oil-based conditioner:
Use before oil-based stains
Longer working time
Better penetration
My preference for most projects
Water-based conditioner:
Use before water-based stains
Faster drying
Raises grain (requires sanding)
Less effective than oil-based IMO
I primarily use oil-based conditioner (Minwax Pre-Stain Wood Conditioner) because most of my stains are oil-based.
Proper Application Technique:
Stir conditioner thoroughly
Apply liberally with brush or cloth
Work with the grain
Ensure complete, even coverage
Let penetrate for specified time (check can—usually 15 minutes)
Wipe off any excess that didn't penetrate
Wait specified time before staining (usually 15-30 minutes, check can)
Don't let conditioner dry on the surface—if it dries before you wipe excess, it creates a sealed surface that resists stain.
Timing Critical Points:
Most conditioners have a recoat window:
Minimum time: 15 minutes after conditioning (usually)
Maximum time: 2 hours (varies by product)
Outside this window, the conditioning effect diminishes and results may be uneven.
I set a timer after conditioning. When it goes off, I'm ready to stain immediately.
DIY Wood Conditioner Alternatives:
You can make your own conditioner:
For oil-based stain: Mix 1 part polyurethane (or your finish) with 3-4 parts mineral spirits
For water-based stain: Mix 1 part water-based poly with 3-4 parts water
This is essentially what commercial conditioners are—thinned finish.
I've used DIY conditioner successfully, but commercial products are formulated for optimal performance and cost $10 for a quart that goes a long way.
When Conditioning Makes Staining Worse:
Conditioning reduces stain absorption uniformly. If you want deep, rich color, conditioning makes the wood accept less stain, resulting in lighter color.
The trade-off: Even but lighter color vs. uneven but darker color.
My approach: I accept lighter color for the sake of evenness. I can always add more coats or use darker stain. Blotchiness can't be fixed easily.
How much does conditioning lighten stain? In my tests, conditioned wood was 1-2 shades lighter than unconditioned, but the evenness improvement was worth it.
Can you condition some areas but not others?
Yes! I sometimes condition only problem areas:
End grain that would otherwise be too dark
Soft areas of pine that would blotch
Patches of blotch-prone wood
This targeted conditioning reduces problem areas while allowing better absorption in stable areas.
My Conditioning Decisions:
Always condition: Pine, cherry, maple, birch, plywood, any softwood
Never condition: Oak, walnut, ash when using pigment stain
Consider conditioning: When testing reveals uneven absorption, when color intensity isn't critical
Skip and use gel stain instead: Sometimes gel stain produces better results than conditioning + regular stain
The bottom line: test with and without conditioner on scrap. Let the results guide your decision!
Choosing the Right Stain Type
Stain type dramatically affects how evenly color applies. Understanding options helps you choose the best product for your wood and project.
Oil-Based Stain: Characteristics and Best Uses:
Traditional oil-based stains use mineral spirits as solvent.
Pros:
Long working time (15-20 minutes before it starts to dry)
Excellent penetration
Rich, deep color
Forgiving of application mistakes
Self-levels reasonably well
Cons:
Strong odor (requires ventilation)
Slow drying (6-8 hours minimum)
Cleanup requires mineral spirits
Can be messy
Best for: Most furniture projects, especially hardwoods like oak
I use oil-based stain for 80% of projects. The long working time lets me work carefully without rushing, which produces more even results.
Water-Based Stain: Pros and Cons:
Modern water-based stains have improved but still differ from oil-based.
Pros:
Low odor
Fast drying (1-2 hours)
Easy water cleanup
Clear colors without amber tint
Environmentally friendly
Cons:
Short working time (5-10 minutes before it dries)
Raises wood grain
Can be tricky for even application
Doesn't penetrate as deeply
More expensive typically
Best for: Indoor projects with ventilation concerns, when you need fast turnaround
I use water-based stain when odor is a concern or when I want absolutely clear color without oil-based amber tones.
Even application is harder with water-based because the short working time means you must work quickly and can't easily blend sections.
Gel Stain for Controlling Blotchiness:
Gel stain is thick, almost paste-like consistency.
How it works differently:
Instead of penetrating the wood, gel stain sits on the surface. This means absorption variations don't matter—you're essentially creating an even coating on top rather than dyeing the wood.
Pros:
Eliminates blotching completely
Works on problem woods (pine, maple, cherry)
No drips or runs on vertical surfaces
Can be used over existing finish
Very controllable application
Cons:
Doesn't look quite as natural (more like paint)
Obscures grain somewhat
More coats needed for depth
Expensive per ounce
Best for: Pine, maple, cherry, or when you've failed with regular stain and need guaranteed evenness
I keep gel stain for rescue situations and for pine projects. It's foolproof for even color.
Dye vs. Pigment Stains:
Most stains are pigment-based—colored particles suspended in liquid. The particles lodge in the wood pores.
Dye stains use dissolved colorants (like food coloring) that actually color the wood fibers themselves.
Pigment stains:
Enhance grain (particles settle in pores)
Can be blotchy on problem woods
Most common type
Easier to find and use
Dye stains:
More even color (no particle settlement issues)
Don't enhance grain as much
Better for problem woods
Require more skill to apply
Can fade in sunlight
For problematic woods like maple, dye often produces more even results than pigment stain.
I use pigment stains for oak, ash, walnut. I use dye for maple and cherry when I need maximum evenness.
Wiping Stain vs. Brushing Stain:
Most stains can be applied multiple ways, but products optimized for each method exist.
Wiping stains: Thinner, designed to be wiped on with cloth
Brushing stains: Thicker, designed for brush application
My preference: I wipe all stains regardless of type. Wiping gives better control and more even application than brushing.
Fast-Dry vs. Slow-Dry Formulas:
Fast-dry stains (like Minwax Fast-Drying) set in 4-6 hours.
Traditional stains take 8-12+ hours to dry.
For even application, slower is better—more time to work the stain, blend areas, and correct mistakes before it sets.
I use standard-drying stains unless time pressure requires fast-dry.
How Stain Viscosity Affects Evenness:
Thick stain sits on the surface and can create uneven coating. Thin stain penetrates better and more evenly.
If stain seems too thick, you can thin it:
Oil-based: Add mineral spirits (10-20% maximum)
Water-based: Add water (10-20% maximum)
Thinned stain produces lighter but more even color.
My Top Product Recommendations:
Best oil-based stain: Minwax Wood Finish (standard, not fast-drying) or General Finishes Oil-Based Stain
Best water-based stain: General Finishes Water-Based Wood Stain or Varathane Premium
Best gel stain: General Finishes Gel Stain (far superior to other gel stains I've tried)
Best dye: TransTint liquid dyes or General Finishes Water-Based Dye Stain
These products produce consistent, quality results and are widely available.
Choosing Stain for Your Project:
Standard hardwood furniture (oak, walnut): Oil-based pigment stain
Problem woods (pine, maple, cherry): Conditioner + oil-based stain, OR gel stain, OR dye
Fast turnaround needed: Water-based stain (with grain-raising prep)
Maximum evenness required: Gel stain or dye
Natural look with depth: Oil-based pigment stain
Test multiple stain types on your actual project wood. Sometimes results surprise you!
Essential Tools and Materials for Even Staining
Having the right tools makes even staining dramatically easier. Cheap or wrong tools create uneven results regardless of technique.
The Best Applicators:
Lint-free cotton rags: My primary stain application method. Old cotton t-shirts work perfectly. Cut them into 8"x8" squares.
Why rags are best:
Complete control over pressure and coverage
Can be discarded (no cleanup)
Conform to any surface shape
Apply exactly the amount of stain you want
I go through maybe 20-30 rags per large project. They're essentially free if you're cutting up old clothes.
Natural bristle brush: For getting into corners, carvings, or detailed areas where rags don't reach easily.
Use natural bristle for oil-based stain, synthetic for water-based.
Foam brushes: Adequate for small projects or touch-ups. They create somewhat even results but not as controllable as rags.
Scotch-Brite pads: Some people use these for stain application. They work but can be scratchy.
Why Cheap Applicators Create Problems:
Paper towels: Leave lint, disintegrate when wet, don't hold enough stain, create streaky application
Shop rags: Often have oils or chemicals that contaminate stain
Cheap brushes: Shed bristles into your stain, create harsh brush marks
Sponges: Hold too much stain, difficult to control application, can leave patterns
I've tried every cheap option hoping to save money. They all produced inferior results. Good applicators are cheap enough that skimping is foolish.
Lint-Free Cloths:
Where to get them:
Old 100% cotton t-shirts (cut up)
Cotton diapers or burp cloths (very absorbent)
Purchase lint-free rags from auto parts stores
White cotton t-shirt material (avoid colors that might bleed)
Avoid:
Synthetic materials (don't absorb well)
Fuzzy materials (leave lint)
Printed t-shirts (dye can transfer)
Anything with elastic or seams
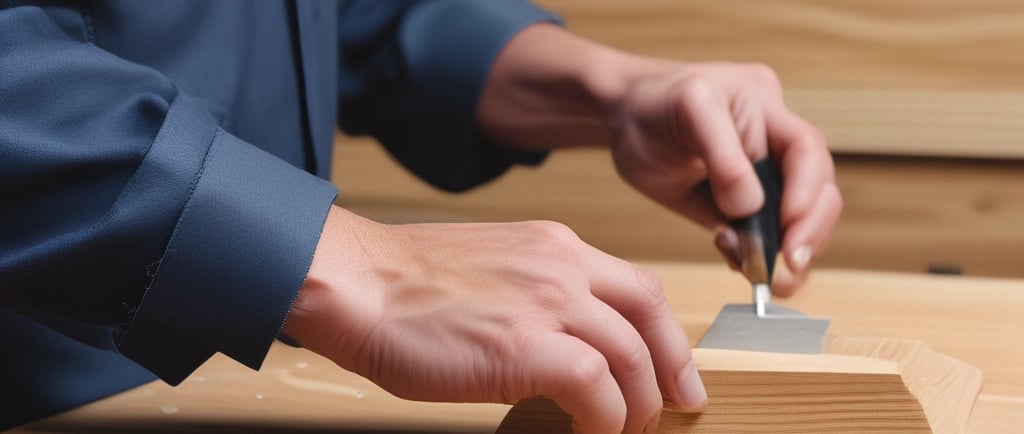
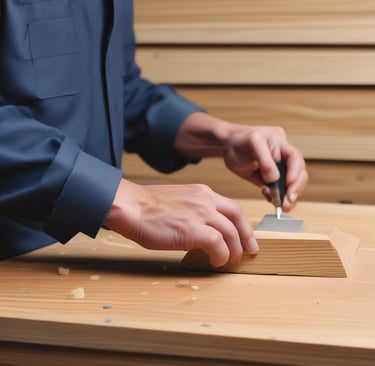
Brushes for Stain:
When you need a brush (detailed work, vertical surfaces):
For oil-based: Natural bristle (China bristle), 2-3" width
For water-based: Synthetic bristle (nylon/polyester)
Quality indicators:
Flagged bristle tips
Comfortable handle
Secure ferrule (no bristle shedding)
Appropriate stiffness (not too soft or stiff)
I own dedicated staining brushes that never get used for anything else. They stay soft and clean.
Protective Gear:
Nitrile gloves: Essential. Stain is nearly impossible to clean off skin and some ingredients are toxic.
I go through dozens of pairs of gloves per year. Buy them in bulk.
Safety glasses: Keep stain out of your eyes when working overhead or in awkward positions.
Respirator (optional): For oil-based stains in enclosed spaces. The fumes are strong.
Apron or old clothes: Stain is permanent on fabric. Wear something you don't care about.
Containers:
For mixing/holding stain:
Small plastic containers (yogurt cups, cottage cheese containers)
Disposable aluminum pans for larger projects
Small glass jars for custom mixed colors
Don't pour stain back into the can after using it—contamination risk.
Mixing Supplies:
Wooden stir sticks: For mixing stain thoroughly (pigment settles)
Measuring cups: If creating custom colors or thinning
Funnel: For transferring stain to smaller containers
Shop Setup for Dust-Free Staining:
Dust settling into wet stain creates ugly specks that are difficult to fix.
My pre-staining shop cleanup:
Vacuum entire shop (floor, benches, shelves, everything)
Damp-mop or wet the floor to keep dust down
Turn off dust collection and any fans
Wait 30 minutes for airborne dust to settle
Close windows and doors
Final tack cloth on workpiece
This paranoid level of dust control prevents most contamination issues.
Having Everything Ready:
Before opening stain can:
Checklist:
Surface fully prepped and inspected
Conditioner applied (if using) and timed correctly
All tools laid out and ready
Adequate lighting arranged
Ventilation adequate
Protective gear on
Scrap rags available for mistakes
Container for applying stain ready
Timer set for work time limits
Opening the stain can starts the clock. Having everything prepared prevents rushing, which causes uneven application.
I stage everything like a surgeon preparing for operation. This methodical approach produces consistently good results!
Step-by-Step: How to Apply Stain Evenly
This is where everything comes together. Proper technique transforms prepared wood into beautifully stained projects.
Pre-Stain Preparation Checklist:
Before touching stain to wood:
Surface sanded to 180 grit
All dust removed completely
Mineral spirits test shows even absorption
Glue spots removed
Wood conditioner applied and timed (if using)
Shop dust controlled
All tools ready
Good lighting arranged
Ventilation adequate
Protective gear on
Don't skip this checklist. Each item affects final results.
Stirring vs. Shaking Stain:
STIR, DON'T SHAKE stain. This is critical.
Shaking creates bubbles that transfer to your wood and create defects. Pigment settles, so stirring is necessary, but do it gently.
My stirring process:
Open can carefully
Stir from bottom up with wooden stick
Stir for 2-3 minutes until completely uniform
Let sit 5 minutes for any bubbles to dissipate
Stir gently again before use
I've had bubbles ruin stain jobs. Now I stir patiently and wait for bubbles to settle.
Loading Your Applicator:
For rags:
Fold rag into a pad (4-6 layers thick)
Pour small amount of stain into container
Dip corner of pad into stain
The pad should be damp, not soaking
Too much stain = drips and runs
Too little = dry application and streaks
For brushes:
Dip bristles about 1/3 depth into stain
Tap brush gently on container edge
Don't wipe across rim (creates bubbles)
I reload frequently with less stain rather than loading heavily and creating drips.
Application Technique: With the Grain Always:
This is non-negotiable. Stain applied across the grain creates visible streaks that won't disappear.
The process:
Apply stain with the grain in long, smooth strokes
Work in sections (2-3 square feet at a time)
Overlap each stroke slightly (about 50%)
Maintain consistent pressure
Keep surface evenly wet
I mentally divide large surfaces into manageable sections and complete each one before moving to the next.
Working Wet-to-Wet to Avoid Lap Marks:
Lap marks are visible lines where dried stain meets wet stain. They're permanent and ugly.
Prevention:
Work fast enough that you're always applying into wet stain, not onto dried stain.
Blend edges of each section while previous section is still wet.
Plan your application path so you're never painting yourself into a corner with dried stain blocking your path.
On large surfaces, have a helper. One person applies stain, the other follows wiping off excess. This ensures consistent timing and prevents lap marks.
Proper Pressure and Coverage:
Too much pressure: Forces stain unevenly into wood, creates dark streaks, tires your arm
Too little pressure: Stain sits on surface without penetrating, creates light, uneven color
The right pressure: Light to moderate—enough to spread stain evenly and work it into the wood, not so much you're scrubbing
I use about the same pressure I'd use to wipe dust off furniture—firm but gentle.
Coverage: The entire surface should be evenly wet with stain. No puddles, no dry spots, just uniformly wet.
Timing: How Long to Let Stain Penetrate:
This varies by product. Check the can instructions, but typical times:
Oil-based stain: 5-15 minutes penetration time Water-based stain: 2-5 minutes penetration time
Gel stain: 3-5 minutes (doesn't penetrate much)
Longer penetration = darker color, but only up to a point. Once the wood has absorbed all it will absorb, additional time doesn't add color.
Too short: Light, uneven color Too long: Can create drying problems or dark splotches Varies by wood: Porous woods absorb fast, dense woods need more time
I test penetration time on scrap. Apply stain, wipe off at intervals (5 min, 10 min, 15 min) and see what produces the color I want.
Wiping Off Excess Stain Consistently:
This is where even color is finalized. Inconsistent wipe-off creates uneven color.
The technique:
Use fresh, clean rags for wiping (not the application rag)
Wipe WITH the grain in long, smooth strokes
Use consistent pressure across entire surface
Flip/refold rag frequently to expose clean surfaces
Keep wiping until no more stain transfers to rag
The entire surface should look uniformly wet but not puddled
Heavy pressure removes more stain (lighter color). Light pressure leaves more (darker color). Consistent pressure = even color.
I go over the entire surface multiple times, checking that I'm using consistent pressure everywhere.
Checking for Missed Spots:
After wiping off excess, inspect carefully in good light:
Look for:
Dry spots where no stain was applied
Puddles where too much stain remains
Drips or runs
Uneven color
Dust or debris in wet stain
Fix immediately while stain is wet:
Apply stain to dry spots
Wipe away excess from puddles
Blend uneven areas
Remove contamination carefully
Once stain starts to dry (15-20 minutes), it's too late to fix problems easily.
My Application Sequence:
For a typical table:
Legs first (least visible if I make early mistakes)
Apron/sides (vertical surfaces—watch for drips)
Top surface last (most visible—I'm warmed up and careful)
Within each section:
Apply stain evenly
Let penetrate for specified time
Wipe off excess with consistent pressure
Inspect and fix any issues
Move to next section
For large surfaces:
Work in sections (3 ft x 3 ft)
Apply to entire section
Wipe off entire section
Blend to next section while both are wet
Continue until complete
Dealing with Different Surface Orientations:
Horizontal surfaces (tabletops): Easiest—gravity works with you. Apply generously, wipe off thoroughly.
Vertical surfaces (legs, sides): Watch for drips and runs. Apply less stain, work quickly, wipe thoroughly. Gravity pulls stain down, so wipe upward to catch drips.
Overhead surfaces (underside of tables): Difficult—gravity fights you. Apply sparingly with cloth, wipe immediately. Consider skipping stain on unseen surfaces.
End grain: See separate section—requires special handling.
Corners and details: Use brush to get into tight areas, then wipe with rag.
I've had stain run down vertical surfaces and create dark drips. Now I apply less to vertical surfaces and wipe more frequently.
What Success Looks Like:
After application and wipe-off, the surface should:
Be evenly wet-looking with no dry spots
Show no puddles or excess stain
Have uniform color (allowing for natural wood variation)
Show no drips, runs, or streaks
Display no contamination
The stain will look darker when wet than when dry. Account for this—the dried color will be lighter.
My Mantra During Application:
"Slow, steady, consistent, with the grain."
I repeat this to myself while working. It keeps me focused on technique instead of rushing to finish!
Dealing with End Grain
End grain is the most challenging aspect of even staining. Without special handling, it will be dramatically darker than face grain.
Why End Grain is Darker:
Remember those cell tubes I mentioned? End grain is looking directly into them—like looking down a bundle of straws.
Stain pours into these open tubes with zero resistance. Face grain has cells running parallel to the surface, so stain can't penetrate as easily.
The result: End grain absorbs 8-10 times more stain, creating dark edges that look unnatural.
Pre-Sealing End Grain:
The most effective technique is sealing end grain before staining to reduce absorption.
Method 1: Thinned finish
Mix 1 part polyurethane (or your topcoat) with 3 parts mineral spirits
Apply to end grain only
Let dry 2-4 hours
Sand lightly with 180 grit
Apply stain to entire piece including sealed end grain
The seal prevents excessive absorption.
Method 2: Wood conditioner
Apply extra-heavy coat of wood conditioner to end grain
Apply normal coat to face grain
Time appropriately
Apply stain to entire piece
This partially seals end grain more than face grain.
I use Method 1 for woods with severe end grain issues (pine, poplar). Method 2 works for moderate issues.
Sanding End Grain Finer:
Another approach: sand end grain finer than face grain to reduce absorption.
Example:
Face grain: 180 grit final
End grain: 220 or 320 grit final
Finer sanding on end grain creates slight burnish that reduces absorption, helping match face grain color.
I've used this successfully on oak and ash where end grain difference is moderate.
Multiple Light Applications:
Instead of one heavy stain application:
Apply very light coat to end grain
Wipe off immediately (15-30 seconds)
Let dry
Apply normal stain coat to entire piece
This gradual approach builds color on end grain more controllably.
Gel Stain for End Grain Control:
Gel stain sits on the surface rather than penetrating, which naturally reduces end grain darkness.
For projects where end grain difference is severe, gel stain produces more even results than liquid stain.
I used gel stain on a pine project with prominent end grain. The results were dramatically more even than previous attempts with liquid stain.
Blending End Grain Color:
Sometimes you can blend end grain into face grain:
After staining:
While end grain is still wet with dark stain
Wipe it more aggressively than face grain
Or apply face grain stain, then immediately wipe end grain to blend
This takes practice and touch to get right.
When to Embrace the Contrast:
Sometimes darker end grain looks natural and attractive. On species like oak where prominent grain is expected, the darker end grain can enhance the look.
I've learned to accept some end grain darkness as character rather than fighting for perfect uniformity that may look artificial.
My End Grain Process:
For problem woods (pine, poplar):
Pre-seal end grain with thinned finish
Sand lightly when dry
Apply wood conditioner to entire piece
Stain entire piece normally
Wipe end grain slightly more than face grain
For moderate woods (oak, ash):
Apply wood conditioner with extra attention to end grain
Stain entire piece
Monitor end grain and wipe earlier/more if it's getting too dark
For minimal issues:
Accept natural difference
Or wipe end grain more aggressively during stain removal
Testing End Grain Response:
On scrap pieces, test different approaches:
Unsealed vs. sealed
Different sanding grits
Different wipe-off timings
Gel vs. liquid stain
The best approach varies by wood species. Testing reveals what works for your specific project.
I make test boards that include end grain specifically to see how it will respond!
Techniques for Problem Woods
Different woods require different approaches. Here's what actually works for the notoriously difficult species.
Staining Pine Without Blotching:
Pine is the poster child for blotchy staining. Here's my battle-tested approach:
Step 1: Select better pine
Avoid sappy boards
Look for consistent grain (less early/late variation)
Heartwood is more stable than sapwood
Step 2: Surface prep
Sand to 150 grit (not finer—pine needs to absorb)
Remove all mill marks
Clean meticulously
Step 3: Condition heavily
Apply oil-based wood conditioner generously
Ensure complete coverage
Time precisely (15 minutes typical)
Wipe excess thoroughly
Step 4: Stain carefully
Use gel stain for most even results OR
Use oil-based stain with quick wipe-off (5 minutes max)
Work in small sections
Maintain consistent technique
Alternative: Dye instead of stain
TransTint or similar dye
Produces more even color than pigment stain on pine
Doesn't enhance blotch like pigment does
I've stained probably 30 pine projects. Conditioning + gel stain produces the most consistent results.
Cherry: Dealing with Natural Blotch:
Cherry has natural density variations that create random blotchiness.
My approach:
Step 1: Consider not staining
Cherry darkens naturally to beautiful color
Clear finish shows natural beauty
Staining often covers what makes cherry special
Step 2: If you must stain:
Use wood conditioner (helps significantly)
Use dye stain instead of pigment
Accept some variation as character
Step 3: Application
Multiple light coats build color gradually
Less aggressive than single heavy coat
Allows you to monitor and control
I stained cherry once with pigment stain. Terrible results. Switched to dye and results improved dramatically.
Now I usually use clear finish on cherry and let nature provide the color.
Maple: The Most Challenging Wood:
Maple is dense with random soft spots that create severe blotching.
My hard-earned maple wisdom:
Best approach: Don't stain maple with pigment stain
Seriously. Maple looks beautiful with clear finish.
The natural color is gorgeous.
If you must stain:
Option 1: Dye stain
Water-based or alcohol-based dye
Colors the wood fibers rather than lodging particles
Much more even results than pigment
TransTint dyes work well
Option 2: Gel stain
Sits on surface
Eliminates absorption variation issues
Looks more like paint than traditional stain
But color is even
Option 3: Conditioner + very light pigment stain
Heavy conditioning
Apply stain and wipe off almost immediately (2-3 minutes)
Accept lighter color for the sake of evenness
Multiple coats if needed
I've fought maple for years. Dye produces the best results when I must color maple.
Birch: Similar Issues to Maple:
Everything I said about maple applies to birch. Same dense, inconsistent grain. Same blotching tendency.
Use dye or gel stain. Or embrace natural birch color with clear finish.
Poplar: The Greenish Tint Challenge:
Poplar has green and purple mineral streaks that show through light stains.
Solutions:
Dark stains: The green becomes less noticeable under dark brown or black stain.
Dye: Colors the green areas along with everything else. More uniform than pigment.
Paint: If the green bothers you, paint instead of stain. Poplar is often used as paint-grade wood.
Embrace it: The color variation can be interesting character.
I use poplar for shop projects or painted pieces. For staining, I go dark to minimize the green showing through.
Plywood: Unpredictable Veneer:
Plywood is difficult because:
Thin veneer is often over-sanded (burnished)
Different sheets may be from different logs
Glue can bleed through thin veneer
Core wood shows at edges
My plywood staining approach:
Option 1: Gel stain
Most reliable for even color on plywood
Minimizes variation between sheets
Option 2: Dye
Can work well on quality plywood
Test thoroughly first
Option 3: Paint
Plywood often looks better painted
Especially if you're seeing veneer issues
Edge treatment:
Edge-band with solid wood and stain to match
Or use iron-on veneer edge banding
Plywood edges are ugly and stain terribly
I avoid staining plywood when possible. When I must, gel stain is my go-to.
Species-Specific Quick Reference:
Easy (stain normally):
Oak - no conditioner needed
Walnut - no conditioner needed
Ash - no conditioner needed
Mahogany - usually fine without conditioning
Moderate (condition recommended):
Cherry - condition helps significantly
Alder - responds well to conditioning
Soft maple - condition required
Difficult (requires special techniques):
Pine - condition + gel stain or dye
Hard maple - dye or gel stain only
Birch - same as hard maple
Plywood - gel stain most reliable
The Bottom Line:
Some woods just don't want to be stained evenly with traditional pigment stain. Use alternative products (gel stain, dye) or embrace clear finish instead of fighting the wood's nature!
Creating Custom Stain Colors
Sometimes available stains don't match your vision. Creating custom colors lets you achieve exactly what you want.
Mixing Stains to Achieve Desired Color:
You can mix different stain colors from the same product line.
Rules:
Mix only within same brand and type (oil-based with oil-based, etc.)
Start with small amounts (2-4 oz) for testing
Keep detailed notes on ratios
Test on scrap before committing
Example: Want a reddish-brown between available colors?
Mix 2 parts dark walnut + 1 part red mahogany
Adjust ratio until color is right
Scale up for project
I've mixed dozens of custom colors. It's easier than you'd think and produces unique results.
Layering Different Stain Colors:
Applying multiple stain colors in sequence creates depth and complexity.
Method:
Apply first color (usually lighter)
Let dry completely (24 hours for oil-based)
Apply second color (usually darker)
The colors blend optically
Example: Antique look:
Base coat: golden oak
Second coat: dark walnut (wiped quickly)
Creates aged appearance
I used layering on a reproduction antique piece. The depth was impossible to achieve with single-color staining.
Using Dyes for Color Control:
Dyes can be mixed to create any color imaginable.
TransTint dyes come in primary colors plus black and white. Mix them to create custom colors:
Start with base color (brown, red, etc.)
Add small amounts of other colors to adjust
Add black to darken, white/clear to lighten
Test extensively
Dyes are concentrated—a little goes a long way. Mix in small quantities.
Testing Stain Combinations:
NEVER test on the actual project. Always use scrap from the same wood.
My testing process:
Prepare multiple test boards (6-10)
Number them
Try different stain combinations
Record exact ratios and process on each board
Let all dry completely
Apply topcoat (this changes appearance)
Choose the winner
I keep a notebook with photos of test boards and the formulas used. Reference library for future projects.
Keeping Consistent Ratios:
If you mix custom color, you need enough for the entire project. Running out partway creates matching nightmares.
Process:
Calculate approximate stain needed (1 quart per 50-75 sq ft)
Mix extra (25% more than calculated)
Mix entire batch at once in large container
Record exact ratios: 12 oz color A + 6 oz color B = 18 oz custom mix
Store in labeled, sealed container
I've run out of custom mix mid-project. Matching the color from memory is nearly impossible. Now I mix generously.
Adjusting Color Intensity:
To lighten stain:
Add mineral spirits (oil-based) or water (water-based)
10-20% dilution makes stain lighter
Or wipe off sooner (less penetration = lighter)
To darken stain:
Add more concentrated colorant
Or let penetrate longer
Or apply multiple coats
Test adjustments on scrap before applying to project.
Common Mixing Mistakes:
Mixing incompatible products: Oil-based + water-based = disaster. Stay within product families.
Not testing: Thinking "it'll probably be fine." Test EVERYTHING.
Insufficient mixing: Stains need thorough mixing. Stir custom mixes for 5+ minutes.
Not making enough: Running out mid-project means impossible matching.
Forgetting to document: Can't recreate the color if you don't remember the formula.
My Custom Color Story:
I wanted a color between natural oak and dark walnut for a mission-style piece. Mixed 3 parts natural oak + 1 part dark walnut.
Made test board, loved it. Mixed 1 quart for project. Halfway through, realized I needed more. Tried to replicate the ratio from memory. Close but not perfect. The inconsistency is visible if you know where to look.
Lesson: Mix plenty, document everything, expect to need more than you calculate!
Common Staining Mistakes and How to Avoid Them
I've made every staining mistake possible. Learn from my errors!
Mistake 1: Not Testing on Scrap Wood First
This is the cardinal sin of staining.
The temptation: "The can shows the color, I'll just apply it."
The reality: Stain looks different on every wood species. The color on the can is meaningless.
The consequence: Discovering you hate the color after staining your entire project.
I've done this. Stained a bookshelf without testing, hated the orange tone, had to strip and re-stain. Four extra days of work.
The fix: Always, ALWAYS test on scrap from the same wood. Apply conditioner, stain, and topcoat exactly as you'll do on the project. Make 3-5 test boards if unsure.
Mistake 2: Skipping Wood Conditioner When Needed
On blotch-prone woods (pine, maple, cherry), conditioner is non-optional.
The temptation: "Maybe I'll be lucky. Maybe this board won't blotch."
The reality: It will blotch. Problem woods ALWAYS blotch without conditioning.
The consequence: Ugly, splotchy appearance you can't fully fix.
I have a pine table from early in my woodworking that I stained without conditioner. It's camouflage-pattern blotchy. A permanent reminder to use conditioner.
The fix: When working with problem woods, condition automatically. It's insurance against disaster.
Mistake 3: Over-Sanding and Burnishing:
Sanding finer than 180 grit for staining creates burnish that blocks absorption.
The temptation: "Smoother is better, right?"
The reality: For staining, 180 grit is optimal. Finer actually creates problems.
The consequence: Light, uneven stain that won't penetrate.
I sanded a tabletop to 320 grit once, thinking I was being thorough. The stain barely penetrated and looked washed out.
The fix: Stop at 180 grit for surfaces that will be stained. Save 220+ for clear-finished projects.
Mistake 4: Inconsistent Application Pressure:
Pressing hard in some areas, light in others creates color variation.
The temptation: Not paying attention to pressure consistency.
The reality: Your brain notices the inconsistency even if you don't consciously.
The consequence: Streaky, uneven color that looks amateurish.
The fix: Focus on consistent, moderate pressure throughout. Treat it like meditation—stay present and aware.
Mistake 5: Letting Stain Dry Before Wiping Excess:
If stain dries on the surface, it creates dark, blotchy areas.
The temptation: Getting distracted or working too slowly.
The reality: Dried stain is difficult to remove and creates permanent dark areas.
The consequence: Blotches and dark patches that may require sanding and re-staining.
I got a phone call mid-staining once. Came back to find stain had dried in streaky patterns. Sanding it off was a nightmare.
The fix: Work in manageable sections. Set a timer. Don't get distracted. Wipe off stain within the specified time.
Mistake 6: Uneven Wipe-Off Technique:
Wiping some areas thoroughly, barely wiping others creates color variation.
The temptation: Rushing through the wipe-off step.
The reality: The wipe-off step determines final color as much as application.
The consequence: Some areas dark, some light, no uniformity.
The fix: Pay as much attention to wiping off as applying. Use consistent pressure, fresh rags, and thorough technique.
Mistake 7: Staining in Wrong Conditions:
Temperature, humidity, and dust affect results dramatically.
The temptation: "I'll just stain now since I have time, even though conditions aren't ideal."
The reality: Poor conditions create poor results.
The consequence: Blotching, drying problems, dust contamination, or uneven absorption.
I stained in my garage in winter (55°F). The stain was syrupy, didn't flow, and created uneven results. Should have waited for warmer weather.
The fix: Only stain in good conditions: 65-75°F, moderate humidity, dust-controlled environment. Wait for the right day rather than forcing it.
Mistake 8: Rushing Between Steps:
Not letting conditioner dry, or staining before conditioner window closes.
The temptation: Impatience. Wanting to finish NOW.
The reality: Each step has critical timing that affects the next step.
The consequence: Uneven absorption, poor adhesion, or color problems.
The fix: Set timers. Follow instructions precisely. Patience produces better results than rushing.
My Learning Process:
I made all these mistakes, often multiple times. Each taught me something.
Now I follow a checklist, work deliberately, and prioritize quality over speed. My failure rate dropped from maybe 40% to under 5% just by avoiding these common mistakes!
Fixing Uneven Stain After Application
Sometimes despite your best efforts, the stain comes out blotchy or uneven. Here's what you can actually do to fix it.
Can You Fix Blotchy Stain? (Sometimes Yes)
The honest answer: Sometimes you can improve it, rarely can you fix it perfectly.
The effectiveness of fixes depends on:
How severe the blotching is
What caused it
How much time has passed
What wood species you're working with
Mild blotching can often be improved. Severe blotching usually requires stripping and starting over.
Applying Additional Stain to Light Areas:
If you have specific light areas surrounded by properly-colored wood:
Method:
Wait until first stain coat is completely dry (24 hours minimum)
Apply additional stain ONLY to light areas
Feather the edges to blend with surrounding color
Wipe off quickly (less penetration time than first coat)
Blend carefully while wet
This works for: Small light spots, missed areas, minor unevenness
This doesn't work for: Overall blotchy appearance, severe color variation
I've successfully fixed small light areas this way. It requires a delicate touch to blend the edges invisibly.
Sanding Back and Re-Staining:
For more serious unevenness, you can sand the stain off and start over.
Process:
Let stain dry completely (24 hours oil-based, 8 hours water-based)
Sand with 120 grit to remove most stain
Progress through 150 to 180 grit
Clean all dust thoroughly
Apply conditioner (if you didn't the first time)
Re-stain with corrected technique
How deep to sand: Until the blotchiness is mostly gone. You may not remove all stain (it penetrates deep), but removing surface stain helps.
This is work-intensive but produces better results than living with terrible staining.
I've sanded back several projects. It's discouraging but beats throwing away the project or living with ugly results.
Using Gel Stain to Even Out Color:
Gel stain can save blotchy projects because it sits on the surface rather than penetrating.
The rescue process:
Let original stain dry completely (24-48 hours)
Lightly sand entire surface with 220 grit (just scuff it)
Apply gel stain over the blotchy stain
Wipe off evenly
The gel stain creates uniform coating on top
Result: The blotchiness is hidden under the gel stain layer. The finish looks more like tinted coating than true wood stain, but it's even.
I've rescued several pine projects this way. The gel stain creates a uniform color that hides the blotchy base.
The Nuclear Option: Stripping and Starting Over:
When nothing else works, strip the finish completely and start fresh.
When to strip:
Severe blotching that can't be fixed
Color is completely wrong
Multiple failed fix attempts
When the time to fix exceeds the time to strip
Stripping process:
Use chemical stripper appropriate for your stain type
Follow all safety precautions (gloves, ventilation, eye protection)
Apply stripper liberally
Let work for specified time
Scrape off dissolved finish
Use fine steel wool to remove remaining residue
Clean with mineral spirits or water (depending on stripper type)
Let dry completely (24 hours minimum)
Sand to fresh wood (120 → 150 → 180)
Start staining process over with lessons learned
Strippers I've used successfully:
Citristrip (low-odor, less harsh)
Klean-Strip (stronger, works faster)
Denatured alcohol for fresh water-based stain (sometimes works)
Stripping is a last resort, but I've done it probably 5-6 times over the years. It's better than living with or throwing away a project.
Embracing the Variation:
Sometimes the "problem" isn't actually that bad, and you can accept it as character.
When to embrace rather than fix:
Variation is minor and only you notice it
The overall appearance is acceptable even if imperfect
Fixing would risk making it worse
Time and effort to fix aren't justified
I've learned that I'm my own harshest critic. "Terrible blotching" that I obsess over is often barely noticeable to others.
The perspective shift: Real wood has variation. Absolutely perfect, uniform color can look artificial. Some variation adds authenticity and character.
Adding Toner Coats to Even Color:
Professional finishers sometimes spray toner (tinted finish) over stained wood to even out color.
The concept:
Apply very thin coats of finish with stain mixed in. This adds color uniformly across the surface, evening out variations.
DIY version:
Mix small amount of stain into your polyurethane (maybe 5-10%)
Apply thin coat over dried stain
This adds uniform color to entire surface
Can help blend uneven areas
This is advanced technique requiring spray equipment for best results. I've tried it with brushing—works moderately well but spray is better.
When to Call It Good Enough:
Perfectionism can be the enemy of done. Sometimes you need to accept "good enough" and move on.
Questions to ask:
Will anyone but me notice this imperfection?
Will it be visible in normal use/lighting?
Is the time to fix proportional to the improvement?
Am I obsessing over minor issues?
I've re-stained projects three times trying to achieve perfection that was impossible with that wood. Sometimes good enough really is good enough.
My Fix-It Decision Tree:
Minor unevenness: Touch up light spots with additional stain, call it done
Moderate blotching: Try gel stain over top to even it out
Severe problems: Strip and start over, or embrace it as rustic character
Impossible situation: Paint instead of stain, or use the piece as shop furniture
The hardest lesson: knowing when to fix versus when to accept or start over!
Environmental Factors That Affect Staining
Your workshop environment dramatically affects staining results. Controlling these factors produces consistent success.
Ideal Temperature for Staining:
Sweet spot: 68-75°F
Within this range, stain flows properly, penetrates evenly, and dries at predictable rates.
Too cold (below 60°F):
Stain becomes thick and syrupy
Won't flow or penetrate properly
Takes forever to dry
Color is lighter (less penetration)
Application is difficult
I tried staining in my 55°F garage. The stain was like molasses, barely penetrated, and looked terrible.
Too hot (above 85°F):
Stain dries too quickly
Difficult to maintain wet edge
Doesn't penetrate fully before drying
Color is uneven
Application must be rushed
Summer staining in 90°F+ is frustrating. The stain starts setting up before I can wipe it off.
Solution:
Work indoors in climate-controlled space when possible. If working in garage/shop:
Heat in winter (space heater with proper ventilation)
Cool in summer (AC, fans, or work early morning)
Time projects for moderate weather
Humidity's Impact:
Ideal: 40-60% relative humidity
High humidity (above 70%):
Slows drying time (actually beneficial for blending)
Can cause blushing (cloudy finish) with some stains
May prevent proper curing
Creates sticky surface
Low humidity (below 30%):
Faster drying (harder to maintain wet edge)
Stain may not penetrate fully
Finish can be brittle
Dust control harder (static electricity)
I monitor humidity with a hygrometer. When it's outside ideal range, I adjust:
Run dehumidifier if too humid
Run humidifier if too dry
Or postpone staining until better conditions
Lighting: How It Affects Perception:
The same stained piece looks different under different lighting.
Natural daylight: Shows truest color. Always evaluate stain in daylight.
Warm incandescent: Makes stain look warmer, redder, richer.
Cool fluorescent: Makes stain look cooler, grayer, flatter.
LED (varies by temperature): Can be warm or cool depending on bulb.
My lighting strategy:
Apply stain in bright, neutral lighting (daylight-balanced LED or natural light)
Evaluate color in the lighting where piece will live
Test samples in actual location before committing
I stained a desk that looked perfect in my shop's fluorescent lighting. In my office with warm LED lighting, it looked completely different. Now I test samples in the actual room.
The angle of light matters too:
Raking light (low angle) reveals every imperfection
Direct overhead light hides imperfections
Evaluate under multiple lighting angles
Dust Contamination:
Dust settling into wet stain creates permanent specks that ruin smooth finish.
Sources:
Airborne dust from previous sanding
Foot traffic stirring floor dust
HVAC system blowing dust
Open windows bringing outdoor dust
Dusty clothing or tools
My dust prevention routine:
Pre-staining cleanup:
Vacuum entire shop (walls, ceiling, benches, floor)
Damp-mop or wet floor to settle dust
Wipe all surfaces with tack cloth
Change into clean clothes
During staining:
Turn off HVAC/fans
Close windows and doors
No foot traffic
No other activities creating dust
After application:
Cover wet piece if possible (very loosely—don't trap vapors)
Minimize movement near wet stain
Leave piece undisturbed for 4-8 hours
Despite precautions, I still get occasional dust specks. But these measures reduce them from 50+ per project to 2-3.
Air Circulation Requirements:
Too much air movement:
Dries stain too fast
Prevents even penetration
Stirs up dust
Creates safety issues with fumes
Too little air movement:
Fumes build up (health hazard)
Slow, irregular drying
Potential for finish defects
The balance:
Gentle air exchange for safety
Not directed at the wet stain
Crack window or door on opposite side of room
Or use fan pointed AWAY from workpiece to pull fumes out
I position a box fan in the doorway blowing OUT. This creates gentle air exchange without blowing air across wet stain.
Seasonal Staining Considerations:
Spring (March-May):
Often ideal conditions
Moderate temperature and humidity
Good ventilation weather
My favorite time for finishing
Summer (June-August):
Hot temperatures (work early morning)
Higher humidity (monitor for issues)
More insects (keep them out!)
Dust from open windows
Fall (September-November):
Again, often ideal conditions
Moderate temperature
Lower humidity (may need humidifier)
Second-best finishing season
Winter (December-February):
Cold temperatures (heat workspace)
Very low humidity (run humidifier)
Heating systems create dust
Indoor air quality concerns
I schedule major projects for spring and fall when possible. Summer and winter require more environmental control.
When to Postpone Staining:
Don't force staining when conditions are wrong. Wait for:
Better temperature: If it's 85°F+ or 55°F-, wait for moderate weather
Lower humidity: If it's 80%+, wait for drier conditions
Cleaner air: If you just sanded or created dust, wait 30+ minutes for settling
Better focus: If you're tired, distracted, or rushed, postpone
I've learned that waiting one day for good conditions beats struggling through bad conditions and getting poor results.
Creating Optimal Conditions:
My ideal staining setup:
Climate-controlled space (68-72°F)
Moderate humidity (45-55%)
Excellent lighting (natural + daylight LED)
Dust-controlled (recently cleaned)
Adequate ventilation (gentle, not direct)
Dedicated finishing time (no interruptions)
With these conditions, staining success rate is probably 95%. Without them, maybe 60%. The environment matters that much!
Multiple Coats and Building Color
Sometimes one coat of stain doesn't achieve the depth of color you want. Multiple coats can build richer tones.
When to Apply Second Coat:
Timing is critical. Too soon and you disturb the first coat. Too late and adhesion suffers.
Oil-based stain:
Minimum: 8 hours after first coat
Ideal: 24 hours after first coat
Maximum: 48 hours (beyond this, light sanding helps adhesion)
Water-based stain:
Minimum: 2-3 hours after first coat
Ideal: 4-6 hours after first coat
Maximum: 24 hours (beyond this, scuff sand)
The test: First coat should be completely dry to touch. If it feels tacky or soft, wait longer.
I always wait the full 24 hours for oil-based stain. Rushing this step creates smearing and uneven color.
How Many Coats You Actually Need:
One coat: Often sufficient for desired color depth
Two coats: Builds richer, deeper color without obscuring grain
Three coats: Maximum for most applications—beyond this obscures grain
More than three: Usually counterproductive—you're approaching paint territory
I rarely go beyond two coats. If two coats doesn't achieve the color I want, I should have chosen darker stain.
Sanding Between Stain Coats:
Controversial topic with different opinions:
The "don't sand" camp:
Sanding removes stain you just applied
Not necessary if applying within recoat window
Risks creating light areas
The "light scuff" camp:
Very light sanding (320 grit) provides tooth
Helps adhesion of subsequent coats
Removes any dust or raised grain
My approach:
Within recoat window (24 hours): No sanding—just apply second coat
Beyond recoat window: Light scuff sand with 320 grit to provide adhesion
If first coat raised grain: Very gentle 320 grit sanding to knock down fuzz
When I do sand between stain coats, I'm incredibly gentle—just a few light passes to scuff the surface, not remove stain.
Building Color Gradually:
Multiple light coats build color more controllably than one heavy coat.
The approach:
First coat: Apply and wipe off quickly (5-7 minutes penetration)
Evaluate color when dry
Second coat: Apply and wipe off with slightly more penetration time (7-10 minutes)
Evaluate again
Third coat if needed: Same as second coat
Advantages:
More control over final color
Can stop when desired depth is reached
Less risk of blotching (light coats are safer)
Disadvantages:
More time (waiting between coats)
More work
More opportunity for dust contamination
I use this approach on special pieces where I want exact color control.
Knowing When to Stop:
Stop adding coats when:
Desired color depth is achieved
Grain clarity starts diminishing
Color isn't getting darker (wood is saturated)
You're just wasting time and stain
How to tell if more coats will help:
Apply stain to small test area. If it darkens the surface, another coat will add color. If it just sits on top without darkening, you've hit maximum absorption.
Color Shift Between Wet and Dry:
Stain looks darker when wet than when dry. This is normal and predictable.
Typical shift: Wet stain is 15-30% darker looking than dried stain.
Why: Wet liquid fills pores and reflects light differently than dried penetrating stain.
The issue: You think you've achieved perfect color, then it dries lighter than expected.
The solution:
Evaluate stain color on your test boards after they're fully dry
Don't judge final color while stain is still wet
Allow full drying time before deciding if additional coats are needed
I made this mistake early on—thought the wet color looked perfect, then disappointment when it dried lighter. Now I only evaluate after complete drying.
Allowing Proper Dry Time:
Between coats: Follow the timing guidelines above
Before topcoat: This is critical:
Oil-based stain:
Minimum: 8 hours
Recommended: 24 hours
Very heavy coats or cool conditions: 48 hours
Water-based stain:
Minimum: 3 hours
Recommended: 6-8 hours
The test: Rub white cloth vigorously on stained surface. If stain transfers to cloth, wait longer.
I learned this the hard way—applied polyurethane over stain that seemed dry. The poly dissolved some stain and created cloudy, streaky mess. Now I wait the full 24 hours.
Final Color Assessment:
Before committing to topcoat:
Ensure stain is completely dry (24+ hours)
Evaluate in good lighting (preferably natural daylight)
View from multiple angles
Compare to test samples
Live with it for a day if unsure
Once you apply topcoat, you're committed. Make sure you're happy with the stain color before sealing it in.
My Multiple Coat Strategy:
For most projects:
One coat of properly-applied stain is sufficient
Second coat only if color is too light
Never more than three coats
For special pieces where color control is critical:
Multiple light coats building gradually
Evaluate after each coat
Stop when desired color is achieved
The key: patience between coats and honest evaluation of whether additional coats improve the result!
Topcoat Over Stain
Stain needs protective topcoat. Proper timing and product selection ensure the topcoat doesn't ruin your staining work.
Waiting Time Before Applying Topcoat:
This is one of the most critical aspects of finishing.
Oil-based stain before oil-based polyurethane:
Minimum: 8 hours
Recommended: 24 hours
Heavy coats or cool weather: 48 hours
Oil-based stain before water-based polyurethane:
Minimum: 24 hours
Recommended: 48-72 hours (oil must be fully cured)
Water-based stain before water-based polyurethane:
Minimum: 3 hours
Recommended: 6-8 hours
Water-based stain before oil-based polyurethane:
Minimum: 6 hours
Recommended: 12-24 hours
The test method:
Rub a white cloth vigorously across the stained surface. If any color transfers, the stain isn't dry enough for topcoat.
I've ruined finishes by applying topcoat too soon. Now I religiously wait the recommended time, usually even longer to be safe.
Polyurethane Over Stain: Critical Timing:
Polyurethane is the most common topcoat. Timing matters because:
Too soon:
Topcoat can dissolve stain (especially water-based over oil-based)
Creates cloudy, streaky appearance
Stain bleeds into topcoat
Drying problems
Too late:
Generally not a problem
Some recommend scuff-sanding if waiting more than 48 hours
I wait 24 hours minimum for oil-based stain before poly. For water-based over oil-based, I wait 72 hours to be absolutely sure.
Oil vs. Water-Based Topcoats Over Stain:
Oil-based poly over oil-based stain:
PROS: Compatible chemistries, excellent adhesion, rich appearance
CONS: Adds amber tone (darkens stain slightly), slow drying
Water-based poly over oil-based stain:
PROS: Doesn't add amber tone (shows true stain color), faster drying
CONS: Must wait longer for stain to cure, can have adhesion issues if rushed
Oil-based poly over water-based stain:
PROS: Adds depth and richness
CONS: Amber tone changes the stain color
Water-based poly over water-based stain:
PROS: Compatible, fast turnaround, true color
CONS: Can be tricky to apply without disturbing stain
My preference:
I typically use oil-based poly over oil-based stain (matching chemistries). When I need clear, non-yellowing topcoat, I use water-based poly but wait extra time for stain to fully cure.
How Topcoat Affects Final Color:
The topcoat dramatically changes appearance:
Oil-based poly:
Adds warm amber tone
Darkens stain by 5-15%
Enriches and deepens color
Creates "wet look" depth
Water-based poly:
Minimal color change
Shows stain as-is
Less depth than oil-based
More natural appearance
Shellac:
Slight amber tone (less than oil poly)
Beautiful depth and clarity
Traditional appearance
I test topcoat on sample boards. The stain that looks perfect dry can look too dark or orange under oil-based poly.
Compatibility Issues Between Products:
Not all products play well together.
Generally safe combinations:
Oil-based stain + oil-based poly
Water-based stain + water-based poly
Either stain + shellac (shellac is compatible with everything)
Problematic combinations:
Water-based poly over fresh oil-based stain (wait 72 hours minimum)
Poly over wax (won't adhere—never wax before poly)
Incompatible brands (stick within product lines when possible)
I've had water-based poly fish-eye (create craters) over oil-based stain that wasn't fully cured. Now I'm paranoid about waiting times.
Sealer Coat Before Topcoat:
Some finishers apply sealer coat before topcoat.
What it does:
Locks in stain completely
Prevents bleeding into topcoat
Provides stable base for topcoat
Can improve adhesion
Options:
Shellac (universal sealer—works under anything)
Thinned first coat of your topcoat
Dedicated sanding sealer
When I use sealer:
When using water-based poly over oil-based stain
When stain seems not fully stable
On difficult woods that bleed color
When I skip it:
Oil-based poly over oil-based stain (not needed)
When confident in stain adhesion and drying
Shellac is my go-to sealer when needed. Dewaxed shellac works under any topcoat.
Protecting Your Stain Job:
The topcoat is what actually protects the wood and stain. Stain alone offers zero protection.
Minimum protection: 2-3 coats polyurethane
Standard furniture: 3-4 coats
High-wear surfaces (tabletops): 4-6 coats
More topcoat = more protection and depth, but also more work and drying time.
My Recommended Topcoat Products:
Best oil-based poly: Minwax Polyurethane (not fast-drying) or General Finishes Arm-R-Seal
Best water-based poly: General Finishes High Performance or Varathane Ultimate
Best sealer: Zinsser SealCoat (dewaxed shellac)
Best wipe-on finish: Minwax Wipe-On Poly (oil-based)
These products are reliable, widely available, and compatible with most stains.
Application Tips:
For polyurethane over stain:
Ensure stain is completely dry (test with white cloth)
Very lightly scuff-sand with 320 grit (optional but helps adhesion)
Clean all dust meticulously
Apply first topcoat carefully (brush or wipe)
Avoid going over areas multiple times (can disturb stain)
Let dry completely
Sand between coats (220-320 grit)
Apply subsequent coats
The first topcoat is most critical—if you disturb the stain, you create permanent problems. Subsequent coats are easier.
My Topcoat Process:
Wait 24 hours after final stain coat (oil-based)
Lightly scuff with 320 grit
Tack cloth cleaning
Apply first coat of poly carefully with quality brush
Let dry overnight
Sand with 320 grit
Apply second coat
Repeat for 3-4 total coats
This produces durable, beautiful finish that protects the stain work underneath!
Staining Different Project Types
Different projects present unique staining challenges. Here's how to handle common situations.
Furniture: Large Flat Surfaces Technique
Tabletops, dresser tops, and other large horizontal surfaces need special attention.
The challenge:
Large area means long working time
Must maintain wet edge across entire surface
Gravity helps (horizontal) but dust is a concern
Very visible—mistakes show
My approach for large flat surfaces:
Work in sections (3 ft x 3 ft maximum)
Have a helper if surface is over 6 sq ft
Start at far edge, work toward yourself (don't trap yourself)
Apply stain to entire section quickly
Wipe off entire section consistently
Blend to next section while both are wet
Work fast enough to maintain wet edge
For a typical dining table (6 ft x 3 ft):
Two-person method works best:
Person 1: Applies stain moving lengthwise
Person 2: Follows 2-3 feet behind wiping off
Both work from far edge toward front
Consistent timing means consistent color
Solo method:
Divide mentally into three 2 ft x 3 ft sections
Complete one section fully (apply and wipe)
Move to next section immediately
Blend the edges while both are wet
I've done large tabletops solo and with help. With help is dramatically easier and produces more even results.
Cabinets: Multiple Surfaces
Cabinets have frames, panels, doors, drawers—all needing consistent color.
The challenge:
Many different grain orientations
Inside and outside surfaces
Doors that might be different wood than frames
Need exact color matching across all pieces
My cabinet staining sequence:
Remove all doors and drawers
Group similar pieces (all doors together, all drawer fronts)
Stain all pieces of one type together (ensures consistent timing)
Start with least visible areas: insides, backs, bottoms
Then visible faces
Cabinet box last (you're practiced by then)
For cabinet doors specifically:
Stain all doors in one session using identical process:
Same penetration time
Same wipe-off pressure
Same environmental conditions
Lay flat while drying
This ensures all doors match exactly.
Frame and panel construction:
Stain panels first (can remove and stain separately if possible)
Then stain frame members
Pay attention to end grain on frame joints
Wipe thoroughly in corners where stain accumulates
I stained kitchen cabinets once where I did doors on different days. Slight color variation from different humidity conditions. Now I batch similar pieces together.
Turned Items: Spindles and Legs
Round spindles, table legs, and turned items are tricky.
The challenge:
Vertical surfaces (gravity causes runs)
End grain at top and bottom
Difficult to wipe consistently
Irregular surfaces hard to reach
My turning staining method:
For legs still attached:
Apply stain with rag or brush
Work quickly in sections
Wipe immediately (gravity is your enemy)
Work from top down
Catch drips before they dry
For legs/spindles removed:
Place on padded sawhorses or supports
Apply stain to one side
Wipe that side
Rotate piece
Repeat until complete
Go back and do ends/difficult areas
Alternative method:
Use gel stain (won't run on vertical surfaces)
Apply with rag, working it into details
Wipe off excess carefully
Much more forgiving than liquid stain
I prefer gel stain for vertical turnings. The thick consistency prevents runs and produces even color without fighting gravity.
Carved Details and Recesses
Carvings accumulate stain in the recesses, creating dark spots if not handled correctly.
The challenge:
Stain pools in carved areas
Difficult to wipe out completely
Can look muddy if over-stained
My carving technique:
Apply stain carefully with small brush
Work it into all recesses
Wipe surface areas normally
Use cotton swabs or pointed tools wrapped in cloth for recesses
Remove excess from deep areas (or they'll be too dark)
Accept that recesses will be slightly darker (this adds depth)
Alternative approach:
Apply stain to entire piece
Wipe flat areas normally
Use compressed air to blow excess out of carvings
Absorb blown-out stain with rags
Some finishers intentionally leave carvings darker for contrast. This can look great—just make it intentional, not accidental.
Interior vs. Exterior Staining
Exterior staining requires different products and expectations.
Exterior staining differences:
Products: Must use exterior-rated stain (contains UV blockers and mildew inhibitors)
Expectations: Exterior stain will fade and need recoating every 2-4 years
Surface prep: More critical—must be clean, dry, and stable
Application: Similar technique but weather matters more
I avoid exterior staining when possible (paint lasts longer), but when required:
Use quality exterior stain (Cabot, Olympic, TWP)
Apply to perfectly dry wood (moisture content under 15%)
Two coats minimum for UV protection
Plan for maintenance recoating
Vertical Surfaces Without Runs
Vertical staining (cabinet sides, doors, panels) requires technique adjustments.
Preventing runs:
Apply less stain than on horizontal surfaces
Work in smaller sections
Wipe more frequently
Work from top down (catch drips as you go)
Watch for developing runs in first 5 minutes
Wipe runs immediately before they dry
Or use gel stain:
Won't run regardless of surface orientation
More forgiving for beginners
Produces reliable results on vertical surfaces
I had stain runs mar a cabinet door. The dried runs were lighter (less penetration) and created permanent streaks. Now I'm paranoid about verticals—use less stain and watch constantly.
End Tables and Small Projects
Smaller projects are easier in some ways but require attention to consistency.
Advantages:
Can complete in one session
Less area to maintain wet edge
Easier to control conditions
Challenges:
End grain is more prominent (smaller pieces = more ends)
Easy to over-stain (heavy hand on small surface shows more)
Temptation to rush
My small project approach:
Treat it with same respect as large project
Prep thoroughly (don't shortcut)
Test on scrap (same wood species)
Apply carefully even though it's "just a small piece"
Pay extra attention to end grain
Small projects are great for practicing technique before tackling furniture-sized pieces.
Large Projects: Maintaining Consistency
When staining multiple pieces for one project (bedroom set, kitchen), consistency is critical.
Ensuring matching color:
Buy enough stain for entire project (don't run out and buy new can—color varies batch to batch)
Mix all cans together in large container (equalizes any variation)
Stain all similar pieces together (all tabletops one day, all legs another)
Use identical environmental conditions
Keep detailed notes on timing, technique
Use same batch of conditioner if conditioning
I stained a bedroom set over three weekends. Used same can of stain but environmental conditions varied. Slight color difference between pieces stained in different humidity. Now I batch process when possible.
My Project-Specific Decision Tree:
Large flat surfaces: Two-person application, work in sections, maintain wet edge
Cabinets: Remove all doors/drawers, batch process similar pieces, stain box last
Turned items: Gel stain for verticals, work top to bottom, catch drips
Carvings: Small brush application, cotton swabs for details, accept some darkness in recesses
Small projects: Don't shortcut—practice good technique
Large matching sets: Batch process, same conditions, detailed notes
Every project type has nuances, but fundamental good technique applies to all!
Testing and Sampling
Testing is the single most important step in successful staining. Never skip it.
Why Test Samples Are Non-Negotiable
The reasons:
Stain looks different on every wood species (the can color means nothing)
Your specific board may behave differently than typical samples
Lighting, topcoat, and technique all affect final appearance
Mistakes on test boards are learning opportunities; mistakes on projects are disasters
I've made this mistake too many times: "I'll just stain it, it'll be fine." It was never fine without testing.
The cost of not testing:
Wasted stain
Wasted time stripping/refinishing
Wasted wood (if you ruin the project)
Frustration and disappointment
The cost of testing:
30 minutes
A few scraps of wood
Small amount of stain
Not testing is false economy.
Making Proper Test Boards
Requirements for test boards:
Same wood species as your project (oak test won't predict pine results)
Same grain pattern if possible (flat-sawn vs. quarter-sawn stains differently)
From the same lumber batch ideally
Large enough to show real results (6" x 6" minimum, bigger is better)
Multiple test boards (test different approaches)
My test board process:
Prepare 3-5 test boards from project wood
Sand to same grit as project (180 typically)
Clean thoroughly
Label each board with test parameters
Apply different approaches to each:
Board 1: No conditioner
Board 2: With conditioner
Board 3: Gel stain
Board 4: Different color stain
Board 5: Mixed custom color
Using Actual Project Wood
This is critical. Don't test on random scraps from different wood.
Why species matters:
I tested stain on oak scraps then applied to maple project. Completely different results—oak looked great, maple was blotchy nightmare.
Why grain pattern matters:
Even within same species, flat-sawn absorbs differently than quarter-sawn. If your project is flat-sawn pine, test on flat-sawn pine scraps.
Where to get test wood:
Offcuts from project wood (ideal)
Extra piece purchased with project lumber
The back/bottom of project piece (if hidden)
Testing Multiple Stain Options
Don't commit to one stain without exploring options.
My typical test array:
Target stain (what I think I want)
One shade lighter
One shade darker
With conditioner
Without conditioner
Gel version if available
Custom mix if I'm being adventurous
This gives me options to compare and choose from.
Process:
Apply all tests in single session (same conditions)
Use identical technique on all boards
Label meticulously
Let all dry completely
Apply topcoat to all boards
Evaluate in final lighting
Documenting Your Tests
Keep detailed records. Your memory will fail you.
What to record:
Wood species and source
Sanding grit used
Conditioner brand and application
Stain brand, color name, and product code
Penetration time before wipe-off
Wipe-off technique
Drying time
Topcoat product and coats applied
Environmental conditions (temp, humidity)
Date
How to record:
Write on test board edge with permanent marker
Keep notebook with photos of test boards
Take photos with color reference card
Note what you liked and didn't like
I have a dedicated test board notebook with photos and notes. Reference it constantly for future projects.
Matching Existing Stained Furniture
When adding piece to match existing furniture, testing is doubly important.
The challenge:
Existing furniture's color has:
Aged and darkened naturally
Been exposed to light (UV darkens/fades wood)
Accumulated patina
Was stained in different conditions
My matching process:
Bring existing piece to shop if possible
Make test boards from same wood
Try multiple stain colors (existing color probably isn't what was originally applied)
Account for aging (new piece will darken over time)
Match undertones (warm vs. cool) not just darkness
Accept that perfect match is difficult
Sometimes close match is best you'll achieve. Slight variation can be explained as "different batch of wood."
Creating a Stain Reference Library
Over time, build a collection of test samples for future reference.
My library system:
File of test boards organized by wood species
Each labeled with stain used and notes
Photos in digital folder
Notebook with formulas and observations
Benefits:
Don't repeat past experiments
Know immediately what works on specific woods
Reference when customers/friends ask for advice
Building institutional knowledge
I reference my test library before every new project. Often find "oh, I tried that stain on oak three years ago—here's how it looked."
Learning From Test Results
Tests aren't just about choosing color—they're about learning technique.
What tests teach you:
How that wood absorbs stain
Whether conditioning helps
Optimal penetration time
How wipe-off pressure affects color
What the topcoat does to appearance
Your technique strengths and weaknesses
Experimenting on test boards:
Try different techniques:
Vary penetration time (5 min vs. 15 min)
Vary wipe-off pressure
Multiple coats vs. single coat
Different applicators
Learn what produces results you like on forgiving test boards rather than on actual projects.
My Testing Commitment:
I test EVERY project without exception. Even if I've stained that wood/stain combination before, I test again because:
Wood varies batch to batch
Conditions vary
My technique may have evolved
30 minutes testing prevents potential disasters
The projects where I've skipped testing have universally produced problems. The projects with thorough testing have universally succeeded.
Test boards are cheap insurance!
Staining FAQs
Let me answer the most common questions beginners ask about staining wood evenly.
Why does my stain look blotchy?
The most common causes:
Wrong wood species: Pine, maple, cherry naturally blotch
No wood conditioner: Problem woods need conditioning
Poor surface prep: Mill marks, burnishing, glue spots block absorption
Inconsistent application: Varying pressure or timing
Wrong environmental conditions: Temperature/humidity affecting absorption
Solution: Use wood conditioner on problem woods, prep surface meticulously (180 grit), and maintain consistent technique.
What's the best wood conditioner to use?
For oil-based stain: Minwax Pre-Stain Wood Conditioner (oil-based)
For water-based stain: Minwax Pre-Stain Wood Conditioner (water-based) or General Finishes Water-Based Wood Conditioner
DIY option: Thin your finish 3:1 with appropriate solvent
I use Minwax oil-based conditioner for 90% of projects. It's reliable, affordable, and works consistently.
How long should I let stain sit before wiping?
Depends on product and desired darkness:
Typical oil-based: 5-15 minutes Typical water-based: 2-5 minutes For lighter color: Wipe sooner (5 minutes) For darker color: Let penetrate longer (15 minutes)
Check the can instructions for specific product recommendations.
I typically do 10 minutes for oil-based on most projects—produces good depth without over-darkening.
Can I stain over existing stain?
Sometimes, with caveats:
If existing stain is in good condition:
Lightly sand with 220 grit
Clean thoroughly
Apply new stain (darker than existing)
Lighter stain won't show over dark stain
If existing finish is polyurethane or other topcoat:
No—stain won't penetrate topcoat
Must strip or sand to bare wood first
I've successfully stained over existing stain to darken color. Going lighter requires stripping to bare wood.
Why is my stain streaky?
Common causes:
Inconsistent application pressure: Pressing hard in some areas, light in others
Uneven wipe-off: Removing more stain from some areas
Dried stain before wiping: Creates permanent dark streaks
Applying across grain: Creates visible cross-grain marks
Burnished wood: Over-sanded areas resist absorption
Solutions: Consistent pressure, always work with grain, wipe within recommended time, stop at 180 grit sanding.
How do I get even color on pine?
Pine requires special handling:
Use wood conditioner (non-negotiable for pine)
Apply conditioner heavily and evenly
Wait specified time (usually 15 minutes)
Use gel stain for most foolproof results, OR
Use oil-based stain with quick wipe-off (5 minutes maximum)
Consider dye instead of pigment stain
Even with perfect technique, pine will never be perfectly uniform. Accept some variation as character.
Should I sand between coats of stain?
Controversial question with different schools of thought:
My approach:
If applying within 24 hours: No sanding (just apply second coat)
If waiting longer than 24 hours: Very light scuff with 320 grit for adhesion
If first coat raised grain: Gentle 320 grit to knock down fuzz
Never aggressive sanding—you'll remove the stain you just applied.
How long before I can apply polyurethane?
Oil-based stain:
Minimum: 8 hours
Recommended: 24 hours
Oil-based poly over oil stain: 24 hours
Water-based poly over oil stain: 72 hours (must be fully cured)
Water-based stain:
Minimum: 3 hours
Recommended: 6-8 hours
The test: Rub white cloth vigorously on surface. If stain transfers, wait longer.
I always wait 24 hours minimum. Rushing this step creates problems.
Why does end grain stain darker?
Because of wood structure:
End grain is looking directly into the wood cell tubes (like looking down straws). Stain pours into these open tubes with zero resistance.
Face grain has cells running parallel to surface, so absorption is much slower and more controlled.
Result: End grain absorbs 8-10x more stain than face grain.
Solutions: Pre-seal end grain, sand end grain finer, use gel stain, or embrace the contrast.
Can I fix uneven stain without stripping?
Sometimes, depending on severity:
For light areas: Apply additional stain to those areas, blend carefully
For overall blotchiness: Apply gel stain over the entire surface to even it out
For severe problems: Stripping and re-staining produces better results than trying to fix
I've successfully fixed minor unevenness with gel stain overlay. Severe blotching requires stripping.
The Common Thread:
Most staining problems come from:
Skipping wood conditioner on problem woods
Poor surface preparation
Inconsistent technique
Wrong environmental conditions
Not testing first
Address these fundamentals and most problems disappear!
Conclusion
Here's the truth about staining wood evenly: it's less about perfect technique and more about understanding wood, choosing the right products, and preparing meticulously. The difference between blotchy disasters and professional results comes down to respecting the wood's nature and working with it rather than against it.
The single most important lesson: test everything on scrap wood first. Use actual project wood, apply the exact process you'll use on the project (conditioner, stain, topcoat), and let it dry completely. This 30-minute investment prevents days or weeks of fixing problems. I test every single project without exception—even woods and stains I've used before, because wood varies and conditions change.
Use wood conditioner religiously on problem woods—pine, maple, cherry, birch, and all softwoods. It's not optional, it's essential insurance against blotching. Minwax Pre-Stain Wood Conditioner costs maybe $10 and saves countless projects. I keep it stocked in my shop at all times.
Stop sanding at 180 grit for surfaces that will be stained. This seems counterintuitive—we're trained to think "smoother is better"—but for staining, 180 grit is the sweet spot. Finer grit burnishes the wood and prevents stain absorption. I ruined several projects by sanding to 320 grit before learning this.
Apply stain with the grain using consistent pressure, let it penetrate for the appropriate time, then wipe off excess thoroughly. The wipe-off step determines final color as much as the application. Inconsistent wiping creates inconsistent color. Focus on this step as carefully as the application.
Work in proper environmental conditions: 65-75°F with moderate humidity. Temperature and humidity affect stain absorption dramatically. If conditions aren't right, wait for a better day. The one time I tried staining in my 55°F garage, the results were terrible and I had to strip and redo everything.
Accept that some woods (maple, pine, cherry) will never stain perfectly evenly with traditional pigment stain. Use dye stain for more even color on problem woods, or use gel stain for foolproof results, or embrace clear finish and let the wood's natural beauty show. Sometimes the best staining decision is not to stain at all.
Be patient with drying times. Wait the full 24 hours between stain and topcoat for oil-based products. Wait 72 hours if applying water-based poly over oil-based stain. Rushing this step creates cloudy, streaky disasters that are difficult to fix.
Remember that slight color variation is natural and adds authenticity. Perfect robot-applied uniformity can look artificial. The goal is consistent overall color without obvious blotches or dramatic streaking—not absolute perfection.
What wood are you planning to stain? What challenges are you facing? Drop a comment below and share your staining questions or experiences! I'm happy to provide specific advice for your situation or troubleshoot problems you're encountering.
Now go stain that project with confidence. Test thoroughly, prep meticulously, condition appropriately, and apply carefully. You can achieve beautiful, even stain results that enhance your woodworking—I promise. It just takes understanding, preparation, and patience!
Happy staining!