How to Choose the Right Container Size for Tomatoes
Learn how to choose the right container size for tomatoes with this complete guide. Discover minimum pot sizes, best container types, and expert tips for growing massive tomato harvests in pots this season.
GARDENING
Here's a stat that blew my mind when I first started growing tomatoes in containers: a tomato plant's root system can spread 2-3 feet in every direction when given the chance! That's absolutely massive, and it completely changed how I thought about container sizes.
I'll be straight with you - I killed more tomato plants from using tiny pots than I care to admit. My first attempt at container tomatoes involved these cute little 2-gallon decorative pots I found on clearance. I thought I was being smart, saving money and space. The plants looked sad from day one, barely grew, and produced maybe three pathetic tomatoes total before giving up entirely.
That failure taught me something crucial: container size isn't just about having enough room for the plant. It's about root development, water retention, nutrient availability, and ultimately whether your tomato plant thrives or just survives. The difference between a 5-gallon container and a 10-gallon container can literally mean the difference between harvesting 10 tomatoes or 50 tomatoes from the same variety!
In this guide, I'm gonna break down exactly how to choose the right container size for every type of tomato you might want to grow. We'll cover determinate vs indeterminate varieties, different container materials, depth requirements, and all the mistakes I made so you don't have to repeat them. Let's get your tomatoes growing in containers that actually set them up for success!
Why Container Size Matters More Than You Think
Container size affects literally every aspect of how your tomato plant grows. It's not just about fitting the plant in the pot - it's about creating an environment where the roots can develop properly and support healthy growth above ground.
The root-to-shoot ratio is something I didn't understand for way too long. Basically, the size of your plant above ground is directly limited by the root system below ground. If you restrict root growth by using a too-small container, the plant can only get so big no matter how much you fertilize or how perfect the growing conditions are. I learned this when my patio tomatoes in 3-gallon pots stayed tiny while my friend's identical variety in 10-gallon pots grew into massive, productive bushes.
Water retention is hugely affected by container size. Small containers dry out insanely fast during summer heat - I'm talking twice-daily watering or more. I spent one terrible July running outside to water my tomatoes every morning and evening because I'd chosen pots that were too small. Larger containers hold more soil, which means they hold more water and dry out much more slowly. This makes your life easier and keeps the plants healthier since they're not constantly stressed from drying out.
Nutrient availability follows the same principle. More soil equals more nutrients available to the plant, and less frequent fertilizing needed from you. Those tiny pots I started with got depleted of nutrients within weeks, and I was constantly trying to keep up with feeding schedules. Bigger containers give you more buffer room and are way more forgiving.
Temperature stability is another factor I didn't consider initially. Small containers heat up and cool down rapidly with temperature swings, which stresses plant roots. Larger containers maintain more stable soil temperatures because there's simply more mass to absorb and release heat slowly. This became obvious to me when I noticed my plants in small black plastic pots wilting during afternoon heat even though the soil was moist - the roots were literally cooking!
Understanding Tomato Types and Their Container Needs
Not all tomatoes are created equal when it comes to container requirements. The growth habit of your specific variety makes a huge difference in what size container you'll need!
Determinate tomatoes are the compact bush types that grow to a predetermined size - usually 3-4 feet tall - then stop growing and produce all their fruit at once. These are sometimes called "bush tomatoes" or "patio tomatoes." Varieties like 'Roma,' 'Celebrity,' and 'Bush Early Girl' fall into this category. I love determinates for containers because they're naturally more compact and manageable in smaller spaces.
For determinate varieties, you can get away with smaller containers - typically 5-7 gallons minimum. I've successfully grown determinates in 5-gallon buckets, though they perform noticeably better in 7-gallon fabric grow bags. The plants stay compact enough that they don't outgrow these moderate-sized containers, and you still get a decent harvest of 15-25 tomatoes per plant.
Indeterminate tomatoes are the sprawling, vining types that keep growing taller and producing fruit continuously until frost kills them. These include most heirloom varieties and popular ones like 'Brandywine,' 'Cherokee Purple,' and 'Sungold' cherry tomatoes. These plants can easily reach 6-8 feet tall or more, and they have correspondingly massive root systems.
Indeterminate varieties absolutely need larger containers - I won't go smaller than 10 gallons, and I prefer 15-20 gallons for these vigorous growers. I learned this lesson hard when my 'Brandywine' plant in a 7-gallon pot just wouldn't thrive. It grew okay but never reached its full potential. The next year I put the same variety in a 15-gallon container, and the difference was night and day - the plant was enormous and produced over 40 huge, delicious tomatoes!
Dwarf and micro-dwarf varieties are specially bred for tiny spaces. Varieties like 'Tiny Tim,' 'Red Robin,' and 'Micro Tom' max out at 8-12 inches tall. These are legitimately the only tomatoes I'd recommend growing in containers smaller than 5 gallons. I've successfully grown 'Tiny Tim' in 2-3 gallon pots, and they produced adorable little cherry tomatoes. They're perfect for windowsills or really tight spaces where bigger tomatoes wouldn't work.
Minimum Container Sizes for Different Tomato Varieties
Let me give you specific recommendations based on years of trial and error with different varieties and container sizes. These are the minimum sizes I'd use - you can always go bigger, and your plants will thank you for it!
For dwarf and micro-dwarf varieties (under 12 inches tall), 2-3 gallons is the absolute minimum. I actually prefer 5 gallons even for these tiny varieties because the extra soil volume makes watering less frequent and provides more nutrients. A 'Tiny Tim' tomato in a 5-gallon container versus a 2-gallon container produces noticeably more fruit and stays healthier throughout the season.
Compact determinate varieties (3-4 feet tall) need a minimum of 5 gallons, but 7 gallons is way better. I tried 'Bush Early Girl' in both sizes side by side, and the 7-gallon plants were healthier, produced more tomatoes, and required less constant attention to watering. The 5-gallon plants worked but were just barely adequate - they needed watering twice daily during hot weather.
Standard determinate varieties (4-5 feet tall) like 'Celebrity' and 'Roma' perform best in 7-10 gallon containers. I wouldn't go smaller than 7 gallons for these. My 'Roma' plants in 10-gallon fabric grow bags absolutely crush it - they produce 30-40 paste tomatoes each season, which is plenty for making sauce and canning.
Compact indeterminate varieties (5-6 feet tall) need at least 10 gallons, though 12-15 gallons is ideal. These are varieties bred to be somewhat compact while still having the continuous production of indeterminates. 'Sungold' cherry tomatoes fall into this category. I grow mine in 12-gallon containers, and each plant produces literally hundreds of sweet little orange tomatoes from June through October.
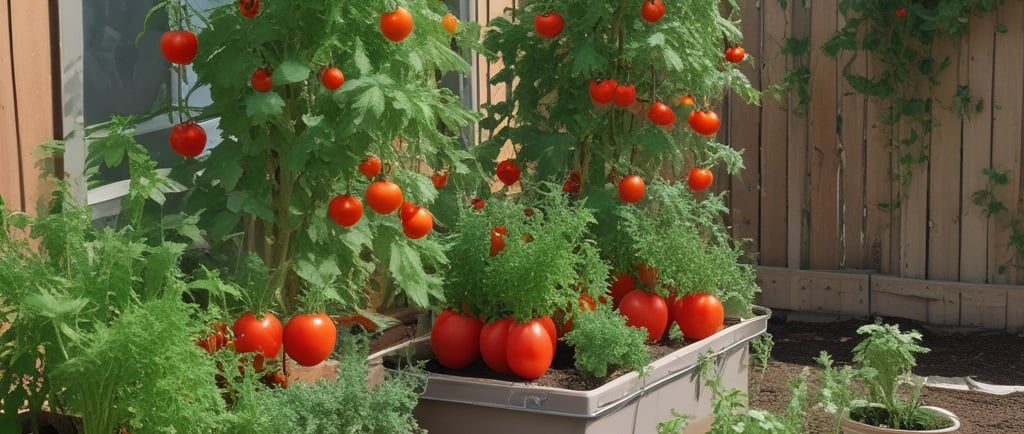
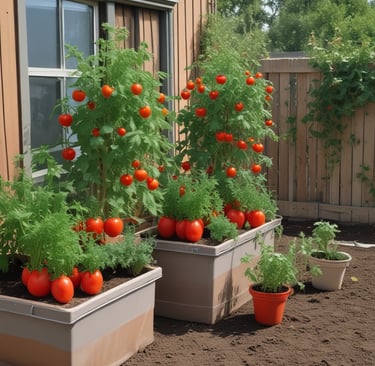
Standard indeterminate varieties (6-8+ feet tall) require 15-20 gallon containers minimum. These big boys like 'Brandywine,' 'Cherokee Purple,' and 'Beefsteak' have absolutely massive root systems. I tried cheaping out with smaller containers, and it never worked well. Once I committed to 15-20 gallon containers for these varieties, everything changed - the plants grew huge, stayed healthy, and produced abundant harvests.
Vigorous cherry tomato indeterminates like 'Sweet 100' and 'Black Cherry' are in their own category because they're insanely productive and sprawling. I use 20-25 gallon containers for these monsters! A 'Sweet 100' plant will literally take over your entire patio if you let it. The huge container supports the massive root system these plants develop when they're producing hundreds of cherry tomatoes.
Container Depth Matters as Much as Volume
Volume isn't the only measurement that matters - depth is crucial too! I made the mistake of using wide, shallow planters for tomatoes early on, thinking the total volume was all that mattered. Wrong!
Tomato roots naturally want to grow deep. In ideal conditions, the main taproot can extend 2-3 feet down into the soil. While container growing obviously limits this, you still want to provide enough depth for good root development. Shallow containers force roots to grow horizontally, which isn't as efficient and can lead to root circling and binding.
The minimum depth I recommend for any tomato except dwarf varieties is 12 inches. That's the bare minimum! I prefer 14-16 inches of depth for most varieties, and 18-20 inches for those big indeterminate heirlooms. The extra depth allows the taproot to grow down properly and supports much better overall plant health.
I did a side-by-side comparison one year that really proved this point. I grew 'Celebrity' tomatoes in both a wide, shallow 10-gallon planter (only 10 inches deep) and a standard 10-gallon pot (16 inches deep). Both containers had the same soil volume, but the deeper pot produced almost twice as many tomatoes! The plant was healthier, more vigorous, and just overall performed better with that extra depth.
Self-watering containers are often shallower than standard pots because of the water reservoir at the bottom. This can be problematic for tomatoes. I use self-watering containers for smaller determinate varieties where 10-12 inches of soil depth above the reservoir is adequate. For bigger plants, I stick with standard deep containers rather than sacrificing depth for the self-watering feature.
Window boxes and rectangular planters can work for tomatoes if they're deep enough. I've successfully grown compact determinates in 12-inch deep window boxes. The key is measuring the actual soil depth, not just the external height of the container. Some decorative planters have thick walls or raised bottoms that reduce the actual soil depth significantly.
Best Container Materials for Growing Tomatoes
The material your container is made from affects everything from watering frequency to root temperature to how long the container lasts. I've tried basically every type of container material over the years, and they all have pros and cons!
Fabric grow bags are my absolute favorite for tomatoes now. The air pruning effect they create is incredible - when roots hit the fabric sides, they're naturally pruned back, which encourages the plant to develop more feeder roots instead of circling roots. This creates a much healthier, more fibrous root system. My tomatoes in fabric bags consistently outperform the same varieties in plastic pots of the same size.
The main downside of fabric bags is they dry out faster than solid containers. During peak summer heat, I'm watering my fabric bags daily while plastic pots might go 2-3 days between waterings. I've learned to accept this trade-off because the improved plant health and production is worth the extra watering. Mulching the soil surface heavily helps reduce water loss through the fabric.
Plastic containers are the most common and affordable option. Black nursery pots work fine for tomatoes, though they can get really hot in direct sun which isn't ideal for root health. I prefer lighter colored plastic pots now because they reflect heat rather than absorbing it. Those UV-resistant plastic containers last for years with proper care, and they're lightweight enough to move around easily.
One trick I learned with plastic pots is to double-pot them during hot weather. I set the black nursery pot inside a slightly larger decorative pot, leaving an air gap between them. This insulates the roots from temperature extremes and has made a noticeable difference in plant health during summer heat waves. It looks better too!
Terra cotta and ceramic pots look beautiful but have some serious drawbacks for tomatoes. They're heavy, they break easily if knocked over, and they dry out incredibly fast because they're porous. I tried growing tomatoes in large terra cotta pots one year and had to water them twice daily even with mulch. They work fine for smaller tomato varieties if you're committed to frequent watering, but I wouldn't recommend them for big indeterminate varieties.
Food-grade plastic buckets are an excellent free or cheap option! I get 5-gallon frosting buckets from a local bakery, drill drainage holes in the bottom, and they work perfectly for compact determinate tomatoes. The white color reflects heat, they're sturdy, they have handles for easy moving, and they're free. I've used some of these buckets for 4-5 seasons and they're still going strong.
Wood containers like half whiskey barrels are beautiful and work well for tomatoes. They insulate roots better than plastic and don't overheat like black pots. The main concerns are making sure the wood is untreated (chemicals can leach into soil), ensuring adequate drainage holes, and accepting that they'll eventually rot and need replacing. I use cedar planters for my patio tomatoes because they look nice, and the natural rot resistance means they last 5-7 years.
How Container Size Affects Watering and Maintenance
Choosing the right container size isn't just about plant health - it's also about how much work you're signing up for! Smaller containers mean way more maintenance, which I learned the hard way during a particularly busy summer.
Watering frequency is dramatically affected by container size. My tomatoes in 5-gallon containers need daily watering during July and August, sometimes twice daily on really hot days. The same varieties in 15-gallon containers might only need watering every 2-3 days. This difference is huge when you're trying to maintain a bunch of plants!
I actually tracked watering needs one season to see the real difference. A determinate tomato in a 5-gallon pot needed watering 95 times over the growing season. The same variety in a 10-gallon pot only needed watering 58 times. That's 37 fewer trips outside to water! Multiply that by multiple plants, and the time savings with larger containers really adds up.
The risk of missing a watering is much higher with small containers. If I forget to water my 5-gallon pots for a day during summer, the plants wilt badly and drop flowers and small fruits. The 15-gallon containers have enough buffer that missing a day isn't catastrophic - the plants might look slightly stressed but they recover fine. This forgiveness factor is worth its weight in gold if you travel occasionally or have an unpredictable schedule.
Fertilizing schedules also differ based on container size. Small containers have less soil volume, which means less total nutrients available even with good potting mix. I fertilize my 5-gallon tomatoes every week during peak production to keep them fed. My 15-20 gallon containers only need fertilizing every 2-3 weeks because there's more soil buffer holding nutrients.
Soil temperature fluctuations are more extreme in small containers. I noticed this when I started using a soil thermometer to monitor root zone temperatures. My 5-gallon black plastic pots showed soil temps swinging from 65°F at night to 95°F+ during afternoon sun. The 15-gallon containers stayed much more stable, ranging from 68-82°F over the same period. Those wild temperature swings stress plants and reduce productivity.
Common Container Size Mistakes I Made (So You Don't Have To)
Let me share some painful lessons I learned through trial and error. These mistakes cost me time, money, and a lot of dead or unproductive tomato plants!
Mistake #1: Trying to grow full-size indeterminate varieties in 5-gallon buckets. This never worked well, but I kept trying for like three seasons thinking maybe I just needed to fertilize more or water more carefully. Nope! The container was simply too small for those vigorous growers. They survived but never thrived, producing maybe 20% of what they should have. Once I accepted that big plants need big pots, my indeterminate tomato harvests increased dramatically.
Mistake #2: Assuming a decorative pot's stated size was accurate. I bought these beautiful ceramic pots labeled as "12 gallons" but when I actually measured the soil capacity, they held maybe 8 gallons because of thick walls and a raised bottom. Always measure or at least visually compare to containers you know the actual volume of. Those misleading decorative pots led to undersized containers and disappointing results.
Mistake #3: Not accounting for soil settling. I'd fill a container to the brim with potting mix, then after watering a few times it would settle down and I'd lose 2-3 inches of depth. Now I fill containers, water them thoroughly, let them sit for a day, then top them off with more soil before planting. This ensures I maintain the full depth I planned for.
Mistake #4: Upgrading container size mid-season. I thought I could start tomatoes in small pots then transplant to larger containers once they outgrew the small ones. This is technically possible but it seriously stresses the plants and sets back production significantly. Every time I did this, the plants took 2-3 weeks to recover from transplant shock. It's way better to start with the right size container from the beginning.
Mistake #5: Going too big with massive containers I couldn't move. I got overzealous one year and planted several tomatoes in 30-gallon containers thinking bigger was always better. The plants did great, but the containers were so heavy once filled with wet soil that I literally couldn't move them. This became a problem when I needed to rearrange my patio or protect plants from storms. Now I stay in the 15-20 gallon range maximum for containers I might need to move.
Mistake #6: Not drilling enough drainage holes. I used a 15-gallon storage tote for tomatoes one year and only drilled four small holes in the bottom. The soil stayed waterlogged, and I ended up with root rot. Large containers need lots of drainage holes - I now drill 8-12 holes spread across the entire bottom of any container over 10 gallons. Better drainage is basically always better for tomatoes.
Calculating the Right Size for Your Specific Variety
Let me walk you through how I actually decide what size container to use when I'm planning my tomato garden each season. It's not complicated once you understand the basic principles!
Step 1: Identify whether your variety is determinate or indeterminate. This information is on the seed packet or plant tag. If it doesn't specify, you can look up the variety online. This is your starting point because it makes a huge difference in container requirements.
Step 2: Check the mature height of the variety. This gives you a sense of how vigorous the plant will be. A determinate that only grows to 2 feet tall has very different needs than one that reaches 5 feet. Generally, add 3-5 gallons of container size for every additional foot of mature height beyond the minimum.
Step 3: Consider your climate and growing conditions. If you live somewhere hot and dry like I do, upsize your containers by 2-3 gallons to help with water retention. If you're growing in a cooler climate with more humidity, you might be fine with the minimum recommendations. I learned this when visiting my friend in the Pacific Northwest - her tomatoes in 7-gallon pots did great there, but that same size dries out too fast in my hot, dry summers.
Step 4: Think about how long your growing season is. Longer growing seasons mean more time for root systems to develop and plants to get larger. If you've got a short season (10-12 weeks), you can go slightly smaller with containers. If you're growing tomatoes for 5-6 months like I do, use larger containers to support that extended growth and production period.
Step 5: Factor in your maintenance tolerance. Be honest with yourself about how much time you want to spend watering and fertilizing! If you travel frequently or have a busy schedule, bigger containers are worth it for the reduced maintenance. If you enjoy daily garden visits and don't mind frequent watering, you can get away with smaller containers.
Here's a practical example: Last year I wanted to grow 'Sungold' cherry tomatoes. It's an indeterminate variety that grows 5-6 feet tall. My base recommendation for indeterminates is 10-15 gallons. Since 'Sungold' is particularly vigorous and I have a long growing season (late April to October), I went with 15-gallon fabric grow bags. The plants absolutely thrived and produced hundreds of tomatoes each. Had I gone with 10-gallon containers, they would've worked but I would've been watering twice daily and the plants wouldn't have reached their full potential.
Special Considerations for Hot Climates
Growing tomatoes in containers in hot climates requires some special attention to container sizing and management. I live in a zone 7b area with brutal summer heat, and I've learned some tricks the hard way!
Upsize your containers by at least 5 gallons if you're dealing with consistently hot weather. The extra soil volume helps buffer temperature extremes and holds more water. What might work in a moderate climate becomes inadequate in the heat. I tried following standard container size recommendations my first few years, and my plants struggled terribly until I started using significantly larger containers.
Color matters way more in hot climates. Black containers absorb heat and can get soil temperatures into the 95-100°F range, which seriously stresses tomato roots. I switched to white or light-colored containers and saw immediate improvement in plant health. If you're stuck with black pots, consider painting them white or wrapping them with reflective material.
Double-potting is a strategy I use for my most valuable tomato plants. I set the actual growing container inside a larger decorative pot with a 2-3 inch air gap between them. This air gap insulates the root zone from extreme heat. I've measured 10-15°F cooler soil temperatures using this method compared to a single pot sitting in direct sun.
Soil level in the container affects heat absorption too. I leave 2-3 inches of space between the soil surface and the pot rim in hot climates. This creates a bit of shade on the upper sides of the container and reduces heat transfer to the root zone. It also makes watering easier without washing soil out of the container.
Mulching becomes absolutely essential in large containers in hot climates. I use 2-3 inches of shredded bark mulch or straw on the soil surface of every tomato container. This dramatically reduces moisture loss through evaporation and keeps the soil surface cooler. Without mulch, I'd probably need to water twice as often.
Consider using self-watering containers or installing drip irrigation if you're in a really hot area. The consistency of moisture they provide is valuable when you're dealing with intense heat. I resisted automated watering for years, thinking it was unnecessary, but it's made a huge difference in plant health during our hottest months. The plants aren't constantly cycling between dry and wet, which reduces stress significantly.
Budget-Friendly Container Options That Work
You don't need to spend a fortune on fancy containers to grow great tomatoes! I've found some awesome budget options over the years that perform just as well as expensive specialty pots.
Food-grade buckets from bakeries or restaurants are my favorite free option. Five-gallon frosting buckets work perfectly for compact determinate tomatoes. I've also scored larger buckets in the 6-7 gallon range. Just drill 6-8 drainage holes in the bottom, and you're good to go. I've literally gotten 50+ buckets this way over the years - the bakery is happy to give them away rather than throwing them out.
Storage totes from discount stores make excellent large containers. I buy 18-gallon storage bins on sale for $8-10 each, drill lots of drainage holes, and they work great for indeterminate tomatoes. They're not the prettiest containers, but who cares when they're covered in beautiful tomato plants? These have been some of my most productive containers.
Fabric grow bags are incredibly affordable when bought in bulk online. I get 7-gallon bags for about $3-4 each when I buy a 10-pack. They last 3-4 seasons with proper care (I bring them inside during winter). The cost per season works out to about a dollar, which is crazy affordable for how well they perform.
DIY containers from scrap lumber work great if you're handy. I built several 15-gallon wooden boxes from fence pickets that cost maybe $12 each in materials. They're basically just rectangular boxes with drainage gaps between the bottom boards. They've lasted 6+ years so far and will probably go another few seasons.
Reused containers from other purposes save a ton of money. I've used old laundry baskets (lined with landscape fabric), broken wheeled coolers (drilled for drainage), and even a retired kids' wagon. If it's roughly the right size and you can add drainage holes, it'll work for tomatoes! Get creative and look around your house for potential containers before buying new ones.
One place I don't recommend cheaping out is potting mix. You can use budget containers all day long, but skimping on soil quality will hurt your results. I learned this when I tried using cheap topsoil mixed with some compost in my containers. The plants were okay but nothing special. Investing in quality potting mix pays off in healthier plants and better harvests, regardless of what type of container you're using.
How Many Tomato Plants Per Container
This is a question I get asked constantly, and the answer might surprise you - almost always just ONE plant per container! I know that feels wasteful when you've got this big pot sitting there, but trust me on this.
Tomato plants are competitive and don't share space well. Each plant needs its full allotment of soil, nutrients, water, and root room to perform well. I tried planting two tomato plants in a 15-gallon container once, thinking I'd get twice the harvest. Instead, both plants underperformed significantly compared to single plants in the same size container. They competed for resources, both ended up stressed, and the total harvest was actually less than I would've gotten from one healthy plant.
The only exception is if you're growing micro-dwarf varieties like 'Tiny Tim' or 'Micro Tom.' These genuinely tiny plants can share containers. I've successfully grown three micro-dwarf plants in a single 10-gallon container. They stay small enough that they're not really competing with each other, and it creates this cute little tomato bush effect.
Some people plant tomatoes with complementary herbs or flowers in the same container. I've tried this with varying success. Basil planted around the base of tomatoes works okay since basil has shallow roots that don't compete much with the tomato's deeper root system. I wouldn't plant anything that has substantial root development alongside tomatoes though - they need all that soil volume for themselves.
If you want to maximize production from limited space, use multiple containers with one plant each rather than multiple plants per container. I have 8-10 individual containers on my patio, each with a single tomato plant, and this setup consistently outproduces my friend's approach of doubling up plants in half as many containers. The individual plants are healthier and more productive.
The "one plant per container" rule applies even more strictly to indeterminate varieties. These plants develop massive root systems that fill every available inch of soil. Cramming two indeterminates into one pot, even a large one, is just asking for problems. I watched a neighbor try this for two seasons running, and the results were terrible both times despite my warnings.
Upgrading Your Container Game Over Time
When you're just starting out with container tomatoes, it's totally fine to begin with basic, budget setups. But as you get more experience and figure out what works for your situation, upgrading your container game can significantly improve your results!
My container evolution went something like this: Year 1, random pots I had laying around in various sizes (mostly too small). Year 2, standardized on 5-gallon buckets for everything (better but still limiting). Year 3, invested in proper 10-gallon nursery pots (major improvement). Year 4, discovered fabric grow bags and never looked back (current system).
Each upgrade taught me something and improved my harvests. The consistency of using the right size containers alone probably doubled my tomato production between year 1 and year 3. Once I figured out proper sizing for each variety type, everything got easier and more productive.
Quality matters more as you scale up your operation. When I was just growing 3-4 tomato plants, it didn't matter that my cheap containers would only last 2-3 seasons. Now that I'm growing 15-20 plants annually, investing in durable fabric bags and quality plastic pots makes sense. They last longer and the improved growing conditions pay off in better harvests.
I've also gradually invested in supporting infrastructure. Drip irrigation was a game-changer when I reached 10+ containers - hand-watering that many plants got old fast. Quality tomato cages and stakes make a huge difference in managing large plants in containers. A good dolly for moving heavy containers around has saved my back countless times.
Specialized containers for specific purposes can be worth it. I use self-watering containers for my front porch tomatoes where I don't walk by as often. I use extra-large 20-gallon fabric bags for my best heirloom varieties. My determinate paste tomatoes go in standardized 7-gallon buckets. Having the right container for each specific use case makes everything run more smoothly.
Don't feel like you need to upgrade everything at once though! I improved my container setup gradually over several seasons, replacing the worst performing containers first and expanding the collection slowly. This approach spread out the cost and let me experiment with different container types without committing huge amounts of money upfront.
Conclusion
Choosing the right container size for tomatoes might seem complicated at first, but it really comes down to a few key principles. Match your container size to your tomato variety's growth habit, provide adequate depth for root development, and don't be afraid to go bigger rather than smaller when you're unsure!
The investment in properly sized containers pays off every single season in healthier plants, bigger harvests, and less maintenance headaches. Those few extra dollars spent on a 15-gallon container instead of a 7-gallon one will literally come back to you in pounds of extra tomatoes. I've tracked this over multiple seasons, and it's absolutely true.
Remember, you can always start with a few containers in the right sizes and expand gradually as you figure out what works best for your specific varieties and growing conditions. My container tomato garden has evolved tremendously over the years, and yours will too! The key is learning from each season and making adjustments based on what you observe.
Your local climate, available time for maintenance, and specific tomato varieties all factor into the perfect container size for your situation. Use the guidelines I've shared as a starting point, then adjust based on your results. Take notes on what works and what doesn't - I keep a simple garden journal that's been invaluable for remembering what container sizes performed best with which varieties.
What container sizes are you planning to use for your tomatoes this season? Have you made any container sizing mistakes that taught you valuable lessons? Drop a comment below and let's share our experiences to help everyone grow better tomatoes!