DIY Self-Watering Containers: Step-by-Step Guide for 2026
Learn how to build DIY self-watering containers with this complete step-by-step guide. Save time, water plants perfectly, and grow healthier vegetables with these easy homemade self-watering planters.
GARDENING
I'll never forget the summer of 2021 when I came home from a week-long vacation to find half my container garden completely dead. The plants had literally shriveled into crispy brown husks despite my neighbor's promise to water them every other day. She forgot. It happens!
That devastating experience pushed me to finally build self-watering containers, something I'd been putting off because it seemed complicated and unnecessary. Turns out, self-watering planters are neither complicated nor unnecessary - they're actually genius! Studies show that plants in self-watering containers use about 25% less water while growing 30-40% more productively than traditional containers. That's because the consistent moisture levels eliminate the stress of wet-dry cycles that plague hand-watered containers.
The concept is brilliantly simple: a water reservoir sits at the bottom of the container, and the soil wicks moisture up as needed. The plant literally waters itself, taking exactly what it needs when it needs it. You just refill the reservoir every few days instead of watering daily. It's like putting your container garden on autopilot!
I built my first self-watering container from two plastic storage totes and some PVC pipe in about 30 minutes. The materials cost maybe $12 total. That single container transformed my tomato growing - the plant was healthier, produced more fruit, and required way less attention than my traditionally watered tomatoes. I was hooked immediately.
In this guide, I'm gonna walk you through exactly how to build self-watering containers using several different methods and materials. We'll cover the basic principles, multiple design options from simple to advanced, troubleshooting tips, and which plants work best in these systems. Let's build something that'll make your gardening life so much easier!
How Self-Watering Containers Actually Work
Understanding the science behind self-watering containers helps you build better ones and use them more effectively. The principle is pretty straightforward once you get it, though I definitely didn't understand it at first!
The basic design has three essential components: a water reservoir at the bottom, a growing medium (potting mix) above it, and a wicking mechanism that connects the two. The soil sits above the water but doesn't directly touch it - there's usually an air gap between them. This prevents the soil from becoming waterlogged while still allowing moisture to move upward.
Capillary action is what makes the whole thing work. This is the same force that lets paper towels soak up spills - water molecules are attracted to soil particles and essentially climb upward against gravity through tiny spaces in the soil. The soil stays consistently moist but not soggy, which is the perfect condition for most plant roots. I learned about capillary action in high school physics but never imagined I'd be using it for gardening!
The wick is the connection between the water reservoir and the soil above. Different designs use different wicking mechanisms - sometimes it's a fabric wick, sometimes it's a column of soil that extends down into the reservoir, sometimes it's perforated cups filled with soil. Whatever the mechanism, its job is to provide a pathway for water to travel upward into the root zone.
The air gap between the water and the main soil mass is crucial for root health. Roots need oxygen as much as they need water, and sitting directly in water would suffocate them. The air gap ensures the lower roots have access to oxygen while still being able to access moisture through the wicking system. I didn't include an adequate air gap in my first DIY attempt, and the plants developed root rot. Lesson learned!
A fill tube allows you to add water directly to the reservoir without disturbing the plants or having to water from the top. This is super convenient and makes reservoir maintenance easy. Most DIY designs use a simple PVC pipe as a fill tube - you just pour water down the tube until the reservoir is full.
An overflow hole prevents the reservoir from getting too full and drowning plant roots. This hole is drilled at the maximum water level you want to maintain. Excess water drains out through this hole, which is especially important during rainy periods when natural rainfall could overfill the reservoir. I forgot the overflow hole on one of my early builds, and after a heavy rainstorm the reservoir overflowed and the soil became completely waterlogged.
Benefits of Self-Watering Containers (Why I'll Never Go Back)
Self-watering containers have so many advantages over traditional pots that I've gradually converted most of my container garden to this system. Let me share what difference they've actually made in my gardening!
Consistent moisture is the biggest benefit. Plants never experience those stressful dry periods followed by flooding when you finally remember to water. The soil stays evenly moist at all times, which plants absolutely love. My tomatoes in self-watering containers have virtually no blossom end rot, while my traditionally watered ones still get it occasionally despite my best efforts at consistent watering.
Time savings are substantial once you've got self-watering containers established. I went from watering my patio containers daily (sometimes twice daily in summer) to filling reservoirs every 3-5 days. That's maybe 10 minutes per week instead of 10 minutes per day. The time savings multiplies with each container you convert - it's been genuinely life-changing for my gardening routine!
Water efficiency is better than hand watering by a significant margin. The closed system means almost no water is lost to evaporation, and plants only take what they need. I estimated I'm using about 30% less water overall compared to my old top-watering method. This matters both environmentally and financially if you're paying for city water.
Vacation-proofing your garden becomes possible with self-watering containers. I can now leave for a week or more without worrying about my plants dying, as long as I fill the reservoirs before I go. This freedom has been amazing - I used to stress about leaving town during growing season, but now I just top up the reservoirs and relax.
Better plant growth and yields have been noticeable across all my crops. The consistent moisture means plants aren't stressed, which shows up in healthier foliage, more flowers, and increased fruit production. My pepper plants in self-watering containers produce probably 40% more peppers than the same varieties in regular pots. I didn't expect such a dramatic difference!
Root development is superior in self-watering containers. The roots naturally grow toward the moisture source, creating a robust root system that reaches throughout the container. I've compared root systems when repotting plants, and the self-watered ones consistently have more fibrous, well-developed roots.
Nutrient delivery is more consistent because you can add liquid fertilizer to the reservoir. The nutrients get wicked up with the water, providing steady feeding. I add diluted fertilizer to my reservoirs every 2-3 weeks, and my plants stay consistently fed without the ups and downs of periodic top watering with fertilizer.
Basic Materials Needed for DIY Self-Watering Containers
The beauty of DIY self-watering containers is you can build them from inexpensive, readily available materials. Here's what you'll actually need for the most common designs!
Two containers of different sizes are the foundation for most DIY self-watering setups. The outer container holds everything and has no drainage holes. The inner container holds the soil and plant, and has lots of holes for drainage and water wicking. I typically use 5-gallon buckets, storage totes, or large nursery pots. The key is finding containers where one nests inside the other with a few inches of clearance.
Storage totes from any discount store work fantastic for larger self-watering containers. I buy the 18-gallon size for about $8-10 each and cut them to create the two-part system. These work great for tomatoes, peppers, and other large vegetables. The rectangular shape also maximizes balcony or patio space better than round buckets.
Food-grade buckets are perfect for medium-sized self-watering containers. I get 5-gallon frosting buckets from a local bakery for free, and they're ideal for this project. You need two buckets per container - one becomes the outer reservoir, one gets cut down to become the inner planting basket.
PVC pipe for the fill tube is available at any hardware store. I use 1-inch or 1.5-inch diameter PVC, cut to a length that reaches from the reservoir bottom to a few inches above the soil surface. A 2-foot section costs maybe $2 and can be cut to size with a regular hand saw.
A drill with various bit sizes is essential for making holes. You'll need small bits (1/4 inch) for drainage holes, a larger bit (1.5-2 inches) for the fill tube hole, and possibly a hole saw for larger openings. I already owned a drill, but if you need to buy one, a basic corded drill costs $30-40 and will last forever for projects like this.
Landscape fabric or weed barrier fabric works as a separator between the reservoir and soil in some designs. This keeps soil from falling into the reservoir while allowing water to wick through. A roll costs $10-15 and provides enough material for dozens of containers. I've also used old t-shirts or burlap as free alternatives that work fine.
Small plastic cups or net pots serve as wicking baskets in some designs. These sit in the reservoir and fill with soil, creating the connection between water and the main soil mass above. Net pots designed for hydroponics work perfectly and cost about $1 each, or you can use recycled yogurt cups with holes drilled in them.
Potting mix suitable for containers is necessary - don't use garden soil! The soil needs to be able to wick water effectively while still draining excess moisture. I use standard potting mix, though some people prefer adding extra perlite or vermiculite to improve wicking. A large bag costs $15-25 and fills multiple containers.
Optional materials include: permanent markers for labeling fill lines, a hacksaw or reciprocating saw for cutting thick plastic, a file or sandpaper for smoothing rough cut edges, and measuring tape for precise measurements. None of these are essential but they make the project easier.
The Bucket-in-Bucket Method (Easiest for Beginners)
This is the simplest self-watering container design and the one I recommend for first-timers. It uses two 5-gallon buckets nested together to create a basic but effective system. I've built probably 15 of these over the years!
Start with two 5-gallon buckets. One will be your outer reservoir bucket (this one should have no holes). The other will become your inner planting bucket (you'll drill lots of holes in this one). I use food-grade frosting buckets from bakeries, but any 5-gallon buckets work fine as long as one fits inside the other with room to spare.
Drill drainage holes all over the bottom and lower sides of the inner bucket. I use a 1/4-inch bit and drill probably 30-40 holes total, covering the entire bottom and up the sides about 2-3 inches. These holes allow water to wick up from the reservoir below and also let excess water drain if the soil gets too wet. Don't be shy with the holes - more is better!
Create spacers to keep the inner bucket elevated above the bottom of the outer bucket. You need a 2-3 inch water reservoir space below the planting bucket. I cut sections of PVC pipe about 3 inches long and use 3-4 of these as spacers. Alternatively, you can drill several 2-inch holes in the bottom of the inner bucket and invert small plastic cups to serve as feet. The method doesn't matter as long as you create that air gap!
Drill a fill tube hole in the side of the inner bucket, near the top rim. Use a 1.5-inch bit or hole saw to create an opening large enough for your PVC fill tube. The tube should extend from the bottom of the reservoir up through this hole to a few inches above the soil surface. I usually angle the drill slightly so the tube sits at a slight angle rather than perfectly vertical.
Insert the PVC fill tube through the hole and down to the reservoir bottom. The top of the tube should stick up above the soil level by 2-3 inches so you can easily pour water into it. Some people glue the tube in place, but I usually just friction-fit it - works fine and makes disassembly easier if needed.
Drill an overflow hole in the outer bucket about 2-3 inches from the bottom. This hole prevents the reservoir from overfilling. Use a 1/2-inch bit for this. The overflow hole should be positioned so that when water drains from it, you have your desired reservoir depth remaining below. I mark the overflow hole location on the outside of the bucket before drilling to make sure it's at the right height.
Place the inner bucket inside the outer bucket, resting on your spacers. Make sure it's stable and level. The buckets should nest comfortably with the inner one elevated to create your reservoir space below.
Fill the inner bucket with quality potting mix. Fill it all the way to within an inch of the rim. Water thoroughly from the top the first time to ensure the soil is evenly moist and to help settle it. This initial top watering establishes the wicking connection between the soil and reservoir.
Plant your vegetable, herb, or flower in the potting mix as you normally would. I typically plant one tomato or pepper plant per bucket, or 3-4 smaller plants like lettuce or herbs.
Fill the reservoir by pouring water down the fill tube. Fill until water starts coming out the overflow hole - that tells you the reservoir is full. After the initial setup, you'll only add water to the reservoir, not water from the top.
This whole process takes maybe 30-45 minutes per bucket once you've done a few. The first one takes longer as you figure out the process, but they get faster! I usually batch-build several at once, drilling all the holes in one session, then assembling all the containers together.
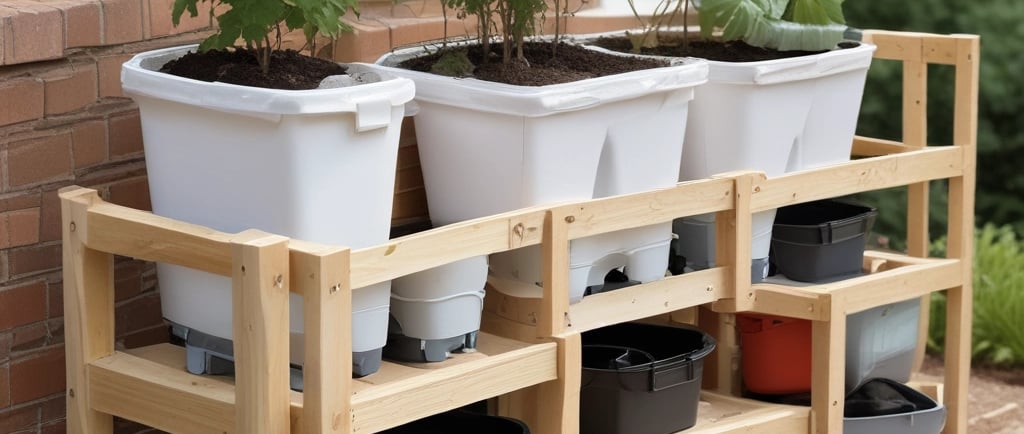
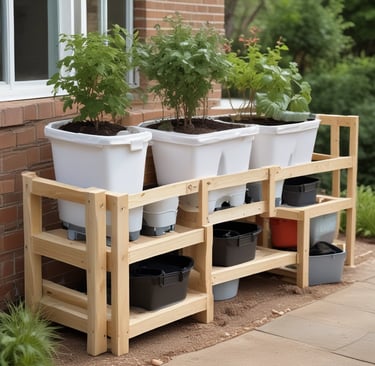
The Storage Tote Method (Best for Large Plants)
For bigger plants like tomatoes, peppers, or even small shrubs, the storage tote method creates a larger self-watering container with more soil volume and a bigger water reservoir. I use this design for all my large vegetables now!
Get one large storage tote (18-27 gallon size works great). This will be your outer reservoir container, so it should be fairly deep - at least 14-16 inches tall. I buy these on sale for $8-12 each. Make sure it has a solid bottom with no holes.
Get a second, smaller plastic tote or use a milk crate or similar container that fits inside the first tote with a few inches of clearance on all sides. This becomes your planting platform. Alternatively, you can cut down a second large tote to create a shallow platform. I've done it both ways - cutting down a matching tote looks cleaner, but using a different container works fine too.
Drill tons of holes in the bottom and lower sides of your inner platform. I drill 1/4-inch holes spaced about 1 inch apart all over the bottom and up the sides 2-3 inches. With a large tote, you'll have 50-70 holes easily. This extensive perforation allows excellent water wicking and drainage.
Create a wicking basket using a small plastic cup or net pot. Drill lots of holes in a plastic yogurt cup or use a 3-inch net pot. Cut a hole in the bottom center of your inner platform large enough for this cup to fit through partway. The cup should hang down into the reservoir space below while also extending up into the soil above. This creates a direct soil connection from the reservoir up into the root zone.
Install platform supports to elevate the inner container 3-4 inches above the outer tote bottom. I use cut sections of PVC pipe, small terracotta pots turned upside down, or even bricks. You need 4-6 support points to keep the platform stable and level. The larger reservoir depth means plants can go longer between refills.
Drill your fill tube hole in the side of the outer tote, up near the rim. Use a 1.5-2 inch hole saw or large drill bit. The fill tube should reach from the tote bottom up through this hole to several inches above the final soil level. I use 2-foot sections of PVC for these larger containers.
Drill the overflow hole in the side of the outer tote, about 3-4 inches from the bottom. This should be below the inner platform but above your desired water level. When water drains from this hole, you should have 2-3 inches of water remaining in the reservoir below.
Line the inner platform with landscape fabric if desired. This prevents soil from falling through the holes into the reservoir while still allowing water to wick through. I cut a piece of fabric to fit the platform bottom and sides, then secure it with duct tape or zip ties. Honestly though, I skip this step about half the time and just make sure my first layer of soil is damp enough to stay in place.
Assemble the system by placing supports in the outer tote, setting the inner platform on top of the supports, and inserting the fill tube. Fill your wicking cup with soil first, making sure it's in good contact with the soil that will go above it.
Fill the container with potting mix up to about 2 inches from the top. With large totes, this takes a LOT of potting mix - budget for 2-3 large bags. Water thoroughly from the top initially to settle the soil and establish the wicking connection.
Plant your crop and fill the reservoir through the fill tube. These large containers can hold several gallons of water in the reservoir, which means they can go 5-7 days or more between refills even in summer heat!
I use this storage tote method for my tomatoes, peppers, eggplants, and larger herbs like rosemary. The extra soil volume and water capacity make a huge difference in plant performance!
The Cut-Down Bucket Method (Most Affordable)
This method uses just one 5-gallon bucket cut in half, making it the cheapest self-watering design possible. I learned this technique from a YouTube video and it's brilliant for its simplicity!
Start with a single 5-gallon bucket. Mark a line around the bucket about 10-12 inches from the bottom. This is where you'll cut it to create two pieces - the bottom becomes your reservoir, the top becomes your planting basket.
Cut the bucket in half using a hacksaw, reciprocating saw, or even a sharp utility knife. Take your time with this cut to keep it relatively straight. The cut doesn't need to be perfect, but a ragged edge can be sharp so I usually file or sand the cut edge smooth.
Drill drainage holes in the bottom section of your cut bucket (the piece that will become your planting basket). Cover the bottom with 1/4-inch holes spaced about an inch apart - probably 20-30 holes total. This allows water to wick up into the soil.
Create wicking cups using 2-3 small plastic cups (yogurt cups work perfect). Drill lots of holes in these cups - I do maybe 15-20 small holes per cup all over the bottom and sides. These will sit in the reservoir and extend up into the soil to create the wicking connection.
Cut holes in the bottom of your planting basket section to accommodate the wicking cups. Space these holes evenly across the bottom - I use 2-3 cups per 5-gallon bucket. The cups should fit through the holes snugly, hanging down into the reservoir space while also extending up into the soil area.
Drill a fill tube hole near the top rim of the bottom reservoir section. Use a 1-inch bit and make the hole large enough for PVC pipe to fit through. The fill tube will extend from the bottom of the reservoir up through this hole.
Drill an overflow hole in the side of the reservoir section, about 2-3 inches from the very bottom. This prevents overfilling and should be positioned to maintain your desired reservoir depth.
Assemble by placing the perforated wicking cups through the holes in the planting basket section. Fill these cups with moist potting mix and pack it in firmly - these are your wicking columns that connect the reservoir to the soil mass above.
Insert the top section into the bottom section, resting the planting basket edges on the rim of the reservoir section. There should be a 3-4 inch gap between the bottom of the wicking cups and the reservoir bottom - this is your water storage space.
Insert your PVC fill tube through the hole and down to the reservoir bottom. Fill the planting section with potting mix, watering from the top initially to settle everything and establish good soil contact with your wicking cups.
Plant your crop and fill the reservoir through the fill tube until water comes out the overflow hole. You're done!
This method is my go-to for herbs, lettuce, and smaller vegetables. The materials cost is literally just one bucket (free if you can source used ones) and a short section of PVC pipe (under $2). You can build one in 20-30 minutes!
Advanced Design: The Wicking Bed System
For serious container gardeners with larger spaces, a wicking bed is basically a giant self-watering container. I built one on my patio using a large wooden planter box, and it's been amazing for growing mixed vegetables!
Start with a large container - a wooden planter box, a large storage tote, or even a kiddie pool. The container should be at least 12 inches deep total, though 16-18 inches is better. Size depends on your space, but I've seen wicking beds ranging from 2x4 feet to 4x8 feet or larger.
Line the container with thick pond liner or heavy-duty plastic sheeting if it's not already waterproof. This is essential - the container must hold water without leaking. I use 45 mil pond liner and secure it with duct tape and staples. Make sure the liner comes up the sides to well above your planned water level.
Create a water distribution layer at the bottom using something that creates air spaces while allowing water to spread evenly. Agricultural drainage pipe (the perforated kind) works perfectly. I lay these pipes across the bottom of the container, spacing them about 12 inches apart. Another option is using upside-down plastic nursery pots or even gravel, though gravel adds significant weight.
Cover the water distribution layer with landscape fabric. This prevents soil from migrating down into the reservoir space while allowing water to wick upward. I cut fabric to fit the entire bottom surface and overlap up the sides a bit, securing it with duct tape.
Install a fill tube in one corner. I use 2-inch PVC pipe that extends from the reservoir bottom up to several inches above the final soil level. Drill or cut a hole in the container side near the top for the pipe to exit, making it easy to add water.
Install an overflow pipe at your desired water level height. This is typically 3-4 inches from the container bottom. Use PVC pipe and drill it through the container side at the appropriate height. When the water level reaches this overflow, excess drains out, preventing waterlogging.
Add your potting mix above the landscape fabric. You want at least 8-10 inches of soil depth above the reservoir for most vegetables. Fill the container, water thoroughly from the top to settle everything, and establish the wicking connection.
The beauty of wicking beds is you can grow multiple plants in one large self-watering system. My 4x4 foot wicking bed currently has four tomato plants, six pepper plants, and a bunch of basil all growing together. The large reservoir holds probably 15-20 gallons of water, which means I fill it maybe once a week even in summer.
The initial build takes longer than a simple bucket system - I spent about 4 hours building my first wicking bed including assembly and filling. But the ongoing maintenance is minimal, and the productivity is incredible!
Choosing the Right Potting Mix for Self-Watering Containers
The potting mix you use in self-watering containers is more important than in regular containers. It needs to wick water effectively while also draining excess moisture. Not all potting mixes do this equally well!
Standard potting mix works fine for most self-watering containers. I use brands like Espoma, Miracle-Gro, or whatever quality mix is on sale. The key is making sure it contains ingredients that retain moisture (like peat moss or coir) mixed with ingredients that provide drainage and aeration (like perlite or vermiculite). Avoid mixes that are super heavy or super light - you want something in the middle.
Avoid potting mixes with a lot of wood chips or bark. These ingredients float and can disrupt your wicking action. They're fine in traditional containers but problematic in self-watering systems. I made this mistake once using a "raised bed mix" that was full of composted bark, and the wicking performance was terrible.
Some people modify standard potting mix for better wicking performance. The most common addition is extra vermiculite (10-20% by volume) which holds water well while staying fluffy. I've experimented with this and honestly haven't noticed enough difference to justify the extra cost and effort. Standard quality potting mix works fine.
Soil-less mixes work great in self-watering containers. These are typically peat-based or coir-based without any actual soil. They're light, they wick well, and they drain well - perfect for self-watering systems. The downside is they have almost no inherent nutrients, so you need to fertilize more regularly than with mixes containing compost.
Avoid using garden soil or topsoil in self-watering containers! This is even more important than in regular containers because poor wicking performance ruins the whole system. Garden soil is too heavy, compacts too easily, and doesn't wick moisture effectively. I've seen people try this and the wicking just doesn't work - the soil below the wicking cups stays dry while water sits in the reservoir unused.
Initial moisture matters when setting up self-watering containers. The potting mix should be pre-moistened before filling your container. Dry potting mix can be hydrophobic (repels water), making it hard to establish the wicking connection initially. I dump potting mix in a large tub, add water, and mix thoroughly until it's evenly moist throughout before filling containers.
Water thoroughly from the top after initially filling the container and planting. This first top-watering ensures the soil is evenly moist and helps establish good contact between the soil and your wicking mechanism. After this initial watering, you'll only add water to the reservoir, but that first top watering is important!
Best Plants for Self-Watering Containers
Most plants do great in self-watering containers, but some are particularly well-suited to this growing method. I've grown dozens of different crops in self-watering systems, and here's what works best!
Tomatoes absolutely love self-watering containers. The consistent moisture prevents blossom end rot, supports steady growth, and produces bigger yields than I get from traditionally watered tomatoes. I grow all my container tomatoes in self-watering systems now. Both determinate and indeterminate varieties work great - just match your container size to the variety.
Peppers thrive in self-watering containers for the same reasons as tomatoes. They appreciate consistent moisture without waterlogging, and the steady water supply supports continuous fruit production. My pepper plants in self-watering containers produce probably 40% more peppers than the same varieties in regular pots.
Lettuce and salad greens perform brilliantly because they hate drying out. The consistent moisture keeps leaves tender and prevents premature bolting. I can harvest lettuce for 2-3 months from self-watering containers versus maybe 4-6 weeks from regular pots before they bolt from water stress.
Herbs with high water needs like basil, mint, and parsley love self-watering systems. These herbs typically need daily watering in regular containers during summer, but in self-watering setups they're happy for days without attention. My basil plants in self-watering containers get absolutely huge - like 2 feet tall and wide!
Cucumbers work well in large self-watering containers. They're heavy drinkers that wilt dramatically if they dry out, so the consistent moisture is perfect for them. I use the large storage tote method for cucumbers and train them up a trellis. One plant produces dozens of cucumbers all summer!
Leafy greens like kale, chard, and spinach appreciate consistent moisture and perform excellently. These crops can get bitter and tough when stressed by inconsistent watering, but self-watering systems keep them tender and productive for extended periods.
Flowers, especially heavy bloomers like petunias, impatiens, and geraniums, do fantastic in self-watering containers. The consistent moisture supports continuous flowering without the stress of drying out between waterings. My self-watered flower containers bloom more profusely and for longer than my traditional ones.
Plants to avoid in self-watering containers are those that prefer drier conditions. Mediterranean herbs like rosemary, lavender, sage, and thyme actually prefer to dry out between waterings and can develop root rot in the consistently moist conditions of self-watering systems. I grow these in traditional containers instead. Succulents and cacti are obviously terrible choices for self-watering containers!
Most vegetables work great in self-watering containers. Beans, peas, squash, eggplant, and even root vegetables like carrots and radishes all perform well. The consistent moisture supports steady growth and better yields across the board.
Maintaining and Troubleshooting Self-Watering Containers
Self-watering containers are low-maintenance, but they do need some attention. Here's what I've learned about keeping them running smoothly and fixing problems when they arise!
Check reservoir levels regularly, especially during hot weather. I check mine every 2-3 days in summer by looking down the fill tube. You can see the water level, or you can stick a wooden dowel down the tube to measure water depth. When the reservoir gets low (down to about an inch of water), I refill it.
Refilling is simple - just pour water down the fill tube until it starts coming out the overflow hole. That tells you the reservoir is full. I use a watering can with a long spout that fits in the fill tube, or sometimes just a funnel and pitcher. In summer, large containers might need 2-3 gallons to refill the reservoir completely.
Clean fill tubes occasionally if they get clogged with algae or debris. I run a bottle brush or pipe cleaner down mine once or twice per season to keep water flowing freely. If the fill tube gets completely blocked, water can't reach the reservoir and the system stops working.
Fertilize through the reservoir for best results. I add diluted liquid fertilizer to the reservoir water every 2-3 weeks. The nutrients wick up with the water, providing steady feeding. Use about half the recommended fertilizer concentration - the constant availability means plants need less frequent, less concentrated feeding.
Watch for algae growth in the reservoir, especially if your containers are translucent or clear. Algae won't hurt plants but it can clog wicking systems and looks gross. I prevent this by using opaque containers or wrapping clear containers with duct tape or fabric to block light from the reservoir.
Salt buildup can occur in self-watering containers over time. Minerals from water and fertilizer accumulate in the soil, sometimes forming white crusty deposits on the soil surface. To flush salts, occasionally water thoroughly from the top until water runs through the overflow. This washes accumulated salts out of the system.
Poor wicking performance means water sits in the reservoir but the soil stays dry. This usually indicates a break in the wicking connection. The soil might have dried out completely and become hydrophobic, or there might be an air gap between the wicking cups and the main soil mass. Fix this by watering thoroughly from the top to re-establish the wicking connection.
Root rot can develop if the reservoir level is too high or if the air gap isn't adequate. Plants sitting in waterlogged soil will develop brown, mushy roots and wilted foliage despite moist soil. Fix this by drilling the overflow hole higher to reduce reservoir depth, or by ensuring your platform is elevated enough to create a proper air gap.
Mosquitoes can breed in the reservoir if you live in a mosquito-prone area. The standing water is a perfect breeding ground! I prevent this by adding mosquito dunks to my reservoirs - these contain bacteria that kill mosquito larvae but are harmless to plants, people, and pets. One dunk lasts about 30 days.
End-of-season maintenance involves emptying reservoirs before winter if you live in a cold climate. Water left in reservoirs can freeze and crack containers. I dump out remaining water, let containers dry out a bit, and store them empty or bring them inside for winter.
Soil replacement should happen every 2-3 seasons. The potting mix breaks down over time and loses its wicking properties. I empty containers, wash them out, and refill with fresh potting mix every few years to maintain optimal performance.
Cost Analysis: DIY vs Store-Bought Self-Watering Containers
Let's talk money, because that's what initially pushed me toward DIY self-watering containers rather than buying commercial versions. The price difference is pretty significant!
Commercial self-watering planters range from $30-40 for small versions to $100+ for large ones. Brands like Earthbox, Grow Box, and various store brands all make quality self-watering containers. They work great and look nice, but the cost adds up fast when you're outfitting an entire container garden.
DIY bucket-in-bucket method costs maybe $5-12 per container depending on whether you buy buckets or get them free. If you can source free food-grade buckets from bakeries or restaurants, your only costs are the PVC fill tube ($2-3) and possibly some small plastic cups for wicking. Even if you buy new buckets at $5 each, you're looking at around $12 total per container.
DIY storage tote method costs $15-25 per large container. The storage totes cost $8-12 each, you need PVC pipe ($2-3), and possibly some support materials. This creates a container roughly equivalent to commercial options that sell for $60-100. The savings are substantial!
DIY cut-down bucket method is the absolute cheapest at $2-5 per container. If you can get free buckets, you only need to buy PVC pipe. Even if you buy new buckets, the total cost is under $10 per container.
Potting mix is the same cost whether you're using DIY or commercial self-watering containers, so that doesn't factor into the comparison. You need quality potting mix either way.
Durability varies but DIY containers generally last 3-5+ years if built well and maintained properly. I have DIY self-watering buckets that are going on year six and still working perfectly. The UV from sun exposure eventually degrades plastic, but that timeline is similar for DIY and commercial containers.
Aesthetics favor commercial containers if appearance matters. Store-bought self-watering planters usually look more finished and decorative. My DIY containers are functional but not particularly attractive! If they're going on a visible front porch or patio where looks matter, commercial containers might be worth the extra cost.
Time investment for DIY is maybe 30-60 minutes per container once you've done a few and have the process down. Your first container might take an hour or more as you figure things out, but they get faster. If your time is very valuable, buying ready-made containers might make sense despite the higher cost.
My setup uses mostly DIY containers because I have 20+ containers and the cost savings are huge. I've invested maybe $200-250 total in DIY self-watering containers versus probably $800-1000+ for equivalent commercial versions. For me, the DIY route was absolutely worth it!
For beginners, I recommend starting with one or two DIY containers to test the concept before investing in commercial versions or building many DIY ones. See if you like the self-watering system, figure out the maintenance routine, and decide whether DIY or store-bought makes more sense for your situation.
Common Mistakes to Avoid When Building DIY Self-Watering Containers
I've made pretty much every possible mistake with DIY self-watering containers over the years. Let me help you avoid these common pitfalls that can sabotage your builds!
Mistake #1: Forgetting the overflow hole. This was literally my first mistake ever. I built a beautiful self-watering container, filled the reservoir, felt proud... then we got a heavy rainstorm that completely filled the reservoir beyond capacity, waterlogged the soil, and caused root rot. Always include an overflow hole positioned at your maximum desired water level!
Mistake #2: Insufficient air gap between water and soil. I built a container where the wicking cups extended all the way to the reservoir bottom, leaving almost no air space. The lower roots sat in constantly soggy conditions and developed root problems. You need at least 2-3 inches of air space between the water surface and the bottom of your main soil mass.
Mistake #3: Not enough drainage holes in the inner container. My first bucket-in-bucket attempt had maybe 10 drainage holes, and the wicking performance was mediocre. When I rebuilt it with 40+ holes, the wicking improved dramatically. Don't be stingy with drainage holes - you want water to move freely through the container bottom and lower sides.
Mistake #4: Using the wrong type of container material. I tried building a self-watering container using wood that wasn't properly sealed. It wicked water through the wood sides, creating a soggy mess and eventually rotting the wood. If using wood, it must be sealed/waterproofed, or use a pond liner. Plastic containers are much more foolproof!
Mistake #5: Wicking cups not making good soil contact. I built containers where the wicking cups were too small or positioned poorly, creating air gaps between the wicking soil and the main soil mass. Water couldn't wick properly. Make sure your wicking mechanism has solid contact with the surrounding soil!
Mistake #6: Fill tube too short or positioned poorly. I made fill tubes that barely extended above the soil surface, which meant they got clogged with soil or buried under mulch. Make fill tubes tall enough to stick up several inches above the final soil level for easy access. Position them where you can easily pour water into them.
Mistake #7: Using containers that are too shallow. I tried converting a shallow window box into a self-watering container, but there wasn't enough depth for both a reservoir and adequate soil depth. Self-watering containers need to be at least 12 inches deep total - ideally 14-16+ inches. Less than that and you're compromising either reservoir size or soil depth.
Mistake #8: Not pre-moistening the potting mix. I filled containers with bone-dry potting mix and expected the wicking system to moisten it. Dry potting mix can actually repel water, and the wicking doesn't work until the soil is initially moistened. Always pre-moisten your potting mix and water from the top initially to establish the wicking connection!
Mistake #9: Sharp edges from cutting plastic. I cut containers and didn't smooth the edges, resulting in sharp plastic edges that cut my hands while handling containers. Always file or sand cut edges smooth, or cover them with duct tape for safety.
Mistake #10: Building containers that are too heavy to move. I built a massive wicking bed and filled it completely before realizing it weighed probably 200+ pounds and couldn't be moved once assembled. Build large containers in their final location, or use lighter materials if mobility might be needed!
Conclusion
Self-watering containers have honestly revolutionized my container gardening experience. The time savings alone would make them worthwhile, but the improved plant health, better yields, and peace of mind about watering are incredible bonuses. I genuinely don't want to go back to traditional hand-watered containers for most crops!
Building DIY self-watering containers is way easier than it looks. The basic concept is simple - create a water reservoir, establish a wicking connection, and let capillary action do the work. Whether you choose the simple bucket-in-bucket method, the larger storage tote design, or the economical cut-down bucket approach, you'll have a functioning self-watering system in under an hour!
The investment in materials is minimal - typically $5-25 per container depending on size and whether you can source free materials. Compare that to $30-100+ for commercial self-watering planters, and the DIY approach makes a lot of sense financially, especially if you're building multiple containers.
Start with one or two DIY self-watering containers this season. Choose an easy method like the bucket-in-bucket design, follow the steps carefully, and see how you like it. I'm betting you'll be hooked after seeing the difference in plant performance and maintenance requirements. Then you can gradually convert more of your container garden to self-watering systems.
Remember that self-watering containers aren't completely hands-off - you still need to check reservoir levels, refill every few days, and fertilize regularly. But the reduced watering frequency and improved plant consistency make them so much easier than traditional containers!
What plants are you planning to grow in self-watering containers? Have you tried building DIY self-watering systems before? Drop a comment below and share your experiences or ask questions! I love helping people get started with self-watering containers because they've made such a positive difference in my own gardening. Let's build something amazing together in 2026!