Container Gardening for Beginners: Complete Guide to Starting Your Patio Garden in 2026
Learn container gardening for beginners with this complete guide. Discover essential tips, best plants, container types, soil requirements, and expert techniques to start a thriving patio garden today.
GARDENING
"You don't have a yard, so you can't garden." That's what I told myself for three years while living in a cramped apartment with nothing but a 6x8 foot concrete balcony. Man, was I wrong about that!
The truth is, over 77% of urban households now grow at least some of their own food or flowers in containers because traditional garden space just isn't available. And honestly? Container gardening might actually be easier than traditional gardening in a lot of ways. I know that sounds crazy, but stick with me here.
I started my container gardening journey with exactly three pots, zero experience, and a bunch of enthusiasm. I killed probably half my plants that first season through various rookie mistakes - wrong soil, terrible watering habits, containers without drainage holes (yikes!). But I learned from every dead plant, and by year two I was growing enough vegetables and herbs on my tiny balcony to actually reduce my grocery bills!
The beautiful thing about container gardening is you can start literally anywhere - a balcony, patio, front steps, driveway, rooftop, or even just a sunny windowsill. You don't need perfect soil or even any ground at all. Just containers, potting mix, plants, and some basic knowledge about what actually works.
In this guide, I'm gonna walk you through absolutely everything you need to know to start your own successful container garden. We'll cover choosing the right containers, selecting beginner-friendly plants, understanding soil and watering, and avoiding all the mistakes I made so you don't have to repeat them. Let's grow something amazing together!
Why Container Gardening is Perfect for Beginners
Container gardening has some serious advantages over traditional in-ground gardening that make it ideal when you're just starting out. I didn't realize this initially - I actually thought containers would be limiting and difficult. Turns out I had it completely backwards!
The soil situation alone makes container gardening way more beginner-friendly. With in-ground gardens, you're stuck with whatever soil exists in your yard - which might be heavy clay, pure sand, compacted hardpan, or full of rocks and construction debris. I watched my dad struggle for years trying to amend terrible clay soil before he finally gave up. With containers, you just buy quality potting mix and you're immediately starting with perfect growing conditions. No digging, no soil testing, no amendments needed.
Pest and disease control is dramatically easier with containers. Slugs and snails have a much harder time reaching plants that are elevated off the ground. Soil-borne diseases aren't an issue because you're using sterile potting mix rather than ground soil that might harbor pathogens. I used to lose entire crops to various soil pests and diseases in my parents' garden, but I rarely deal with those issues in containers.
Mobility is a game-changer that people don't appreciate until they experience it. You can move containers to follow the sun, protect plants from storms or frost, bring tender plants indoors for winter, or rearrange your garden design whenever you want. I've moved apartments three times in the past five years, and each time I just loaded up my containers and took my entire garden with me. Try doing that with an in-ground garden!
Accessibility makes container gardening possible for people who can't do traditional gardening. Raised containers eliminate bending and kneeling, which is huge for people with mobility issues, back problems, or age-related limitations. My grandmother took up container gardening at 78 because she couldn't kneel down anymore for ground-level gardening. She's been growing gorgeous flowers and herbs in elevated planters for years now.
The learning curve is more forgiving with containers too. When you screw something up - wrong fertilizer, bad watering, poor plant choice - it affects that one container, not your entire garden. I learned so much by experimenting with different techniques across multiple containers. Some approaches worked great, others failed miserably, but the failures were small-scale and easy to recover from.
Essential Container Gardening Supplies to Get Started
Let me break down exactly what you need to start container gardening. The good news? The initial investment is way lower than traditional gardening, and you can start super small then expand as you gain confidence!
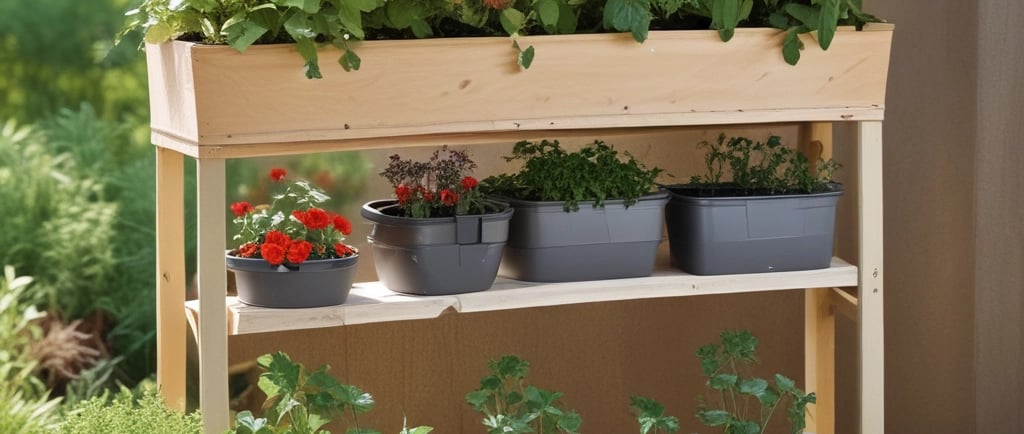
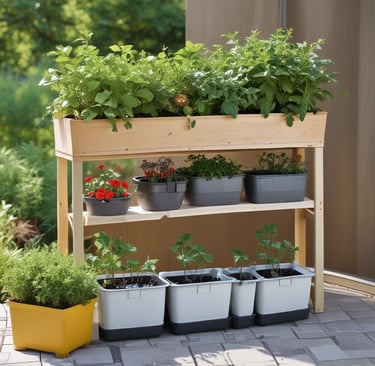
Containers are obviously the first requirement! For beginners, I recommend starting with 3-5 containers in various sizes. Get at least one large container (10+ gallons), a couple medium containers (5-7 gallons), and maybe some small pots for herbs. This variety lets you try different plants and figure out what size containers you prefer working with. I started with five random pots I had laying around, which worked fine for learning the basics.
Drainage is absolutely non-negotiable. Every single container must have drainage holes in the bottom. This was my very first mistake - I used pretty decorative pots without drainage, and the plants basically drowned. If you fall in love with a container that doesn't have holes, drill some yourself or use it as a decorative outer pot with a properly draining inner pot nestled inside.
Quality potting mix is worth every penny you spend on it. Do NOT use garden soil or topsoil in containers! I made this mistake early on, filling pots with dirt from my parents' yard. The soil compacted into cement-like hardness, drainage was terrible, and plants struggled constantly. Actual potting mix or container mix stays fluffy, drains well while retaining moisture, and gives roots room to breathe. Brands like Espoma, FoxFarm, or Miracle-Gro Performance Organics all work great.
Basic gardening tools for containers are minimal. You need a small trowel or scoop for filling pots, a watering can or hose with a gentle spray nozzle, and maybe some pruners for trimming plants. That's genuinely it for the essentials! I gardened for two full seasons with just those three tools. You can add fancy stuff later if you want, but you definitely don't need much to start.
Fertilizer of some kind will be necessary since container plants can't access nutrients from ground soil. I recommend starting with a general-purpose liquid fertilizer like fish emulsion or an all-purpose water-soluble formula. You can get more specialized later, but basic fertilizer will handle most beginner needs. I use fish emulsion for everything, despite it smelling pretty funky for a day after application.
Optional but helpful items include saucers to catch drainage water (especially important for balconies and patios where you can't have water running everywhere), plant labels so you remember what you planted, a soil scoop for easier pot filling, and maybe some decorative mulch to make containers look finished. None of these are essential, but they make container gardening more convenient and enjoyable.
Choosing the Right Containers for Your Garden
Not all containers are created equal, and choosing appropriate ones makes a huge difference in how well your plants perform. I've tried basically every type of container over the years, so let me save you some trial and error!
Size matters way more than beginners typically realize. The most common mistake I see is people using containers that are too small for what they're trying to grow. Most vegetables and larger flowering plants need at least 5-gallon containers minimum, and many prefer 7-10 gallons or more. Those cute little 6-inch pots? Save those for small herbs and succulents. I tried growing tomatoes in 2-gallon decorative pots my first year, and they were absolutely pathetic.
Here's a general size guide I follow: Small herbs and lettuce - 1-3 gallons; larger herbs, greens, and compact vegetables - 5 gallons; tomatoes, peppers, and most vegetables - 7-10 gallons; large vegetables like zucchini - 10-15 gallons; small trees and shrubs - 15-25 gallons. When in doubt, go bigger! I've never regretted using a too-large container, but I've definitely regretted using too-small ones.
Material choice affects everything from watering frequency to how long the container lasts. Plastic pots are affordable, lightweight, and retain moisture well. They're perfect for beginners! I still use tons of plastic nursery pots because they're cheap, durable, and they work. The only downside is darker colors can overheat in direct sun, stressing plant roots.
Fabric grow bags have become my favorite container type over the years. They promote incredible root health through air pruning, they're super affordable when bought in bulk, and they fold flat for easy storage when not in use. The main trade-off is they dry out faster than solid containers, so you'll water more frequently. For me, the improved plant performance is worth the extra watering.
Terra cotta and ceramic pots are beautiful but have some practical drawbacks. They're heavy, they break easily when dropped or frozen, and they dry out crazy fast because they're porous. I use them for ornamental plants on my front porch where looks matter most, but I wouldn't choose them for food production or for plants that need consistent moisture.
Wooden containers look fantastic and insulate roots well from temperature extremes. Cedar naturally resists rot and can last 5-7 years or more. The main concerns are ensuring the wood is untreated (no chemicals leaching into your soil), drilling adequate drainage holes, and accepting that they'll eventually deteriorate. I have several cedar planters for my patio display areas, and they're worth the investment for how nice they look.
Found and recycled containers can work great! I've used food-grade buckets, storage totes, old laundry baskets (lined with landscape fabric), broken wheeled coolers, wooden crates, and all sorts of creative options. If it holds soil and you can add drainage holes, it can be a planter! This is a great way to save money when you're starting out.
Understanding Potting Mix vs Regular Soil
This is such a critical topic that beginners often get wrong, and it absolutely tanked my first container garden before I understood the difference. Let me save you from that painful learning experience!
Regular garden soil or topsoil is completely wrong for containers. I know it seems logical to use actual soil in your pots, and it's certainly cheaper than buying potting mix. But soil is far too dense and heavy for container use. It compacts over time, squeezing out air pockets that roots need to breathe. It drains poorly, leading to waterlogged conditions and root rot. And it's often full of weed seeds, diseases, and pests.
I filled my very first containers with dirt from my parents' yard mixed with some bagged topsoil. The "soil" turned into something resembling concrete after a few weeks. Plants could barely push roots through it, water pooled on the surface instead of draining, and everything looked sad and stunted. I couldn't figure out what was wrong until a gardening neighbor took one look and immediately identified my soil problem.
Potting mix is specially formulated for containers with completely different ingredients than soil. Most quality potting mixes contain peat moss or coco coir (for moisture retention), perlite or vermiculite (for drainage and aeration), and often some compost or fertilizer (for nutrition). Some mixes include moisture-retaining crystals or mycorrhizae fungi. The result is a light, fluffy medium that drains excess water while retaining enough moisture for plant roots.
The texture difference is immediately obvious when you touch both materials. Garden soil feels dense and heavy, clumping into solid chunks when squeezed. Quality potting mix feels light and airy, falling apart easily when you release your grip. This fluffiness is essential for healthy root development in the confined space of containers.
Sterility is another key advantage of commercial potting mixes. They're typically heat-treated or otherwise sterilized during manufacturing, which kills weed seeds, disease pathogens, and pest eggs. When I switched from garden soil to real potting mix, I went from constantly pulling weeds out of my containers to basically never seeing weeds. That alone was worth the cost difference!
Cost is the main objection people have to using potting mix. It's definitely more expensive than dirt, no question. But the performance difference is night and day. I watched my containers go from struggling survivors to thriving producers simply by switching to proper potting mix. The investment pays for itself in healthier plants and better harvests. Buy it in bulk if you can - those big compressed bales of potting mix are way cheaper per cubic foot than small bags.
Best Plants for Beginning Container Gardeners
Choosing the right plants for your first container garden is crucial for building confidence and experiencing success. Some plants are naturally forgiving and easy to grow in pots, while others are finicky and frustrating for beginners. Let me steer you toward the winners!
Herbs are hands-down the best starting point for container gardening beginners. They're almost impossible to kill, they grow quickly, they're useful in cooking, and most of them actually prefer the well-drained conditions that containers provide. Basil, mint, oregano, thyme, and chives all thrive in pots with minimal care. I started with a simple herb container garden on my kitchen windowsill, and those herbs gave me the confidence to expand into vegetables.
Basil specifically is probably the single easiest plant to grow in containers. It germinates quickly from seed, grows vigorously with just sun and water, and you can harvest it continuously by pinching off leaves and stem tips. I've literally never had basil fail in containers. Just give it a 6-8 inch pot, decent potting mix, regular water, and watch it explode!
Lettuce and salad greens are perfect for beginners because they grow fast and don't need huge containers. You can harvest baby greens in as little as 3-4 weeks from planting seeds! Loose-leaf varieties like 'Oak Leaf,' 'Red Sails,' and mesclun mixes are way easier than head lettuce. I love lettuce for beginners because the quick results keep you motivated while you're learning.
Cherry tomatoes are incredibly rewarding for beginners despite being slightly more demanding than herbs. Compact varieties like 'Patio Princess,' 'Tiny Tim,' or 'Sweet Million' produce loads of tasty tomatoes from a single container plant. Yes, they need bigger pots (at least 5-7 gallons), regular feeding, and support stakes. But the payoff of picking fresh tomatoes from your patio is unbeatable! My first successful tomato plant made me feel like an actual gardener.
Peppers are surprisingly easy in containers and more compact than people expect. Both sweet bell peppers and hot peppers work great. I recommend starting with something reliable like 'California Wonder' bells or 'Jalapeño' if you like heat. Peppers need similar care to tomatoes but they're actually more forgiving about water and feeding consistency.
Radishes are the ultimate instant-gratification container crop. They go from seed to harvest in about 25-30 days, which is perfect when you're impatient or need a confidence boost! You can grow them in relatively small containers (8-10 inches deep), and they're nearly impossible to screw up. I plant radishes every spring just because they're fun and fast, even though I don't love eating them.
Green onions (scallions) are ridiculously easy and can literally be regrown from grocery store scraps! Save the white root ends from store-bought green onions, stick them in a pot of soil, and they'll regrow within a week. I haven't bought green onions in years because I just keep regrowing the same ones over and over. It feels like magic and costs basically nothing.
Marigolds and other annual flowers are wonderful for beginning container gardeners who want color rather than food. Marigolds specifically are nearly indestructible - they handle heat, drought, poor soil, and beginner neglect better than almost any other flower. Plus they bloom continuously from late spring through fall frost. I always include marigolds in my container gardens for reliable color.
Plants to Avoid as a Beginning Container Gardener
Not every plant is suitable for container growing, and some that technically work are just frustrating for beginners. Let me save you the heartache of trying plants that are likely to fail and discourage you!
Large vining plants like pumpkins, watermelons, and winter squash are technically possible in containers but they're honestly a pain. They need absolutely massive containers (20+ gallons minimum), constant feeding and watering, extensive support structures, and they still usually underperform. I tried growing pumpkins in containers once and it was a disaster - the plants were huge, sprawling, and demanded tons of attention for a measly two small pumpkins. Not worth it for beginners.
Corn is another crop that just doesn't make sense in containers for most people. You need to plant it in blocks for pollination (corn is wind-pollinated), which means you'd need like 12+ plants in multiple large containers. The space and resource investment versus the harvest is terrible. Save corn for when you have actual garden space.
Root vegetables that grow deep like carrots and parsnips can work in containers, but they're tricky for beginners. You need really deep containers (12-18 inches), the right soil consistency, and careful variety selection. Regular grocery store carrot varieties will just get stunted and deformed. I tried standard carrots in containers my first year and got these weird, forked, twisted things that were barely edible.
Asparagus is a perennial that needs several years to establish before producing, requires huge containers (15-20 gallons minimum), and takes up valuable space year-round while producing for only 4-6 weeks in spring. It's genuinely not practical for container growing unless you have tons of space and patience. Start with annual crops that give you results the first season!
Melons of any kind are possible in containers but challenging for beginners. They need giant containers, lots of fertilizer and water, strong support structures for the vines, and often hand pollination since container gardens may not have enough bee activity. The effort-to-reward ratio is poor unless you really, really love melons and have no other option.
Artichokes are beautiful plants but they're enormous (4-5 feet tall and wide), need huge containers, and take up space year-round in mild climates. In cold climates you'd need to bring the massive containers indoors for winter or treat them as annuals. Either way, they're advanced-level container gardening.
Finicky herbs like cilantro, dill, and parsley that bolt easily or have specific temperature requirements can frustrate beginners. They're not impossible, but they're less forgiving than something like basil or mint. Save these for year two once you've got some successful growing under your belt and understand how container conditions affect plants.
Watering Container Gardens the Right Way
Watering is probably the number one thing that beginners struggle with in container gardening. It's definitely what I struggled with most! Too much water, too little water, inconsistent watering - I did it all wrong before figuring out what actually works.
The finger test is your most reliable watering indicator. Stick your finger into the soil up to your second knuckle (about 2 inches deep). If the soil feels dry at that depth, it's time to water. If it's still moist, wait another day and check again. I do this quick check every morning during my coffee, and it takes literally five seconds per container. This simple habit transformed my watering accuracy.
When you do water, water thoroughly until you see it draining out the bottom holes. This ensures the entire root ball gets moisture, not just the top few inches. Light, frequent waterings only wet the surface while deeper roots stay dry, which encourages shallow root development and weak plants. I learned this when several of my plants suddenly wilted and crashed despite regular watering - turns out I'd been doing quick, light waterings that never penetrated deep enough.
Time of day matters more than I initially realized. Early morning watering is ideal because it gives plants moisture before the heat of the day, and wet foliage has time to dry before evening. Wet leaves sitting overnight are an invitation for fungal diseases. I used to water in the evening after work because it was convenient, and I had constant issues with powdery mildew and other fungal problems. Switching to morning watering reduced these issues by probably 75%.
Container size dramatically affects watering frequency. Small containers dry out insanely fast - during summer heat, a 2-gallon pot might need watering twice daily! Larger containers hold more soil and therefore more water, drying out much more slowly. This is yet another reason I recommend bigger containers for beginners. A 10-gallon pot might only need watering every 2-3 days even in summer, which is way more forgiving if you forget or get busy.
Weather and season change watering needs constantly. In cool spring weather, containers might go 3-4 days between waterings. In July heat, those same containers might need daily water. Rainy periods mean skipping watering entirely for days. Cloudy weather reduces water needs compared to bright sun. You can't follow a rigid schedule - you have to check moisture levels and adjust based on conditions.
Mulching the soil surface helps tremendously with water retention. I cover the top 1-2 inches of my containers with shredded bark, straw, or even grass clippings. This mulch layer prevents moisture from evaporating as quickly and can reduce watering frequency by 30-40%. It also keeps the soil cooler, prevents weeds, and looks nicer than bare potting mix.
Self-watering containers or simple drip irrigation systems are worth considering if you travel, have a busy schedule, or tend to forget about watering. I resisted automated watering for years thinking it was unnecessary and complicated. Finally installed a basic drip system on a timer, and it's been absolutely life-changing! The consistency of moisture has improved plant health noticeably, and I no longer worry about my garden when I'm away for a few days.
Fertilizing Container Plants for Healthy Growth
Container plants need more frequent fertilization than in-ground plants because nutrients wash out of pots with regular watering. This concept took me way too long to understand, and my second-year plants in recycled soil performed terribly before I figured out the nutrition issue!
All container plants need supplemental feeding of some kind. The potting mix you start with contains nutrients, but those get depleted relatively quickly. Most quality potting mixes have enough nutrition for about 4-6 weeks of growth. After that, you need to start fertilizing or your plants will slowly decline from nutrient deficiency.
I use a two-part fertilization strategy that works really well for containers. At planting time, I mix slow-release granular fertilizer into the potting mix. Products like Osmocote or organic equivalents release nutrients gradually over 3-4 months. This provides baseline nutrition without me having to remember constant feeding schedules. It's especially helpful for beginners who might forget to fertilize regularly.
On top of the slow-release base, I supplement with liquid fertilizer every 1-2 weeks during active growth. I use fish emulsion most often because it's organic, relatively gentle, and provides a good balance of nutrients. Yes, it smells terrible for about 24 hours after application - kind of like rotting fish mixed with ammonia. My neighbors probably hate me during fertilizing days! But the smell dissipates, and the plants love it.
Different plants have different fertilizer needs, which becomes important as you gain experience. Heavy feeders like tomatoes, peppers, and most vegetables need fertilizing on the more frequent end - every 7-10 days during peak growth. Light feeders like most herbs and lettuces can go 2-3 weeks between feedings. Over-fertilizing leafy greens actually causes problems, making them bolt to seed prematurely.
Signs of fertilizer deficiency include yellowing leaves (especially older, lower leaves), slow growth, small leaves, poor flowering or fruiting, and generally weak-looking plants. I learned to recognize these signs after watching my container plants decline one season while I stubbornly insisted the soil "should still have nutrients."
Signs of over-fertilization include leaf tip burn (brown, crispy leaf edges), excessive leafy growth with no flowers or fruit, white crusty buildup on the soil surface or container rim, and sometimes sudden wilting. I've definitely overdone fertilizer before, especially with tomatoes where I thought more would equal more tomatoes. It doesn't work that way! Follow package directions and err on the side of slightly less rather than more.
Organic versus synthetic fertilizers is a personal choice. Organic options like fish emulsion, compost tea, or seaweed extract are gentler and improve soil biology. Synthetic fertilizers like Miracle-Gro work faster and are more precisely formulated. I use mostly organic fertilizers now because I prefer that approach, but synthetic products work fine and are often easier for beginners to use effectively.
Sunlight Requirements for Container Plants
Understanding sunlight needs might be the single most important factor in choosing what to grow and where to place containers. I cannot overstate how much proper sunlight matters! My early mistakes with light requirements led to so many disappointing failures.
Full sun means 6-8+ hours of direct sunlight daily. This is what most vegetables, herbs, and flowering plants need to perform well. When plant tags or seed packets say "full sun," they mean it! I tried growing tomatoes and peppers on my north-facing balcony one year, and they were absolutely pathetic. They survived but barely produced anything. Plants that need full sun will exist in less light, but they won't thrive or produce well.
Partial sun or partial shade means 4-6 hours of direct sun. This works for lettuce, spinach, many leafy greens, and some herbs. These crops actually appreciate shade during the hottest part of the day, especially in hot climates. My lettuce and spinach do way better with morning sun and afternoon shade - they don't bolt to seed as quickly and the leaves stay more tender.
Full shade means less than 4 hours of direct sun daily. Very few edible plants tolerate full shade, though some leafy greens and herbs like mint or parsley will survive. If you've only got full shade, focus on ornamental foliage plants rather than vegetables. I've tried growing vegetables in shade multiple times, and it never works well. Accept your light limitations and choose appropriate plants!
Light quality matters as much as quantity. Direct sunlight is much more intense than bright indirect light. A north-facing spot might seem bright to human eyes but might only be getting bright indirect light rather than actual direct sun. I misjudged this constantly when I started, thinking bright areas had enough light when they actually didn't.
You can measure your sunlight by literally sitting in the spot where you want to put containers and tracking when direct sun hits that area. I did this for every potential growing spot on my balcony and patio, noting what times sun hit each area. This helped me place containers accurately based on each plant's needs. Yeah, it took a few hours of observation throughout the day, but it saved me from months of watching plants struggle in wrong conditions!
Moving containers to follow the sun is one of the beautiful advantages of container gardening. I shift my containers around seasonally as the sun angle changes. In spring and fall when the sun is lower, some spots get way less light than they do in summer when the sun is higher. Being able to move plants to optimize light exposure is incredibly powerful.
Reflected light from white walls or pavement can significantly boost available light. My patio has white stucco walls that bounce light back onto my plants, effectively increasing light levels. This is especially helpful for spots that get borderline light - the reflection can make the difference between adequate and inadequate light.
Common Container Gardening Mistakes and How to Avoid Them
Let me share the painful mistakes I made so you can skip directly to the success part! Every single one of these errors cost me time, money, or dead plants before I learned my lesson.
Mistake #1: Using containers without drainage holes. I already mentioned this but it's worth repeating because it's such a common killer. Plants sitting in waterlogged soil develop root rot and die, period. Every container must have drainage holes! If you love a pot that doesn't have holes, either drill some yourself or use it as a decorative outer pot with a properly draining inner pot inside.
Mistake #2: Filling pots with garden soil or topsoil instead of potting mix. I beat this topic to death already, but it's critically important! Soil compacts in containers, suffocates roots, and creates terrible growing conditions. Use actual potting mix designed for containers, and your success rate will skyrocket.
Mistake #3: Choosing containers that are too small for the plants. This was my biggest mistake early on. Bigger is almost always better with containers! Most vegetables and larger plants need at least 5-7 gallon containers, and many prefer 10+ gallons. Those cute little pots you see at garden centers are too small for anything except small herbs and annuals.
Mistake #4: Overcrowding plants in containers. I wanted to maximize my limited space, so I crammed way too many plants into each pot. They competed for nutrients, water, and light, everything got weak and spindly, and harvests were terrible. Follow spacing recommendations even though it feels wasteful. One healthy plant produces way more than three struggling plants competing in the same container.
Mistake #5: Inconsistent watering that creates cycles of wet and dry. This stresses plants enormously and causes all kinds of problems - blossom end rot in tomatoes, bolting in lettuce, cracked fruits, woody root vegetables. I get it, life gets busy and watering falls off the priority list. Setting a daily phone alarm to check moisture has helped me maintain much better consistency.
Mistake #6: Placing sun-loving plants in shade or vice versa. I tried forcing plants to grow in inappropriate light conditions multiple times before accepting that it just doesn't work. Tomatoes in shade produce almost nothing. Lettuce in full afternoon sun bolts immediately. Match your plant choices to your available light, and everyone will be happier!
Mistake #7: Forgetting to fertilize or fertilizing on an irregular schedule. Container plants need regular feeding! I went entire seasons without fertilizing in my early years, wondering why my plants were yellowish and unproductive. Now I have a simple schedule of liquid fertilizer every 2 weeks during growing season, and plant performance improved dramatically.
Mistake #8: Not providing adequate support for tall or vining plants. I've had tomato plants snap in half, pepper branches break under fruit weight, and pole beans flop over and smother neighbors. Install stakes, cages, or trellises at planting time before plants get big and it becomes difficult without damaging roots.
Creating a Container Garden Plan
Having an actual plan before you start buying containers and plants makes everything easier and more successful. I learned this after three years of random, impulsive container purchases that resulted in a chaotic, mismatched garden!
Start by assessing your available space. Measure the area you have for containers - balcony dimensions, patio square footage, how much of your driveway or front steps you can use. This gives you realistic limits for how many containers fit comfortably without creating a cramped jungle. My balcony is 6x8 feet, which means I can fit about 8-10 medium-to-large containers maximum before it gets too crowded to navigate.
Evaluate your sunlight in different areas. Track where sun hits throughout the day and for how long. Note which spots get morning sun versus afternoon sun - this makes a difference for plant placement. I literally drew a map of my balcony and marked sun patterns at different times of day. It looked crazy but it helped me place plants optimally!
Consider your time and commitment level realistically. Be honest about how much time you want to spend on garden maintenance. If you're super busy or travel frequently, focus on low-maintenance plants and invest in self-watering containers or drip irrigation. If you enjoy daily garden visits and have time for intensive care, you can grow more demanding crops like tomatoes and vegetables.
Decide what you actually want to grow based on what you'll use. There's no point growing Brussels sprouts if nobody in your household eats them! I made this mistake growing lots of vegetables that seemed cool but that I didn't actually like eating. Now I focus on herbs I cook with regularly, salad greens we eat constantly, and a few tomatoes and peppers for summer.
Choose a cohesive container style if aesthetics matter to you. My early container garden was a mismatched mess of random pots in different colors, sizes, and materials. It worked functionally but looked chaotic. Now I use mostly fabric grow bags in black and terracotta-colored plastic pots, which creates a more unified look. This isn't essential but it makes the space more visually pleasant.
Plan for succession planting to extend harvests. Instead of planting all your lettuce at once (which then all matures at once and bolts at once), plant some every 2-3 weeks for continuous harvest. I do this with radishes, lettuce, and herbs, which keeps fresh produce available over months rather than getting overwhelmed with more than we can use at once.
Budget for initial setup and ongoing supplies. Container gardening isn't hugely expensive but there are costs involved - containers, potting mix, plants or seeds, fertilizer. My first-year setup cost maybe $150-200 for containers, soil, and plants. Subsequent years are cheaper since you're reusing containers and just buying fresh potting mix and plants.
Seasonal Container Gardening Basics
Container gardens change throughout the year, and understanding seasonal rhythms helps you make the most of each growing period. This was a revelation when I finally figured it out after treating my containers the same year-round with mediocre results!
Spring is prime planting time for most container gardens. As soon as nighttime temperatures stay consistently above 50°F, you can start cool-season crops like lettuce, spinach, peas, and radishes. Wait until all frost danger has passed and nighttime temps stay above 55-60°F before planting warm-season crops like tomatoes, peppers, and basil. I used to jump the gun planting tomatoes in April, and they'd sit there doing nothing for weeks until it warmed up. Now I wait until May, and they take off immediately.
Summer is peak production time but also peak maintenance time. Plants grow like crazy, produce abundantly, and need constant watering and feeding. This is when container gardening is most demanding but also most rewarding. My tomatoes, peppers, herbs, and flowers are all cranking out food and blooms continuously from June through August.
The heat stress of summer affects container plants more than in-ground plants. Containers dry out faster and soil temperatures can get quite high in black pots sitting in direct sun. I mulch heavily, water consistently, and sometimes move containers to shadier spots during the worst heat. Some plants like lettuce and spinach just won't grow well in summer heat no matter what you do - I skip those crops entirely from July through August.
Fall brings another opportunity to plant cool-season crops. As temperatures moderate in September-October, I pull out spent summer plants and replant with lettuce, spinach, kale, and other greens. These crops actually taste better when grown in cooler weather, and I get harvests well into November or even December depending on how cold it gets. Fall container gardening is honestly easier than summer because the cooler weather means less frequent watering.
Winter depends entirely on your climate. In mild climates, you can grow cool-season crops year-round in containers. In cold climates, most container plants go dormant or die back. I'm in zone 7b, which means I can grow cold-hardy stuff like kale and certain lettuces through winter with some frost protection. I bring my perennial herbs indoors in their pots, and they survive on a sunny windowsill until spring.
Container soil management between seasons is important. I reuse potting mix for 2-3 seasons typically, but I refresh it each spring. I dump out containers, break up any compacted soil, mix in fresh compost and some new potting mix, then replant. This replenishes nutrients and improves soil structure without completely replacing expensive potting mix every year.
Troubleshooting Common Container Garden Problems
Even with good practices, problems inevitably come up. Here's how to identify and fix the most common issues I've encountered in years of container gardening!
Yellow leaves are probably the most common complaint. This can indicate several different problems. Lower leaves yellowing while upper leaves stay green usually means nitrogen deficiency - time to fertilize! Entire plant yellowing might indicate overwatering and root rot, or iron deficiency if the veins stay green while the leaf tissue yellows. I learned to diagnose yellowing by looking at the pattern and considering recent care.
Wilting despite adequate water often indicates root problems. If the soil is moist but the plant is wilted, suspect root rot from overwatering or poor drainage. I've lost plants to this issue multiple times before learning to check both moisture level AND drainage when plants wilt. Sometimes you need to unpot the plant and inspect the roots - healthy roots are white or tan, while rotted roots are brown, mushy, and smell terrible.
Stunted growth that doesn't respond to fertilizer usually means the container is too small and the plant is root-bound. Unpot the plant and look at the roots. If they're circling around the container edge in a dense mat, that's your problem. Either transplant to a larger container or root-prune the plant (trim away outer roots) before repotting in the same container with fresh soil.
Blossom end rot on tomatoes and peppers shows up as dark, sunken spots on the bottom of fruits. This is caused by calcium deficiency, but it's not usually about lack of calcium in the soil - it's about inconsistent watering that prevents the plant from uptaking available calcium. The cure is more consistent moisture, not adding calcium. I solved my blossom end rot problems by improving watering consistency and mulching to maintain even moisture.
Pests in container gardens are generally less severe than in-ground gardens, but they still happen. Aphids cluster on new growth and can be blasted off with a strong spray of water or treated with insecticidal soap. Spider mites cause stippled, yellowish leaves and fine webbing - treat with neem oil spray. Caterpillars eat holes in leaves and can be hand-picked or treated with Bt (Bacillus thuringiensis).
White crusty buildup on soil surface or container rims is salt accumulation from fertilizer and water minerals. This is super common with container growing and isn't necessarily a problem unless it gets severe. I scrape it off periodically, or flush the containers thoroughly with water to wash out accumulated salts. Using rainwater instead of tap water reduces this issue.
Plants falling over or getting damaged by wind is common on balconies and rooftops. Staking tall plants helps, and grouping containers together provides mutual wind protection. I've had containers literally blow off my balcony during storms before I learned to either bring them inside or secure them when high winds are predicted.
Expanding Your Container Garden Over Time
Starting small and expanding gradually is the best approach for container gardening success. I wish someone had told me this before I bought 20 containers and tried to grow everything in year one!
Year one should be all about learning with 3-5 containers maximum. Grow easy, forgiving plants like herbs, lettuce, and maybe one tomato. Focus on mastering basic skills - proper watering, appropriate fertilizing, understanding your sun exposure, choosing the right potting mix. Make mistakes on a small scale where they're easy to recover from.
My first year I grew basil, mint, lettuce, and one cherry tomato plant in five containers. It was a modest setup but I learned so much! I figured out my balcony sun patterns, discovered my tendency to overwater, learned how fast containers dry out in summer, and got comfortable with basic container care. That foundation made year two way more successful.
Year two is when you can expand to 8-12 containers and try slightly more challenging crops. Add some peppers, more varieties of tomatoes, maybe some beans or cucumbers on a trellis. Experiment with different container sizes and materials. Try a few new plants that interest you. You've got basic skills now, so stretching a bit makes sense.
Year three and beyond is when you can get creative with specialty crops, larger permanent plantings like blueberries or dwarf fruit trees, more elaborate container combinations, and maybe some infrastructure like drip irrigation or cold frames for season extension. At this point you understand your space and your abilities, so you can make informed decisions about what's worth growing.
I'm in year six of serious container gardening now, running 25-30 containers year-round with a rotating selection of vegetables, herbs, flowers, and even a couple dwarf fruit trees. It's a far cry from my initial five pots! But this expansion happened gradually over years, with each season teaching me something new and building my confidence.
Don't feel pressure to have an Instagram-worthy container garden immediately. Those beautiful container gardens you see online took time and experience to develop! Start small, learn from mistakes, celebrate successes, and expand at your own pace. The process is honestly more enjoyable when you're not overwhelmed trying to maintain more containers than you can handle.
Conclusion
Container gardening opens up the possibility of growing your own food and flowers regardless of your living situation or available space. You don't need a yard, perfect soil, or even any ground at all - just some containers, quality potting mix, appropriate plants, and willingness to learn!
The beautiful thing about starting with containers is how forgiving and flexible the approach is. Make a mistake with one pot? No big deal, try something different in the next one. Need to move your garden because you're relocating? Load up your containers and take them with you. Want to experiment with new plants without major commitment? Try them in a single container first.
Start with just 3-5 containers this season. Choose easy, reliable plants like herbs, lettuce, cherry tomatoes, or whatever genuinely interests you. Focus on learning the basics of watering, fertilizing, and providing appropriate light. Make mistakes, figure out what works in your specific situation, and build your skills and confidence gradually.
Remember that every experienced container gardener started exactly where you are now - with zero experience and probably some dead plants in their past! I've killed more plants than I can count through various rookie mistakes. Each failure taught me something valuable that made me better at this. Give yourself permission to experiment, mess up, and learn as you go.
Your container garden will evolve and improve season by season. The small herb garden you start this spring might become a productive vegetable garden next year, and an elaborate mixed container garden the year after that. Or maybe you'll stay small and focused - that's totally fine too! The goal is creating something you enjoy that fits your lifestyle.
What are you planning to grow in your first container garden? What questions or concerns do you have about getting started? Drop a comment below and let's figure this out together! I love helping beginning container gardeners avoid the mistakes I made and find success faster than I did. Let's grow something amazing in 2026!