Best Vegetables to Grow in Containers on a Balcony: 25 Top Picks That Actually Produce
Discover the best vegetables to grow in containers on a balcony! From tomatoes to lettuce, learn which veggies thrive in pots, exact container sizes needed, and pro tips for maximizing your harvest.
APARTMENT/ MINIMALIST GARDENING
Introduction
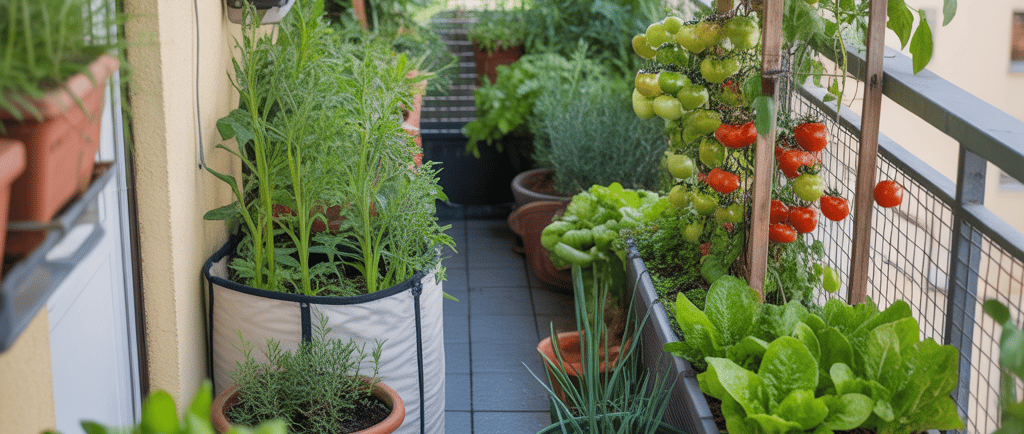
I remember the exact moment I became a believer in balcony vegetable gardening. It was a Tuesday evening in late July, and I walked out to my tiny seventh-floor balcony and picked a handful of cherry tomatoes, some fresh basil, a small cucumber, and enough lettuce for a full salad. Made dinner entirely from food I'd grown on a 6x8 foot concrete slab in the sky. I literally stood there for a minute just kind of amazed at myself.
Before that summer, I'd been deeply skeptical. I mean, real vegetables need real gardens, right? Big plots of soil, room to spread out, all that stuff. The idea of growing actual food on a balcony seemed like one of those things that sounds good but doesn't really work in practice. I'd seen people try and fail—sad little plants in tiny pots producing maybe three tomatoes all summer. I didn't want that disappointment.
But here's what I didn't know then: those failures weren't because balcony gardening doesn't work. They were because people were making fixable mistakes—wrong container sizes, wrong varieties, wrong soil, not enough water. Once you understand what vegetables actually need and match that to what a balcony can provide, the results are genuinely impressive. Studies show that a well-managed 10x10 foot container garden can produce 50+ pounds of vegetables per season. On a balcony you won't hit those numbers, but meaningful harvests are absolutely achievable.
I've been growing vegetables on various balconies for eight years now. I've had balconies ranging from tiny 4x6 south-facing slab to a more generous 8x12 partially shaded space. I've grown tomatoes, peppers, cucumbers, squash, beans, lettuce, kale, herbs, root vegetables—basically everything. Some worked amazingly, some flopped spectacularly. Each failure taught me something important.
In this guide, I'm sharing everything I've learned about which vegetables actually produce well in containers on balconies, what they need to succeed, and how to avoid the mistakes that lead to disappointment. Whether you're a complete beginner or you've tried container vegetables before without great results, this guide will help you grow real food on whatever outdoor space you've got. Let's get into it!
Can You Really Grow Vegetables on a Balcony?
Let me address the skepticism head-on because I had it too, and I talk to people constantly who don't believe balcony vegetable gardening is worth the effort.
Real yield expectations from container vegetables are more impressive than most people think, but you need to be realistic. You're not going to feed your family entirely from a balcony garden—let's be clear about that. But you can produce meaningful quantities of fresh vegetables that genuinely supplement your grocery shopping. My best season on a medium-sized balcony included over 40 pounds of tomatoes, a cucumber every few days for two months, more lettuce than I could eat, abundant herbs all season, and various other vegetables. My grocery bill for produce dropped noticeably from July through September. That's real value from a small space.
Sun requirements and how to assess your balcony is the first thing you need to figure out—honestly and accurately. Most vegetables need 6-8 hours of direct sunlight. Fruiting vegetables (tomatoes, peppers, cucumbers) need the most sun—6-8 hours minimum. Leafy greens are more flexible—4-6 hours works. Root vegetables are in between. Before you buy a single plant, track sun on your balcony. Go out every hour for a full day and note which areas get direct sun versus shade. I use a simple chart—draw your balcony and mark shaded areas at each hour. This tells you exactly what's possible.
Weight considerations for containers and soil are serious on balconies and shouldn't be ignored. Wet soil is heavy—a 5-gallon container with wet potting mix weighs 40-50 pounds. A 10-gallon container can weigh 80-100 pounds wet. If you're loading up a balcony with many large containers, weight adds up fast. Most residential balconies are rated for 40-60 pounds per square foot, but check your building specs if possible. Use lightweight potting mix (not garden soil), lightweight containers (resin or fabric grow bags instead of ceramic), and distribute weight around the perimeter where structural support is strongest.
Wind exposure and its impact on vegetables is something I underestimated badly on my high-rise balcony. Wind desiccates plants, breaks stems, and can knock over containers. Tall plants like staked tomatoes are especially vulnerable. On an exposed balcony, I've had wind snap tomato stems, dry out containers within hours, and shred large leaves. Solutions: position containers in protected corners, use shorter more compact plant varieties, stake everything securely, and consider windbreak screening if your balcony is particularly exposed. Ground-level balconies have less wind than high-rise ones.
Water access and irrigation planning is crucial because container vegetables need water constantly—often daily in summer. If you have an outdoor water spigot on your balcony, you're in great shape. If you need to carry water from inside, plan this carefully. A 5-gallon container needs maybe a gallon of water daily in hot weather. Ten containers means ten gallons per day. That's a lot of carrying. I eventually installed a hose run through my balcony door to make watering manageable. Self-watering containers and drip irrigation systems are also excellent solutions.
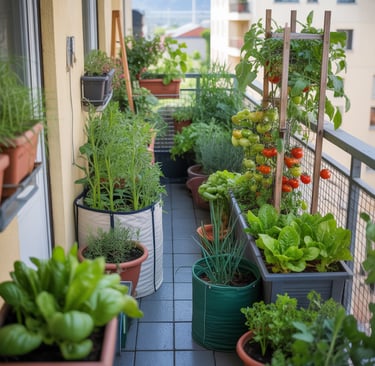
Space optimization strategies make a huge difference in how much you can produce from limited space. Think vertically—trellised cucumbers and beans produce way more per square foot than sprawling plants. Use tiered plant stands to create multiple levels. Hang railing planters for herbs and lettuce without using floor space. Put smaller containers on top of larger ones. I fit more plants on my 8x12 balcony than most people have in ground gardens because I've optimized every vertical and horizontal inch.
Why balcony vegetables often outperform garden beds surprised me when I thought about it. In a balcony container, you control everything—premium potting mix, perfect drainage, exactly the right fertilizer, consistent watering. In-ground gardens have soil quality issues, competition from tree roots, poor drainage, variable fertility. Your balcony containers can be optimized perfectly. I've grown tomatoes in containers that produced more fruit per plant than my in-ground plants in a previous house. Control over growing conditions is a huge advantage.
Success stories and what's actually possible give you realistic inspiration. I know a woman who grows 80% of her family's summer salad greens on a small apartment balcony. I have a friend who produces dozens of pounds of tomatoes from just four large containers on his rooftop deck. Urban farmers report producing hundreds of pounds of food from container setups on patios and balconies. The key is choosing the right plants, using appropriate containers, and providing what plants actually need. The results can be genuinely impressive.
Setting Up Your Balcony for Vegetable Success
Before buying a single plant, get your setup right. The right foundation makes everything else easier.
Assessing sun exposure accurately is step one and the most important setup task. I've said this before but it bears repeating—track your sun for a full day before buying anything. Use a simple method: go outside every hour from 8am to 7pm and photograph your balcony. Note which areas get direct sun versus shade at each hour. Add up the hours of direct sun in your main growing area. Over 6 hours: you can grow almost anything. 4-6 hours: stick to leafy greens, herbs, and some root vegetables. Under 4 hours: very limited options. Don't guess—actually measure. I've seen people buy tomatoes for north-facing balconies and then wonder why they failed.
Choosing the right containers for vegetables is where many beginners make expensive mistakes. The rule is simple: go bigger than you think you need. Most vegetables need more root space than people provide. My minimum container sizes by vegetable type: herbs 6-8 inches, lettuce and greens 8-12 inches deep, root vegetables 12 inches deep minimum, tomatoes 5 gallons (about 12 inches diameter), peppers 3-5 gallons, cucumbers 5 gallons, zucchini 10+ gallons. I use a mix of fabric grow bags (lightweight and excellent drainage), resin containers (durable and freeze-proof), and five-gallon buckets (cheap and effective). Avoid terracotta for large containers—too heavy and dries out too fast.
Best potting mix for container vegetables is not garden soil or basic cheap potting mix. Those are too dense and drain poorly. I use a premium mix with perlite added. My standard recipe: 60% quality potting mix (like Espoma or FoxFarm), 30% perlite for drainage and aeration, 10% compost or worm castings for nutrition. This mix drains well, holds appropriate moisture, and provides a good nutritional starting point. It's lighter than garden soil which matters for balcony weight limits. I mix large batches at the start of each season in a big tub.
Drainage requirements and solutions cannot be overlooked. Every container needs drainage holes—multiple, large ones. I drill additional holes in containers that come with insufficient drainage. I put pot feet or bricks under containers to allow free drainage and air circulation underneath. I check drainage before planting—pour water in an empty container and watch how fast it drains. Should drain within 30-60 seconds of filling. If it's slow, add more perlite or more drainage holes. Standing water at the root zone kills vegetable plants quickly.
Watering systems for busy gardeners make the difference between thriving plants and dead plants. Container vegetables dry out fast—especially in summer sun and wind. Options: hand watering daily (works but requires commitment), self-watering containers with reservoirs (great for herbs and lettuce), drip irrigation on a timer (my current system, highly recommended), or ollas (clay pots buried in soil that slowly release water). My drip system runs for 10 minutes every morning automatically and has transformed my success rate. I no longer come home to wilted plants after a long day.
Fertilizing container vegetables is essential because frequent watering leaches nutrients from potting mix quickly. I use a two-part approach: slow-release granular fertilizer mixed into the potting mix at planting (provides baseline nutrition), plus liquid fertilizer every two weeks once plants start producing. For leafy greens, I use higher nitrogen fertilizer. For fruiting plants (tomatoes, peppers, cucumbers), I switch to lower nitrogen and higher phosphorus/potassium fertilizer once they start flowering—high nitrogen produces lush leaves but delays fruit set.
Wind protection strategies depend on your balcony's exposure. On my first high-rise balcony, I installed a bamboo privacy screen on the windiest side. It reduced wind velocity significantly and my plants thrived behind it. Other options: arrange containers so larger plants protect smaller ones, use heavy containers or anchor lightweight ones, install clear polycarbonate screening that blocks wind but maintains light. For really exposed balconies, stick with low-growing compact varieties that are less affected by wind.
Organizing containers for maximum efficiency means planning your layout before placing anything. Put tallest plants where they won't shade shorter ones (usually back or north side). Group plants with similar water needs together. Create pathways so you can access all containers for maintenance. Use vertical space with trellises and tiered stands. I spend 30 minutes drawing my layout before the season starts. Moving containers full of soil is a pain—plan before filling and positioning them.
Tomatoes: The King of Balcony Vegetables
If there's one vegetable that makes balcony gardening worthwhile, it's tomatoes. Homegrown tomatoes are infinitely better than store-bought, and they do really well in containers.
Best compact and patio tomato varieties are crucial—not all tomatoes work in containers. Don't plant full-size indeterminate varieties like Beefsteak unless you have a very large container and serious support structure. My favorite container varieties: Tumbling Tom (trails beautifully in hanging baskets or over pot edges), Tiny Tim (stays under 18 inches, very productive), Patio (determinate, 2 feet tall, classic name says it all), Sweet Million (indeterminate but manageable, produces hundreds of cherry tomatoes), Celano (compact, sweet, excellent producer). I've also had great success with Bush Early Girl and Celebrity for larger slicing tomatoes in bigger containers.
Container size requirements—minimum 5 gallons is the rule for tomatoes, and bigger is definitely better. I use 7-10 gallon containers for most tomatoes and get way better production than when I used 5-gallon buckets. The extra soil volume means more consistent moisture and better nutrition. I've tried 3-gallon containers for small cherry tomato varieties and they work but need watering twice daily in hot weather. Don't go smaller than 5 gallons for any tomato. I've had best results in 7-gallon fabric grow bags—excellent drainage, air-prunes roots, lightweight.
Staking and support in containers needs to be planned before planting, not after. I push stakes or tomato cages into containers before transplanting so I don't disturb roots later. For compact varieties, a simple 3-foot stake works. For larger indeterminate types, I use 5-6 foot bamboo poles tied to my balcony railing for additional support. The issue with unsupported containers is top-heavy tomato plants topple in wind. I've had containers blow over and snap stems—not fun. Secure everything before the plant gets large.
Watering consistency for preventing blossom end rot is critical—this was my most common early tomato problem. Blossom end rot (that dark sunken area on the bottom of tomatoes) isn't a disease, it's calcium deficiency caused by inconsistent watering. Calcium is absorbed with water, so if watering is sporadic, calcium delivery is sporadic. The fix: water consistently. I water my tomatoes at the same time every day in summer. Self-watering containers dramatically reduce blossom end rot. I also add crushed eggshells or calcium amendments to soil at planting for extra calcium buffer.
Fertilizing for maximum fruit production requires understanding what tomatoes need at different stages. When young and establishing, balanced fertilizer is fine. Once flowering starts, I switch to a tomato-specific fertilizer with lower nitrogen and higher phosphorus and potassium. High nitrogen after flowering produces lush green plants with few fruits—the plant puts energy into leaves, not tomatoes. I fertilize every two weeks with liquid tomato fertilizer and have noticed significant yield improvement compared to just using balanced fertilizer all season.
Managing indeterminate versus determinate varieties requires different approaches. Determinate varieties stop growing at a certain height (2-4 feet usually), produce all fruit over a few weeks, then are done. They're easier to manage in containers—one cage and you're good. Indeterminate varieties keep growing and producing all season but get very large and need constant management. I pinch out suckers on indeterminate varieties to control size—the suckers are side shoots that grow in the crotch between the stem and branch. Removing them focuses energy on existing fruit and keeps plants manageable.
Common tomato problems on balconies include: blossom drop (usually from temperature extremes or inconsistent watering), poor fruit set on high-rise balconies (lack of pollinators—shake plants daily to help), hornworms (handpick, check daily), early blight (improve air circulation, avoid wetting leaves), and container-specific problems like soil drying out too fast. I check plants every morning, water consistently, fertilize regularly, and deal with problems early. Prevention through good culture is way easier than treating problems after they develop.
Expected yields from container tomatoes vary by variety and management. From a well-grown 7-gallon container of Sweet Million cherry tomatoes, I got roughly 200-300 tomatoes over the season—more than I could eat. A full-size slicing tomato in a 10-gallon container produced maybe 15-20 large tomatoes. Compact patio varieties in 5-gallon containers produced maybe 50-80 cherry tomatoes. These aren't giant numbers but they're meaningful harvests from containers on a balcony. Quality-wise, nothing beats a tomato picked ripe from your own plant.
Peppers: Surprisingly Perfect for Containers
Peppers are honestly my favorite balcony vegetable after tomatoes. They're compact, productive, beautiful plants that thrive in containers.
Sweet peppers versus hot peppers for containers both work great, but they have different growing requirements. Sweet bell peppers need warm temperatures and more nutrients for large fruits. Hot peppers (jalapeños, cayenne, habanero) are generally more compact, more drought-tolerant, and often more productive in containers. I grow both but have better consistent results with hot peppers. They seem more forgiving of the temperature fluctuations and occasional inconsistent watering that happen on balconies. Plus, you only need a few hot peppers for most recipes, so one plant produces plenty.
Best compact pepper varieties for containers include: Lunchbox peppers (small sweet peppers, insanely productive, compact plants), Jalapeño (classic hot pepper, perfect container size, extremely productive), Shishito (Japanese pepper, mild heat, great for eating whole, very productive in containers), Patio Bell (dwarf bell pepper bred for containers), Jimmy Nardello (sweet Italian frying pepper, long and narrow, excellent producer), and any of the small hot pepper varieties. I've had great success with all of these. Avoid large bell pepper varieties in small containers—they get huge and produce fewer fruits.
Container size and soil requirements for peppers are more forgiving than tomatoes. A 3-5 gallon container works well for most pepper varieties. I use 5-gallon fabric grow bags for most peppers and they do great. Same premium potting mix as tomatoes—well-draining, fertile, perlite-amended. Peppers prefer slightly acidic soil (pH 6.0-6.5) which most quality potting mixes provide. I add a little extra lime if I know my water is acidic. Don't overpot peppers into huge containers—they can get root-bound and stressed which actually promotes fruiting!
Heat and sun requirements are where peppers really shine on balconies. Peppers love heat. A south-facing balcony that's too hot for some vegetables is perfect for peppers. They need minimum 6 hours sun and actually produce better with more. Hot peppers especially love heat—my habaneros went crazy on my hot west-facing balcony when most other plants struggled. If your balcony is hot and sunny, peppers are your best friends. Cool summers or shady balconies produce disappointing pepper yields.
Overwintering pepper plants indoors is something most people don't know about but it's fantastic for container growing. Peppers are actually perennials—they just die from frost. You can bring container peppers indoors before first frost and overwinter them as houseplants near a sunny window. Next spring, move them back outside. These overwintered plants start producing fruit weeks earlier than new transplants and often produce more heavily. I've had the same jalapeño plant for three years now. The main stem is thick as my thumb and it produces hundreds of jalapeños each summer.
Watering and fertilizing peppers requires slightly different approach than tomatoes. Peppers tolerate drought better than tomatoes but still need consistent moisture for best production. I water when the top inch of soil is dry—usually every other day in summer. Inconsistent watering causes flower drop. For fertilizer, I treat peppers similarly to tomatoes—balanced fertilizer early, then switch to lower nitrogen once flowering starts. Peppers are lighter feeders than tomatoes so I fertilize monthly rather than biweekly. Too much nitrogen produces beautiful leafy plants that don't fruit well.
Pollination on high-rise balconies can be an issue for peppers too. Peppers self-pollinate but need some movement—wind or bees—to shake pollen onto the stigma. On a calm high-rise balcony with no insects, pepper flowers can drop without setting fruit. Solution: shake plants gently every day or use a small paintbrush or electric toothbrush to vibrate flowers. I use a battery-powered toothbrush held against the stem for a second or two—sounds weird but works great. Since I started doing this, fruit set improved dramatically on my most sheltered balcony.
Yield expectations and harvest tips for peppers are impressive. My Lunchbox pepper plant in a 5-gallon container produced over 100 small peppers in one season. A jalapeño plant gave me 40-50 peppers. Even a bell pepper plant in a decent container produces 6-10 large peppers. Harvest peppers when they reach full size—they can be eaten green or left to ripen to red, yellow, or orange (riper = sweeter). Regular harvesting encourages more production. Don't let peppers over-ripen on the plant or production slows.
Lettuce and Salad Greens: The Easiest Balcony Vegetables
If you're a beginner, start here. Lettuce and salad greens are the most forgiving, fastest-producing, and most practical vegetables for balcony containers.
Cut-and-come-again varieties for continuous harvest are the key concept for productive lettuce growing. These are loose-leaf varieties where you harvest outer leaves and the plant keeps growing from the center. Rather than growing head lettuce that you harvest once, cut-and-come-again gives you a continuous supply from the same plant. My favorites: Black Seeded Simpson (classic loose-leaf, fast-growing), Salanova (produces tons of small leaves, incredible for salads), Oak Leaf varieties (heat-tolerant, beautiful shape), Mesclun mixes (various greens in one package). I avoid head lettuces like iceberg for container growing—takes forever and you harvest once.
Shallow container requirements are one of lettuce's biggest advantages. Lettuce roots are shallow—6-8 inches deep is sufficient. This means you can use window boxes, shallow trays, railing planters, even repurposed colanders as lettuce containers. I have three window boxes on my railing growing nothing but lettuce and they produce a remarkable amount of salad greens. These shallow containers are lightweight, don't take up floor space, and look attractive. You can grow lettuce in containers that nothing else would tolerate.
Succession planting for non-stop salads changed my lettuce game completely. Plant a small container of lettuce, wait two weeks, plant another container, wait two weeks, plant another. When the first container is producing heavily, the second is just starting. When the first bolts and goes bitter, the second is at peak, and the third is coming in. I maintain four small lettuce containers in rotation and have fresh salad greens from April through November. Without succession planting, everything produces at once and you're overwhelmed, then have nothing.
Managing heat and bolting is the main challenge with lettuce. When temperatures consistently exceed 75-80°F, lettuce bolts—sends up a flower stalk, leaves become bitter, and it's essentially done. On a hot sunny balcony in summer, lettuce is a spring and fall crop. I move lettuce to shadier spots in summer, plant heat-tolerant varieties (Jericho, Summer Bibb), and use shade cloth over containers during the hottest months. I also do ice-water tricks—adding ice cubes to the soil surface to cool roots during heat waves. Sounds silly but actually helps delay bolting.
Shade tolerance for north-facing balconies makes lettuce one of your best options if you have limited sun. Lettuce performs reasonably well with just 3-4 hours of direct sun—better than almost any other vegetable. On my former north-facing balcony, lettuce was basically the only vegetable that actually produced well. Other greens like spinach and arugula also tolerate partial shade. If you're working with a shaded balcony, focus on leafy greens rather than fruiting vegetables that need more sun.
Growing mix for salad bowls is a fun approach that produces visually attractive containers while maximizing variety. I plant one large container (14-16 inches) with multiple varieties: red oak leaf, green butterhead, baby spinach, arugula, and some chives around the edge. Harvest by snipping a bit of each variety rather than cleaning out any single plant. The result is a beautiful mixed container that produces restaurant-quality mixed greens. Change the mix seasonally—different varieties for spring, summer, and fall. People always comment on how beautiful these mixed containers look.
From seed versus transplants: lettuce is one of the easiest vegetables to grow from seed and it's significantly cheaper. A packet of seeds costs $3-4 and gives you hundreds of plants. I direct-seed lettuce in containers by scattering seeds thinly, covering with 1/8 inch of potting mix, keeping moist, and thinning once germinated. Seeds to harvest takes about 4-6 weeks for cut-and-come-again types. For quick results or if you're nervous about starting from seed, transplants work fine. But with lettuce, seeds are easy enough that transplants feel unnecessary.
Harvesting techniques for maximum production matter more than people realize. Harvest outer leaves only—take the outer 2-3 leaves from each plant, leaving the growing center intact. Don't harvest more than 1/3 of the plant at once. Harvest in the morning when leaves are most crisp. Rinse and spin-dry immediately for best storage. With proper harvest technique, one lettuce plant produces for 6-8 weeks before quality declines. With poor technique (pulling whole plants or harvesting too aggressively), you'll exhaust plants in 2 weeks.
Herbs That Double as Vegetables
Herbs are technically separate from vegetables but they're so practically useful and easy that I'm including them. They're often more valuable dollar-for-dollar than vegetables.
Basil is the most useful balcony herb and one of the easiest plants to grow in containers. One large basil plant produces more fresh basil than most people can use—way more than those $3 grocery store packets that go slimy in three days. I grow three or four plants and make pesto all summer. Basil loves heat and sun—perfect for hot sunny balconies where other plants struggle. Plant in 6-8 inch containers, water regularly, pinch flower buds as they appear to keep plant producing leaves. My biggest basil plants get 2 feet tall and bushy. Grow basil near tomatoes—classic companion planting.
Cilantro and managing bolting is the frustrating part of growing cilantro. It desperately wants to go to seed (bolt) especially in warm weather, and once it bolts the leaves become sparse and the flavor changes. Tricks: grow in partial shade to slow bolting, keep well-watered, succession plant every 2-3 weeks rather than one big planting, harvest frequently and aggressively. I've accepted that I'll always be fighting cilantro's desire to bolt—it's just the nature of the plant. Succession planting is the real solution. Also: let some plants go to seed and you get coriander—a different spice from the same plant.
Parsley as a continuous harvest crop is underappreciated. Parsley is biennial—it produces leaves the first year, seeds the second year, then dies. This means one planting gives you fresh parsley for over a year! I keep two large parsley containers going always—one newer plant for heavy harvest, one older plant as backup. Italian flat-leaf parsley has better flavor for cooking. Curly parsley is prettier and good for garnish. Both grow easily from seed or transplant in 6-8 inch containers. Harvest outer stems regularly and the plant keeps producing. One of the most reliable balcony herbs.
Chives for constant snipping are basically a perennial herb that comes back year after year in containers with minimal care. Snip the grass-like leaves with scissors and they regrow quickly. The flowers are edible and pretty. I use chives on everything—eggs, potatoes, salads, soups. One container of chives provides steady harvest all season. In winter they die back but return in spring. Hardy to Zone 3 so they handle cold well. The only maintenance is occasional division if the clump gets too large and starts to decline. Absolutely worth growing.
Mint in its own container—seriously, this cannot be overstated. Do not plant mint with other herbs or in garden beds. It spreads aggressively via underground runners and will take over everything. In its own container it's fine and wonderfully productive. I keep a dedicated mint container (mojito mint, spearmint, and chocolate mint in separate pots) near my door. Fresh mint for drinks all summer, mint tea whenever I want it. Mint tolerates partial shade better than most herbs. Can be invasive if roots escape drainage holes into soil below, so I keep containers on hard surfaces.
Dill for pickling and cooking grows quickly and looks beautiful—feathery blue-green foliage that adds visual interest to container arrangements. Dill can get tall (2-3 feet) so choose compact varieties like Fernleaf for containers. Seeds or transplants both work. I use dill constantly when cucumbers are producing—makes amazing quick pickles. The flowers attract beneficial insects which helps with pollination of nearby vegetables. Let some plants go to seed for dill seeds (separate spice) and to self-sow for next season. Easy, practical, and pretty.
Oregano and thyme as perennials are the workhorses of the herb container garden. Plant them once and they come back for years. Both are drought-tolerant, love sun, and stay compact. Thyme has many varieties—lemon thyme is wonderful for cooking and tea, creeping thyme is low and trailing. Greek oregano has the best flavor for cooking. Both provide fresh herbs year-round (I harvest mine even in winter during mild spells). Hardy in containers to Zone 5 with minimal protection. Essentially indestructible and constantly useful.
Creating a culinary herb container garden in a single large container is one of my favorite setups. A 14-16 inch pot with basil in the center, parsley and chives as fillers, and trailing thyme at the edges looks beautiful and provides most of what I need for cooking. I position this container near my kitchen door for easy access. The herbs work as companion plants for each other and the container is attractive enough to be ornamental while being practical. This single container probably saves me $10-15 per month in fresh herb purchases.
Beans and Peas: Vertical Vegetables for Balconies
Beans and peas are perfect for vertical growing, making them space-efficient options for balconies.
Bush beans versus pole beans for containers each have advantages. Bush beans stay compact (12-18 inches), don't need support, and produce a concentrated harvest over 2-3 weeks. Pole beans grow 6-8 feet tall, need support, but produce continuously for months. For balconies, I prefer pole beans specifically because of the continuous harvest and efficient use of vertical space. Trellis them up the balcony railing or a vertical support and they produce an enormous amount of beans in a small footprint. Bush beans are easier but less productive overall from limited space.
Container peas and their trellis needs make them excellent balcony plants when you provide appropriate support. Peas are a cool-season crop—plant in early spring or fall. They're not heat tolerant so they're done by summer in most areas. I plant peas in March (Zone 6) against my balcony railing, they climb the railing using their tendrils, produce heavily through May and June, then decline when it gets hot. The railing does double duty as pea trellis. For containers without railing access, a simple bamboo trellis in a large pot works fine.
Container size for legumes needs to accommodate their root systems. Bush beans do okay in 8-10 inch deep containers. Pole beans prefer 12+ inches deep with at least 2-3 plants per 12-inch pot. Peas need 8-10 inches deep minimum. I use long window boxes for beans and peas—they're efficient and provide enough root room. Or 5-gallon buckets with 2-3 plants. Don't try to squeeze more than 3-4 bean or pea plants per container or they compete excessively.
Succession planting beans for continuous harvest is the same concept as lettuce. Plant a container of beans, wait 2-3 weeks, plant another container. This staggers harvests so you're not drowning in beans for two weeks and then have nothing. I do three successions of beans, two weeks apart, starting when soil temperatures reach 60°F. This gives me fresh beans from late spring through early fall. Beans produce for a relatively short window per planting, so succession is important for steady supply.
Snap peas versus snow peas versus shelling peas for containers all work but have different uses. Snap peas (like Sugar Snap) have edible pods and are my favorite—eat pod and all, sweet and crisp. Snow peas have flat edible pods—great for stir-fries. Shelling peas have sweet peas inside pods—the classic English pea. For containers, I prefer snap peas for maximum edible yield per plant. They're also the most productive and versatile in the kitchen. Kids love picking and eating snap peas straight off the vine—great way to get kids interested in gardening.
Support structures on balconies for vining beans and peas can be creative. I've used: balcony railings (excellent for peas that grab with tendrils), bamboo teepees in large containers (3-4 poles tied together at top), wire tomato cages (works for bush-type peas), netting strung between two posts in a container (for pole beans). The key is getting support in place before planting so you're not fighting to add it later. I tie pole beans loosely to their support as they grow—they don't self-climb as well as peas.
Nitrogen-fixing benefits of beans and peas are a bonus. These plants have root bacteria that convert atmospheric nitrogen to plant-available nitrogen. This means they need less fertilizer than other vegetables. I barely fertilize my beans and peas—maybe a light application of balanced fertilizer at planting and that's it. They're excellent for following in containers after heavy feeders like tomatoes and peppers have depleted the soil. After beans, my soil is actually enriched. This makes them great in a container rotation system.
Harvesting at peak for best flavor means checking daily once pods start forming. Beans should be harvested when pods are full but before you can see seeds bulging through. Peas should be harvested when pods are full and round but before they start to yellow. Both get tough, stringy, or starchy if left too long. Daily harvesting also encourages more production—leaving mature pods on the plant signals it to stop producing. I pick every single day during peak production. Beans and peas decline quickly in heat so harvest promptly.
Cucumbers: More Possible Than You Think
I resisted growing cucumbers on my balcony for years thinking they were too big. Wrong! With the right varieties and vertical growing, cucumbers are fantastic balcony vegetables.
Compact and bush cucumber varieties are what make balcony cucumber growing work. Don't plant full-size vining cucumbers in containers—they get massive and unmanageable. Compact varieties I love: Bush Pickle (stays 2 feet, perfect for containers), Spacemaster (compact vines, full-size cucumbers), Patio Snacker (bred for containers, very productive), and Salad Bush. These varieties produce full-size or close-to-full-size cucumbers on much more manageable plants. I've had Spacemaster in a 5-gallon bucket produce 15-20 cucumbers over a season. Not a giant harvest but more than enough for fresh eating.
Vertical growing to save floor space transforms cucumber production. Even compact varieties benefit from vertical support. I grow cucumbers up my balcony railing or a bamboo A-frame trellis in a large container. The plant takes up maybe 4 square feet of floor space but 6 feet of vertical space. The fruit hangs down and is easier to find and harvest. Vertical growing also improves air circulation which reduces disease issues. I use soft plant ties to attach the main stem to the trellis as it grows.
Container size requirements for cucumbers are substantial—5 gallons minimum, 7-10 gallons better. Cucumbers are heavy feeders with big root systems. I've tried 3-gallon containers and the plants struggle and produce poorly. In 7-gallon fabric grow bags, they thrive. The larger soil volume also holds more moisture which cucumbers desperately need. Cucumbers are about 95% water—they require consistently moist soil to produce well-formed, bitter-free fruit. Let soil dry out and cucumbers become bitter or develop poorly.
Consistent watering needs are the main challenge with container cucumbers. They need water constantly. During peak summer, I water my cucumber containers twice a day. Self-watering containers work exceptionally well for cucumbers because they maintain consistent moisture. I've had far better cucumber results with self-watering containers than regular pots. If you can't water daily (sometimes twice), either use self-watering containers or skip cucumbers. Inconsistent watering is why most container cucumber attempts fail.
Pollination issues and solutions are real on balconies, especially high-rise ones. Cucumbers have separate male and female flowers on the same plant. Male flowers appear first (no mini cucumber at the base). Female flowers have a tiny cucumber at the base. Bees need to transfer pollen from male to female. On a 15th-floor balcony, bees might not show up. Solution: hand-pollinate. Use a small paintbrush and transfer pollen from male flower stamens to female flower pistils. Takes 30 seconds and dramatically improves fruit set. I do this every morning when I see female flowers open.
Managing vine growth in small spaces requires regular attention. Even compact varieties want to spread. I train the main stem vertically and prune side shoots that grow horizontally and would take over the balcony. Weekly pruning keeps plants tidy and focuses energy on fruit production. I take off any yellow leaves, remove spent flowers, and guide new growth vertically. Without pruning, a cucumber plant on a small balcony becomes a chaotic mess within weeks.
Parthenocarpic varieties (no pollination needed) are a game-changer for enclosed or high-rise balconies. These varieties set fruit without pollination—cucumbers develop without fertilized seeds. Perfect for balconies with no bee access. Diva is my favorite parthenocarpic variety—produces beautiful thin-skinned cucumbers on compact plants. Tastes excellent. No need to hand-pollinate. If your balcony rarely sees pollinators, seek out parthenocarpic cucumber varieties. They're also available in many seed catalogs as "seedless" or "self-fertile."
Pest management for container cucumbers requires vigilance because cucumber beetles and aphids both love cucumbers. I check plants daily, especially undersides of leaves where aphids congregate. Yellow sticky traps catch cucumber beetles (also helps monitor population). Row cover over young plants prevents early pest pressure. Neem oil spray every two weeks as prevention. Aphids I knock off with strong water spray or treat with insecticidal soap. The enclosed nature of balconies can actually help—less pest immigration than open gardens. But once established, pests spread quickly in the limited space.
Radishes, Turnips, and Root Vegetables
Root vegetables aren't the first thing people think of for balcony containers, but some work really well with the right approach.
Radishes as the fastest balcony vegetable are perfect for impatient gardeners. Radishes go from seed to harvest in 25-30 days—literally the fastest vegetable you can grow. I plant radish seeds in any available container space and have fresh radishes in a month. They're great for filling gaps between slower-growing plants, using empty container space, and providing quick gratification for new gardeners. My kids love growing radishes because the fast results keep them engaged. French Breakfast and Cherry Belle are my favorite container varieties—both mature quickly and have good flavor.
Container depth requirements for roots are the limiting factor for root vegetables in containers. Radishes: 6-8 inches deep (very forgiving). Turnips: 10-12 inches deep minimum. Beets: 10-12 inches. Carrots: this is where it gets tricky—standard carrots need 12-14 inches of deep, loose soil. On a balcony, I use half-barrel containers for most root vegetables. The depth allows proper root development without the roots hitting the container bottom and forking or deforming.
Turnips and beets in deeper containers actually work surprisingly well. I grow Golden Beet and Chioggia beet in 12-inch deep containers with great results. They're beautiful plants too—the red-stemmed foliage of beets is ornamental. Turnips take up similar space to beets and produce both edible roots and edible greens. I love Hakurei Japanese turnips—they're sweet enough to eat raw, mature quickly (38 days), and the greens are delicious. One 12-inch pot can hold 4-5 beets or turnips.
Carrots in containers require specific consideration—which varieties work. Regular full-length carrots (8-10 inches) need deep, perfectly loose soil free of any impediment. In containers, I use specifically bred short varieties: Chantenay (5-6 inch roots, excellent flavor), Paris Market (round golf-ball shaped, perfect for containers), Thumbelina (round, incredibly sweet), and Danvers Half Long. These shorter varieties succeed where full-length ones fail. I grow them in 12-inch deep containers filled with my perlite-heavy mix that stays loose and drains well.
Succession planting for continuous harvest applies to root vegetables just like lettuce. Plant a small container of radishes or carrots, wait 2-3 weeks, plant another. This gives you continuous harvest instead of everything ready at once. I plant a small container of radishes every three weeks throughout spring and fall (they don't like summer heat). For carrots and beets, I do two successions in spring and two in fall. This keeps root vegetables producing over a long season rather than having a one-time glut.
Managing soil moisture for root development is different from other vegetables—root vegetables need consistently moist but never waterlogged soil. Too dry and roots get tough and cracked. Too wet and they rot. Forking and deformed roots happen when soil is compacted, too dense, or hit dry-then-wet cycles. I maintain even moisture by mulching the soil surface, watering when the top inch is dry, and using my perlite-amended mix that provides good aeration. The loose texture of good container mix is actually perfect for root vegetables compared to compacted garden soil.
Container selection for root vegetables should prioritize depth over width. A tall narrow container is better than a wide shallow one for most root vegetables. I use tall planters, deep window boxes, and five-gallon buckets. Standard 12-inch diameter, 12-inch deep containers work for most root vegetables except full-length carrots. I've also used deep fabric grow bags—they provide excellent drainage and the dark color warms soil slightly which root vegetables appreciate. Avoid shallow containers for anything except radishes.
When roots fail and why is usually one of these issues: soil too shallow (roots hit bottom, fork), soil too compacted (roots can't penetrate, fork), inconsistent moisture (cracking, bitterness), too hot (bolt, roots become woody), wrong variety (trying full-length carrots in 8-inch containers). I've had all these failures. Now I know: choose appropriate varieties for container depth, use loose well-draining mix, maintain consistent moisture, grow root vegetables in cooler parts of the season, and use adequate container depth. Get these right and root vegetables do surprisingly well.
Kale, Spinach, and Leafy Greens
Beyond basic lettuce, the leafy green category includes some of the most productive and nutritious balcony vegetables.
Kale as a long-season container producer is one of my must-grow balcony vegetables every year. Kale tolerates cold incredibly well (down to 10°F for some varieties), handles partial shade, survives heat better than lettuce (though it prefers cool), and produces from fall through spring in mild climates. I plant kale in late summer, harvest through fall and winter, and it produces heavily again in spring before finally bolting. One planting gives me 8-10 months of harvests. Lacinato (dinosaur) kale is my favorite for flavor. Curly kale is prettier and hardier. Red Russian kale has tender leaves good for salads.
Spinach for cool-season container growing is excellent in spring and fall but hates summer. It bolts in warm weather even faster than lettuce. In containers, I treat spinach as a cool-season crop—plant in early spring (soil temps 35-65°F), harvest through spring, then replant in late summer for fall harvest. Bloomsdale Long Standing has better heat resistance than other varieties. In containers with shade cloth for protection from afternoon sun, I've extended my spinach season a few extra weeks in summer. Small containers make spinach easy to move to shadier spots during warm spells.
Swiss chard for colorful containers combines edibility with ornamental value. Rainbow chard with its red, yellow, orange, and pink stems looks gorgeous in containers. Highly productive—harvest outer stalks continuously and the plant regrows. Tolerates more heat than spinach and less heat than kale—kind of a middle ground. Prefers cooler temperatures but doesn't bolt as easily as lettuce. Hardy through light frost. I grow rainbow chard every year partly for beauty and partly for food. The stems can be sautéed separately from the leaves (they take longer to cook). Excellent nutritional value.
Arugula for peppery quick harvests is incredibly fast (ready in 3-4 weeks from seed) and easy. The spicy peppery flavor adds complexity to salads that mild lettuce can't provide. Container growing works great—arugula has shallow roots and grows quickly in 6-8 inch containers. Like all brassicas, it prefers cool weather and bolts in heat, though established plants tolerate more heat than lettuce. Sylvetta (wild arugula) has more intense flavor and better heat tolerance than regular arugula. I keep arugula in rotation year-round, moving it to shady spots in summer to extend the season.
Mustard greens and Asian greens are underused in Western balcony gardens but incredibly productive and fast-growing. Red Giant mustard has beautiful purple-red leaves and spicy flavor. Mizuna has feathery attractive leaves and mild peppery taste. Bok choy grows well in containers with 8-10 inch depth. Tatsoi forms beautiful flat rosettes. All of these grow quickly (30-45 days), tolerate partial shade, and prefer cool weather. I mix Asian greens into my succession planting rotation—they add variety to salads and are excellent in stir-fries. Very underappreciated for container growing.
Managing heat and bolting in containers gives you some tools that in-ground gardeners don't have. You can physically move containers to shadier spots when temperatures rise. I move my shade cloth-covered lettuce containers behind my larger tomato and pepper containers in summer—the taller plants provide afternoon shade. You can also add ice cubes to soil surface to cool roots during heat waves. These are impractical for in-ground gardens but totally doable with containers. The mobility of containers lets you hack your microclimate.
Container size for leafy greens is forgiving—most do well in 6-12 inch deep containers. Lettuce and arugula: 6 inches. Spinach and chard: 8-10 inches. Kale: 10-12 inches for best production. I use whatever containers I have available for leafy greens and rarely have size-related failures. The main concern is providing enough root room for longer-season plants like kale that will be in the container for months. A larger container means more soil, more nutrition, and better moisture retention—all good for long-season leafy greens.
Year-round production strategies using leafy greens in containers is achievable in many climates. Spring: lettuce, spinach, arugula. Summer: heat-tolerant varieties, kale, chard (with shade protection). Fall: restart lettuce, spinach, arugula, kale. Winter (mild climates or with frost protection): kale, arugula, winter greens. On my balcony in Zone 6, I have fresh greens from March through November and often December with a little protection. In warmer climates (Zone 7+) you can have greens year-round. Leafy greens are the backbone of year-round balcony vegetable production.
Squash and Zucchini: Surprisingly Doable
Most people think zucchini is impossible in containers. It's not easy, but with the right approach it's doable and rewarding.
Compact and bush squash varieties for containers are absolutely essential—don't try standard vining zucchini in containers. Varieties specifically bred for containers: Bush Baby (zucchini type, compact plant), Astia (bred specifically for containers), Patio Star (container-bred, productive), and Patio Green Bush. For summer squash, Pattypan varieties are naturally more compact. For winter squash, stick to small-fruited varieties like Delicata or small acorn squash types. I've grown Bush Baby in a 10-gallon container and gotten 6-8 zucchinis before the plant wore out—not huge production but impressive for containers.
Why most people fail with container zucchini comes down to container size. I see this constantly—people put zucchini in 5-gallon containers, the plant looks great for a few weeks, then it struggles and produces nothing. Zucchini has a massive root system and needs a lot of nutrients and water. Minimum 10 gallons, 15 gallons is better. I use a 15-gallon fabric grow bag and the difference versus 5-gallon containers is dramatic. Under-potting zucchini is basically guaranteed failure. The plants look deceptively fine in small containers initially then collapse when they start trying to produce fruit.
Container size requirements of 10-15 gallons for zucchini also means the containers are heavy and take up significant space. A 15-gallon container with wet soil weighs 100+ pounds. Be realistic about whether your balcony can handle this weight and whether you have room. Zucchini plants also get large—leaves can span 3 feet. One zucchini plant can easily take up 6-9 square feet of floor space. Before committing to container zucchini, make sure you have the space and the container size. It's worth it but requires commitment.
Hand-pollination techniques are essential for container zucchini because bees are needed for pollination and aren't always present on high-rise balconies. Identify male flowers (straight stem, pollen-covered center) and female flowers (mini zucchini at base, sticky center). In the morning when flowers are open, use a small paintbrush or just pluck a male flower, peel back petals, and dab the pollen-covered center directly onto the sticky center of female flowers. This takes 30 seconds. Without pollination, female flowers fall off and you get no zucchini. I hand-pollinate every morning during flowering. Once I started doing this consistently, my fruit set improved dramatically.
Managing massive leaves in small spaces requires aggressive pruning. Zucchini leaves are enormous and will shade everything else on a small balcony. I remove older lower leaves as they yellow, prune any leaves that extend too far into walking areas, and position the plant in the sunniest corner of the balcony where its shade impact is minimized. Some people remove almost all leaves leaving just a few around developing fruit. I do moderate pruning—keeping the plant manageable while maintaining enough leaves for photosynthesis. It's an ongoing battle throughout the season.
Water and fertilizer requirements for container zucchini are substantial. These are the hungriest, thirstiest plants I grow. Daily watering in summer is minimum—twice daily in extreme heat. I fertilize zucchini every week with liquid fertilizer—high phosphorus and potassium once flowering starts. Signs of nutrient deficiency (yellow leaves, poor fruit development) appear quickly in containers. I use a diluted liquid fertilizer weekly and also top-dress with compost mid-season. Neglect water or fertilizer and production stops immediately.
Harvesting zucchini before it gets out of hand is crucial for continuous production. Zucchini grows incredibly fast—a zucchini that's 4 inches on Monday might be 18 inches by Thursday. Harvest at 6-8 inches for best flavor and tenderness, and to signal the plant to keep producing. Let one zucchini grow huge and the plant thinks its job is done and production slows dramatically. I check daily once plants start producing. Missing a day means baseball bat zucchini. Regular harvest means steady production.
Pattypan and other compact alternatives are worth considering over standard zucchini. Pattypan squash (those flying saucer-shaped ones) have naturally more compact plants than zucchini, produce beautiful small fruit, and seem to do better in containers in my experience. Harvest at golf-ball to baseball size for best flavor. They're productive, attractive, and the compact plant habit makes container growing more manageable. Yellow crookneck squash also does reasonably well in large containers. These alternatives might actually be better choices than trying to force standard zucchini into containers.
Eggplant: The Underrated Balcony Vegetable
Eggplant is one of those vegetables people don't think to grow on balconies, but it's actually exceptionally well-suited to containers.
Why eggplant thrives in containers is mostly about its love of heat. Eggplants are tropical plants that want hot temperatures—they languish in cool conditions and thrive when it's hot. A south-facing balcony that gets brutally hot in summer is perfect for eggplant. The contained soil in dark containers heats up faster than garden soil, which eggplants love. I've had struggling in-ground eggplants while my container eggplants on the same sunny hot balcony produced abundantly. The container environment actually suits eggplant better than many other vegetables.
Best compact eggplant varieties for containers include Japanese/Asian types that are naturally smaller-fruited and more compact than Italian globe varieties. Ichiban (long slender purple fruit, very productive), Hansel (small cylindrical fruits, prolific, bred for containers), Patio Baby (dwarf plant, golf ball-sized fruit, extremely productive for a small plant), and Orient Express (long Japanese type, compact, early). I avoid large globe eggplants like Black Beauty in containers—they want to be huge plants producing huge fruits, which doesn't translate well to container growing. Japanese varieties in containers are outstanding.
Heat and sun requirements mean eggplant needs your hottest, sunniest spot. Minimum 6 hours of direct sun, 8+ is better. They're not happy in partial shade—production suffers. Unlike some other vegetables that struggle in intense heat, eggplants embrace it. I position my eggplants where they get afternoon sun that's too intense for my tomatoes and peppers. If your balcony faces south or west and gets intense heat, eggplant will likely be one of your most successful vegetables.
Container size and soil needs: 5-gallon containers work for compact varieties, 7-10 gallon for standard-sized varieties. Same premium potting mix as other fruiting vegetables. Eggplants are heavy feeders and need consistent fertilization. I add extra compost to my eggplant containers at planting and fertilize every two weeks once they start flowering. They also like consistently moist soil—not wet, but never totally dry. I've found they handle brief dry periods better than tomatoes but prolonged drought stops production.
Pollination and fruit set in eggplant is less problematic than cucumbers or squash because eggplants are self-pollinating—each flower contains both male and female parts. However, on calm days with no wind or insects, I still gently shake plants to help pollen drop. A gentle tap on the stem is sufficient. Blossom drop (flowers falling without setting fruit) in eggplants usually means temperatures are too hot (above 95°F) or too cool (below 65°F). Container growing in hot climates sometimes causes extreme heat blossom drop—move to slight afternoon shade during heat waves above 95°F.
Common eggplant problems in containers include: flea beetles (tiny holes in leaves, treat with neem oil), spider mites in hot dry conditions (improve air circulation, increase humidity with water spray), blossom drop from temperature extremes (see above), and stunted growth from insufficient nutrients (increase fertilizer). Eggplants are generally less pest-prone than many other vegetables in my experience. The main issues are nutrient-related from the heavy feeding requirement of containers. I rarely have serious pest problems with container eggplants compared to in-ground.
Harvesting at the right time is important for flavor and continued production. Harvest eggplant when the skin is glossy and the fruit feels firm. If the skin has started to dull and lost its shine, it's past peak—the seeds are maturing and the flesh becomes bitter. Cut (don't pull) fruit from the plant with pruners or scissors, leaving a short stub of stem. Regular harvesting encourages more production. I harvest my Japanese eggplants at 6-8 inches long when they're at their sweetest. Larger fruits have more developed seeds and slightly more bitter flavor.
Asian eggplant varieties for better production deserve more attention in Western gardens. Japanese types like Ichiban and Orient Express are longer, slimmer, and sweeter than Italian globe types. They mature faster (55-65 days vs. 70-85 days), produce more fruit per plant, and are better suited to container growing with more compact plants. Chinese eggplants are even slimmer and lighter purple. Thai eggplants are small and green. Indian eggplants (the small round purple ones) are incredibly productive in containers. Any of these Asian varieties will likely outperform Italian types in containers.
Green Onions, Garlic, and Alliums
Alliums are easy, space-efficient, and incredibly useful in the kitchen. Every balcony garden should include at least one or two.
Green onions from seed or sets are one of the quickest and easiest balcony vegetables. Sets (small bulbs) planted 1 inch deep in a container can be harvested in 3-4 weeks as green onions. From seed takes a bit longer but still relatively fast. I plant green onions in almost every container that has space—they don't take much room and having fresh scallions constantly is wonderful. Plant every few weeks for continuous supply. They tolerate partial shade and can be grown in fairly shallow containers (6-8 inches). Green onions are also one of the few vegetables that can be grown year-round in mild climates.
Regrowing green onions from store-bought is the ultimate zero-cost gardening hack. Buy a bunch of green onions from the grocery store, use the green tops, and plant the white root ends in a container of potting mix with the white part buried and green stub showing. Water regularly and within 1-2 weeks you have full green onions again. Harvest again, replant, repeat indefinitely. I do this with store-bought green onions constantly and essentially never buy them—I just regrow them. The quality of regrown onions is excellent and the cost is zero after the initial purchase.
Garlic in containers with fall planting for summer harvest is a rewarding long-term project. Plant garlic cloves in fall (October-November in most areas), they slowly grow through winter, then produce harvestable bulbs by June-July. Use a deep container (12+ inches) with good drainage. One clove produces one full bulb. I plant 6-8 cloves in a 12-inch pot each fall and harvest 6-8 beautiful garlic bulbs the following summer. The green tops (garlic greens) can be harvested through the growing season as a mild garlic chive substitute. Hardneck varieties also produce scapes in late spring—harvest these and use like garlic in cooking.
Shallots as easier garlic alternative are excellent for containers. Plant shallot sets in fall or early spring, harvest in summer when tops die back. Each planted set multiplies into a cluster of 6-8 shallots. More productive per container than garlic and the flavor is more complex and subtle. I love shallots in cooking—they're sweeter and more refined than onions. In containers they're low-maintenance and reliable. Good varieties for containers include French Gray and Dutch Yellow. The plants are attractive too—slender upright foliage looks tidy in containers.
Chives as perennial allium option: I covered this in the herb section but it bears mentioning again in the allium context. Chives are essentially a perennial green onion that dies back in winter and returns each spring in containers. Different types are available: standard chives (mild onion flavor), garlic chives (mild garlic flavor, white flowers), and Siberian chives (larger, hardier). All grow easily in 6-8 inch containers. One container provides constant harvest for years. Divide when clumps get large and decline in productivity. Essential for any balcony food garden.
Container requirements for alliums are modest. Green onions: 6-8 inches deep. Garlic and shallots: 10-12 inches deep minimum (bulbs develop underground and need room). Chives: 6-8 inches. Most alliums can be crowded more than other vegetables—plant green onions 2 inches apart, garlic 4-6 inches apart, shallots 6 inches apart. They tolerate slightly crowded conditions better than most vegetables. A 12-inch pot can hold 6-8 garlic cloves or a dozen green onion sets.
Harvesting and curing garlic in small spaces: harvest garlic when the lower half of leaves have turned yellow-brown (usually late June-early July in Zone 6). Pull the whole plant, brush off loose soil, and hang or lay in a warm dry spot with good airflow for 3-6 weeks. After curing, trim roots and tops and store in a cool dry place. A successful garlic harvest from 12 cloves planted gives you 12 beautiful cured heads. Not huge scale but homegrown garlic has significantly better flavor than grocery store garlic, and the satisfaction is real.
Using alliums as companion plants adds bonus value beyond eating. Alliums (especially chives and garlic) repel aphids and other pests when planted near susceptible vegetables. I tuck chives and green onions around my container tomatoes and peppers and notice less aphid pressure than on isolated plants. The companion planting benefit is real—alliums produce sulfur compounds that deter many insects. This makes them doubly useful in container gardens where pest management is important.
Container Soil, Fertilizing, and Watering Deep Dive
This section covers the fundamentals that make everything else work. Get these right and almost everything else falls into place.
Why garden soil kills container vegetables is physics and biology. Garden soil is designed to work as part of a large ecosystem—in the ground, it's aerated by earthworms, regulated by massive volumes of soil buffering moisture and nutrients, and connected to a continuous water table. In a container, garden soil compacts under its own weight within weeks, cutting off oxygen to roots. It drains poorly, roots suffocate, and plants die slowly. I made this mistake with my first container garden—dug soil from my yard, put it in pots, wondered why everything struggled. Never use garden soil in containers. Ever.
Best commercial potting mixes for vegetables vary in quality. Premium mixes worth the extra cost: FoxFarm Ocean Forest (rich in organic nutrients, good texture), Espoma Organic Potting Mix (peat-based with beneficial microbes), Pro-Mix BX (professional growers use this), Coast of Maine Stonington Blend. Budget mixes that work if amended with perlite: Miracle-Gro Performance Organics (decent but heavy—add perlite), any store brand with perlite already added. Mixes to avoid: cheap bark-heavy mixes that dry out immediately, anything without perlite or vermiculite, mixes with visible large chunks of undecomposed wood.
DIY potting mix recipes save money for gardeners filling many containers. My standard recipe: 3 parts peat moss or coconut coir, 1 part perlite, 1 part compost or worm castings. This provides drainage, aeration, and nutrition. Mix in slow-release granular fertilizer according to package directions before using. I make large batches at the start of each season in a big plastic storage bin. Cost per gallon is significantly less than premium bagged mix. Coconut coir is more sustainable than peat and works equally well.
Slow-release versus liquid fertilizers each have their place in container vegetable growing. Slow-release granular fertilizer (like Osmocote or similar) provides baseline nutrition over 3-6 months. I mix it into potting mix at planting. It's foolproof and provides consistent low-level nutrition without me thinking about it. Liquid fertilizer (fish emulsion, seaweed extract, liquid tomato fertilizer) provides quick available nutrition and allows me to adjust nutrient ratios based on growth stage. I use both together—slow-release as the foundation, liquid as the supplement. This combination gives excellent results.
Feeding schedules for heavy feeders like tomatoes and peppers: at planting, mix in slow-release granular fertilizer. Weeks 1-4 while establishing: no additional fertilizer needed. First flowers appear: start liquid fertilizer every two weeks. Actively producing fruit: increase to weekly liquid fertilizer for heavy producers like tomatoes. Late season: taper off fertilizer as plants decline. Leafy greens need less intensive fertilizing—every 3-4 weeks with balanced fertilizer is sufficient. Root vegetables need minimal fertilizing—too much nitrogen produces lush tops but small roots.
Watering frequency in hot weather is the most common challenge new balcony gardeners face. On a 90°F day, a 5-gallon container can go from moist to bone dry in 24 hours. Large containers dry slower. Dark containers dry faster (absorb more heat). Windy locations dry faster. Sunny spots dry faster. I check containers daily during summer—lift them (light = dry), stick finger 2 inches in, or use a moisture meter. Better to check twice daily in extreme heat. Underwatering is the most common reason container vegetables fail in summer.
Self-watering containers for vegetables are genuinely transformative for success rates. These containers have a water reservoir in the bottom that wicks moisture up to roots as needed. You fill the reservoir every few days instead of watering daily. Plants maintain consistent moisture without wet-dry cycles that cause blossom end rot, bitter cucumbers, and bolting lettuce. I've converted about half my containers to self-watering types and success rates improved dramatically. They cost more ($20-50 vs. $5-15 for regular containers) but the production improvement justifies the cost.
Signs of nutrient deficiency in container vegetables help you diagnose problems early. Yellow leaves throughout the plant: nitrogen deficiency—use high-nitrogen liquid fertilizer. Purple-tinged leaves: phosphorus deficiency—use bloom fertilizer or add bone meal. Yellow leaves with green veins: iron deficiency—use chelated iron. Poor fruit set with healthy foliage: too much nitrogen—switch to bloom formula. Slow overall growth: overall nutrient depletion—use balanced complete fertilizer. Blossom end rot: calcium uptake problem (usually watering inconsistency)—water more consistently and add calcium. Recognizing these signs early allows quick correction.
Maximizing Yields: Advanced Balcony Vegetable Techniques
Once you've mastered the basics, these advanced techniques push production to the next level.
Companion planting in containers uses plant relationships to improve growth and reduce pests. Classic combinations that work in containers: tomatoes and basil (basil may repel tomato pests, definitely improves cooking), beans and carrots (beans fix nitrogen, carrots loosen soil for bean roots), lettuce and tall tomatoes (tomatoes provide afternoon shade that extends lettuce season), marigolds and anything (repel numerous pests). I plant marigolds in or near every food container—they repel aphids, whiteflies, and nematodes. Small French marigolds tuck nicely into containers without competing too aggressively.
Succession planting calendar for a typical Zone 6 balcony: March—plant peas, lettuce, spinach, arugula; April—second lettuce succession, add kale and chard; May—plant tomatoes, peppers, cucumbers after last frost; June—third lettuce succession, plant beans; July—fourth lettuce succession, second bean succession; August—start fall greens (lettuce, kale, spinach), third bean succession; September—final lettuce succession, harvest garlic, plant garlic for next year; October—winter greens with protection, harvest final tomatoes before frost. This calendar ensures something is always being planted and harvested.
Vertical growing systems for balconies multiply your effective growing space. Beyond basic trellises, consider: pocket wall planters for herbs and lettuce (dozens of plants in vertical wall space), tower gardens (stackable containers creating columns of plants), A-frame trellises in large containers for beans and cucumbers, tension wire systems along walls, and hanging inverted tomato planters. I've added probably 50% more growing capacity to my balcony through vertical systems without using additional floor space. Vertical systems also improve airflow and light distribution.
Season extension with row covers and frost cloth lets you start earlier and end later. Mini hoops over containers with row cover fabric extend my growing season by 4-6 weeks on each end. In early spring, I cover containers with frost cloth (protects to 28°F) and start growing lettuce and peas 3-4 weeks before my frost-free date. In fall, row covers extend tomato and pepper production through several frost events. On a balcony, I use simple PVC pipe bends as hoops and clip frost cloth over them. Takes 10 minutes to set up and protects plants on cold nights.
Pinching and pruning for more production seems counterintuitive—removing plant material to get more food—but it works. Pinching basil flower buds diverts energy to leaf production. Removing suckers from indeterminate tomatoes keeps plants manageable and improves air circulation. Pinching the growing tips of bush beans when they reach full size encourages side branching and more pods. Cutting back overgrown herb plants rejuvenates them and triggers fresh growth. Regular pruning and pinching produces more usable food from smaller plants.
Managing container microclimate takes advantage of the mobility of containers. Move heat-sensitive plants to shade during heat waves. Move cold-sensitive plants against the house wall before frost. Rotate containers so all sides get equal light. Group plants to create humidity pockets. Use heat-absorbing dark containers to warm soil for heat-loving plants and light containers to keep roots cool for heat-sensitive plants. I think of each container as an adjustable environment that I manage rather than a fixed system.
Pollination strategies for enclosed balconies go beyond hand-pollinating individual flowers. Grow flowering herbs and plants that attract whatever pollinators venture to your balcony—lavender, marigolds, sweet alyssum. Create a continuous bloom to encourage pollinators to visit regularly. On very enclosed balconies with zero pollinator access, focus on self-pollinating vegetables (tomatoes, peppers, beans) or parthenocarpic varieties (certain cucumbers, some tomatoes). Hand-pollinate anything that's not reliably self-pollinating. Understanding pollination requirements of each vegetable helps you select appropriate varieties.
Maximizing light with reflective surfaces is a technique I stumbled on accidentally. I had white foam board panels I used to bounce studio light in photography, and I propped one near my shadier containers—noticed significantly better growth on that side of the plants. Now I position reflective materials (white-painted boards, Mylar sheeting, aluminum foil on cardboard) to bounce light into shaded areas. This effectively extends your usable growing space into areas that would normally be too shaded. Reflective mulch on soil surface also helps—white or silver mulch reflects light up into plant canopies and warms soil.
Conclusion
Look, I started this guide with a story about picking dinner from my balcony, and I want to end with the honest truth: that moment is absolutely achievable for you, no matter how small your balcony is or how brown your thumb has been in the past.
The key insight from everything I've shared is this: balcony vegetable gardening fails when people ignore what plants actually need. Wrong container size, wrong soil, not enough sun, inconsistent watering—these are fixable problems, not fundamental limitations of balcony growing. Get those basics right and plants produce.
Start small. Seriously. Pick two or three vegetables from this guide that excite you most, get appropriate containers and quality potting mix, put them in your sunniest spot, water consistently, and fertilize regularly. See how that goes before scaling up. I've watched people go from zero to twenty containers in year one and get overwhelmed. Two thriving productive containers are way more satisfying than ten struggling ones.
And please, assess your sun before you buy anything. I know I've said this multiple times but it genuinely is the most important factor. Buy a tomato plant for a shady balcony and you'll be disappointed. Put that same plant in full sun and you'll be overwhelmed with tomatoes by August. Sun is the foundation everything else builds on.
The other thing I want you to take away: don't be discouraged by failures. I've killed hundreds of plants over eight years of balcony gardening. Every dead plant taught me something. Every failed variety eliminated a bad choice. Every container problem solved improved my success rate. Gardening is learning, and the learning happens through doing and sometimes failing.
I want to hear about your balcony vegetable garden! What are you growing this season? What's worked amazingly and what's flopped spectacularly? What questions are you still wrestling with? Share in the comments—balcony gardeners are an incredibly helpful community and someone out there has probably solved whatever problem you're facing.
Now go assess that sun, choose your first vegetables, get some good containers and quality potting mix, and start growing real food on that balcony. Your future self eating a salad grown six floors up in the sky will think you're pretty awesome.